Introduction
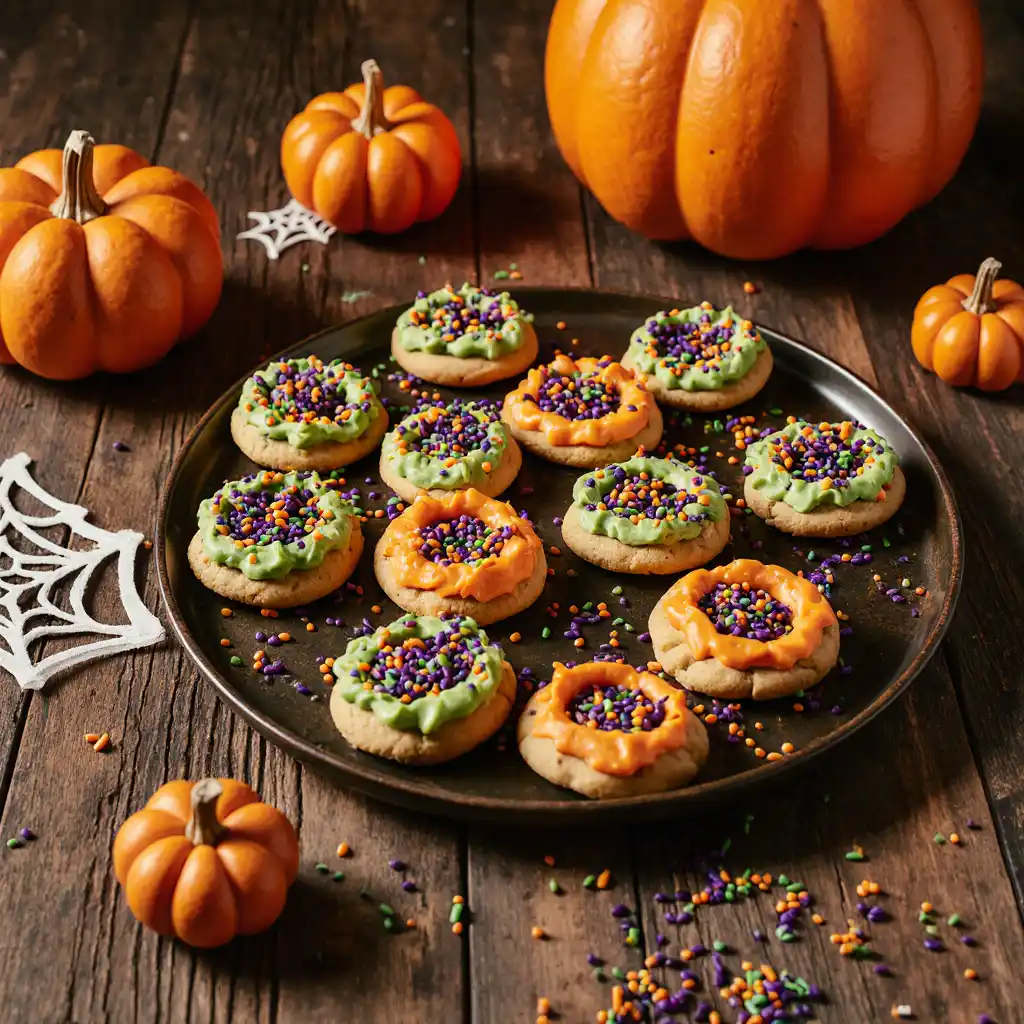
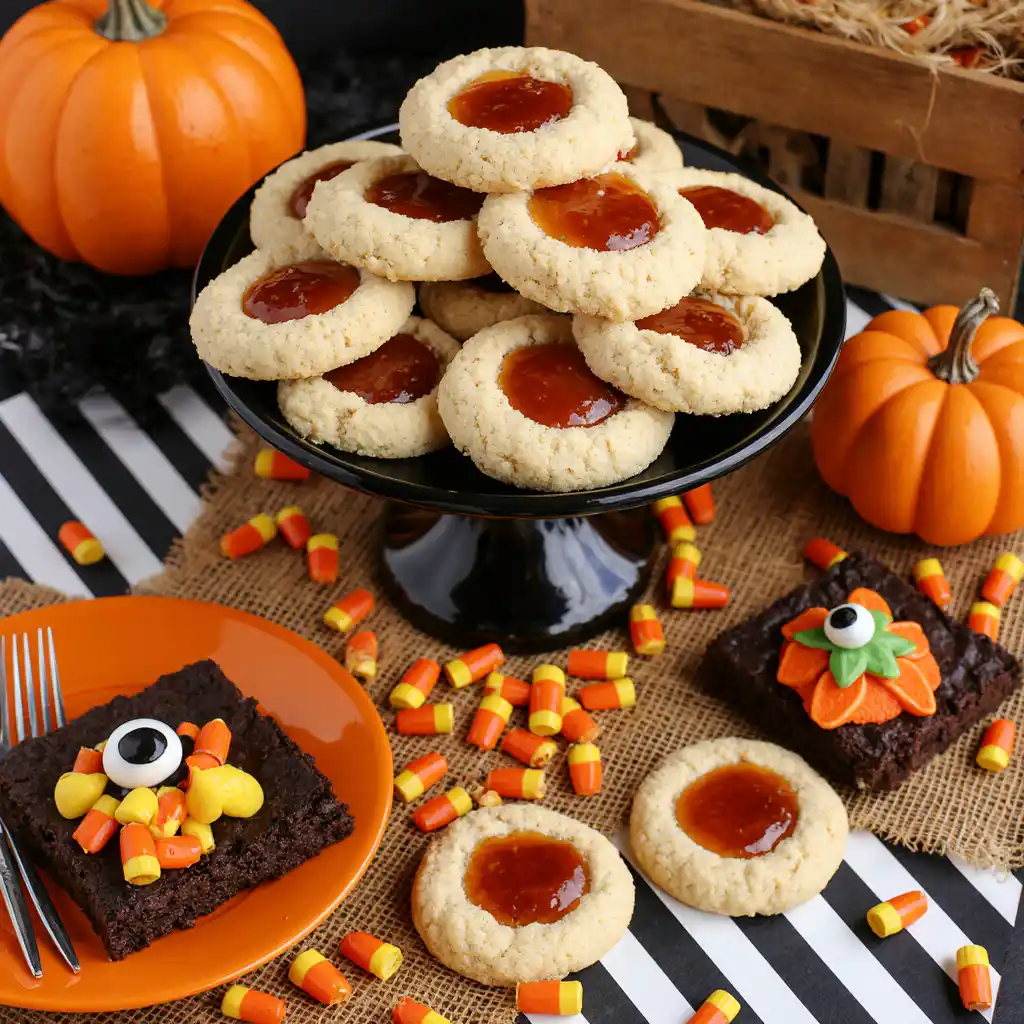
Halloween thumbprint cookies bring the perfect mix of fun and flavor to your spooky celebrations. With their bright centers, colorful sprinkles, and buttery base, these cookies are as eye-catching as they are delicious. Unlike simple sugar cookies or classic shortbread, Halloween thumbprint cookies feature playful icing-filled centers that can be dyed in bold seasonal shades—orange, purple, or green—to instantly create a festive platter. They are a standout favorite in my guide to Halloween Cookie Recipes, where I share my best tips for creating a cohesive and spooky dessert spread.
One of the best parts about these cookies is how simple they are to make. The dough comes together quickly with pantry staples like butter, powdered sugar, and flour, yet the end result looks bakery-worthy. Kids love rolling the dough in sprinkles and pressing the thumbprints, while adults appreciate the buttery texture and rich vanilla flavor. Whether you’re baking for a party, making gifts, or just enjoying an afternoon in the kitchen, these easy Halloween thumbprint cookies are guaranteed to be a hit.
If you’re already a fan of buttery cookies, you’ll also love my Halloween Shortbread Cookies. Both recipes highlight simple dough that transforms into something special with festive decorating.
Table of Contents
Why Halloween Thumbprint Cookies Are a Must
Festive Appeal for Every Celebration
Halloween is one of the most colorful holidays of the year, and these festive Halloween cookies capture that spirit perfectly. Rolled in sprinkles and filled with vibrant icing, thumbprint cookies stand out on any dessert table. They’re ideal for school parties, family gatherings, or even handing out as special homemade treats. The centers can be tinted in shades of orange for pumpkins, purple for witches, or green for monster eyes, making them versatile enough to match any spooky theme.
These cookies also deliver that perfect balance of flavor and texture. The buttery base melts in your mouth, while the slightly crisp edges and chewy icing centers add contrast. Kids are especially drawn to these thumbprint cookies for Halloween because they’re not just tasty—they’re fun to make and decorate.
How They Differ from Other Halloween Cookies
While sugar cookies and shortbread rely on cut-outs or shapes, thumbprint cookies shine because of their unique centers. That small indentation becomes a canvas for creativity—perfect for colorful icing, chocolate ganache, or even a candy center. Unlike classic chocolate chip cookies, which are chewy and rustic, these spooky thumbprint cookies have a more polished look that makes them party-ready.
They’re also easier than they look. No complicated rolling, chilling, or cutting—just roll, press, and bake. The result is a tray of easy Halloween thumbprint cookies that look straight from a bakery but come together in under an hour. If you enjoy variety on your cookie trays, pair them with my Halloween Chocolate Chip Cookies for a mix of chewy and colorful options that everyone will love.
Print
Halloween Thumbprint Cookies
- Total Time: 38 minutes
- Yield: 18 cookies 1x
Description
Buttery cookies rolled in sprinkles with colorful icing centers. These Halloween thumbprint cookies are festive, fun, and perfect for parties.
Ingredients
- 1 cup unsalted butter, softened
- 1 cup powdered sugar
- 2 tsp vanilla extract
- ½ tsp salt
- 2 ½ cups all-purpose flour
- Halloween sprinkles
Icing:
- ¾ cup powdered sugar
- 1 tbsp corn syrup
- ⅛ tsp vanilla extract
- 1 tsp melted butter
- 1 ½ tbsp milk (adjust for consistency)
- Gel food coloring
Instructions
- Preheat oven to 350°F (175°C). Line baking sheets with parchment.
- Cream butter, sugar, and vanilla. Mix in salt, then flour.
- Scoop dough, roll into balls, coat with sprinkles.
- Press thumb into each ball to create an indentation.
- Bake 10 minutes, press centers again, bake 7–8 minutes more.
- Cool completely on a rack.
- Mix icing ingredients until smooth, divide into bowls, and tint with gel colors.
- Spoon icing into cookie centers. Add candy eyes if desired.
Notes
- Don’t flatten cookies too much; they’ll spread slightly while baking.
- Use gel coloring for bold Halloween shades.
- Store in airtight container for up to 5 days.
- Prep Time: 20 minutes
- Cook Time: 18 minutes
- Category: Dessert
- Method: Baking
- Cuisine: American
Nutrition
- Serving Size: per cookie
- Calories: 219 kcal
- Sugar: 14.5 g
- Sodium: 75 mg
- Fat: 10.9 g
- Carbohydrates: 29.6 g
- Protein: 1.9 g
Key Ingredients & Substitutions
The Basics of a Perfect Thumbprint Cookie
Every great batch of Halloween thumbprint cookies begins with a few simple ingredients. These basics are pantry staples, but when mixed correctly, they create cookies that are buttery, tender, and ready to decorate.
- Butter: Unsalted butter at room temperature is key. It creams beautifully with powdered sugar, giving the cookies their melt-in-your-mouth texture.
- Powdered sugar: Unlike granulated sugar, powdered sugar creates a smoother, softer crumb that’s essential for buttery thumbprint cookies.
- Flour: All-purpose flour builds the cookie’s structure, keeping the shape intact while still light.
- Vanilla extract: Adds warmth and depth to the flavor.
- Sprinkles: Halloween-colored sprinkles make the outside festive and give every bite a bit of crunch.
- Icing: A quick mix of powdered sugar, milk, corn syrup, and butter creates the glossy filling. Gel food coloring transforms it into those vibrant orange, purple, or green centers.
Together, these ingredients create festive Halloween cookies that are equal parts simple and impressive.
Easy Substitutions for Flexibility
The beauty of thumbprint cookies is their adaptability. If you need to adjust for dietary needs or preferences, here are some smart swaps:
- Butter: Replace with vegan butter for dairy-free cookies.
- Milk in icing: Use almond milk or oat milk for a non-dairy alternative.
- Corn syrup: Substitute with honey or maple syrup if you want a natural sweetener.
- Flour: A 1:1 gluten-free flour blend works well for easy Halloween thumbprint cookies.
- Filling: Swap icing for melted chocolate or tinted white chocolate for a rich, candy-like center.
For inspiration on working with icing and color, take a look at my Halloween Sugar Cookies with Royal Icing. The decorating techniques there easily translate to thumbprints, giving you even more ways to customize these spooky thumbprint cookies for your party trays.
Step-by-Step Recipe
Shaping the Thumbprints
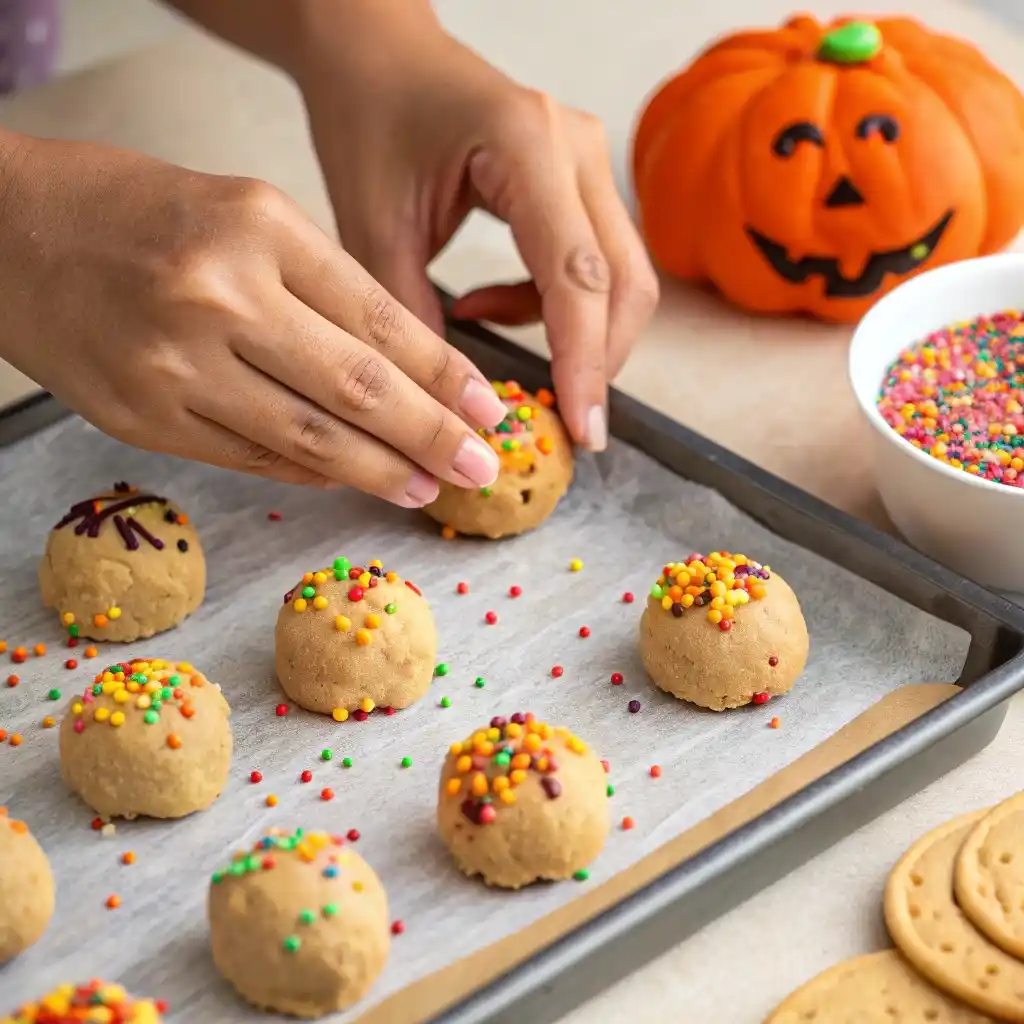
Start by preheating your oven to 350°F (175°C) and lining two baking sheets with parchment paper. In a stand mixer, cream the butter, powdered sugar, and vanilla until fluffy. Add salt, then slowly mix in flour until the dough comes together. Scoop tablespoons of dough, roll into balls, and coat each one in Halloween sprinkles.
Next comes the signature move: pressing your thumb into the center of each ball. Don’t flatten the dough—just create a small indentation. This will be the perfect space for icing after baking. Bake for 10 minutes, then carefully press the centers again with the back of a melon baller or small spoon. Bake another 7–8 minutes until the edges are set but not browned.
Icing & Decorating
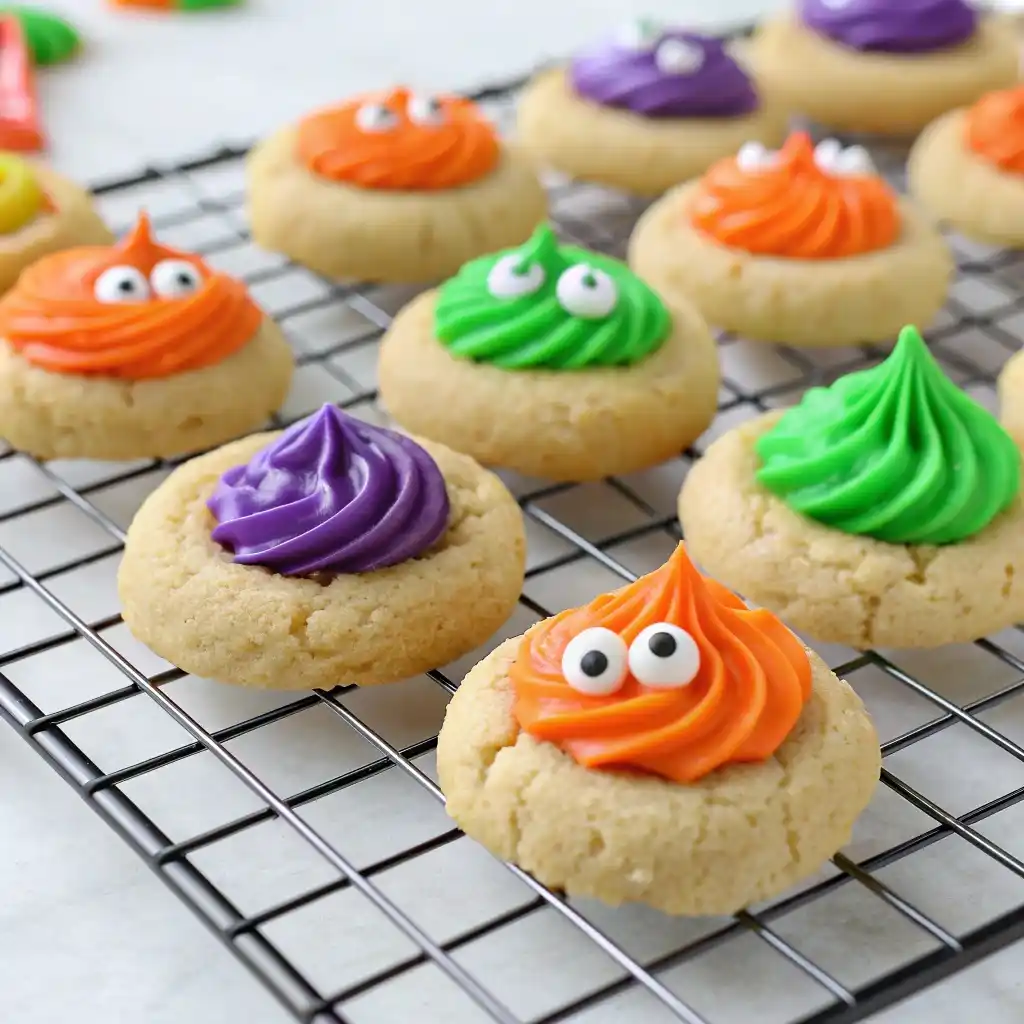
While the cookies cool, prepare the icing. Combine powdered sugar, corn syrup, butter, vanilla, and a little milk until smooth. Divide into bowls and color each batch with gel food coloring—orange for pumpkins, purple for witches, and green for monster eyes. Spoon a little icing into each thumbprint, then let cookies set on a rack until the centers are firm.
For a playful twist, add candy eyes to the icing while it’s still wet. This simple step transforms them into spooky thumbprint cookies that look like tiny monster faces. Kids will love helping with this step, and the bright designs are perfect for Halloween parties.
If you enjoy decorating fun, also check out my Frankenstein Halloween Rice Krispie Treats. Like these cookies, they’re simple to make and full of spooky personality.
Tips, Mistakes to Avoid & Variations
Tips for Perfect Thumbprints Every Time
The trick to flawless Halloween thumbprint cookies is balancing texture with appearance. Always cream butter and powdered sugar thoroughly—about 2–3 minutes—so the dough is smooth and pliable. If the dough feels too crumbly, add a teaspoon of milk to bring it together. Rolling dough balls evenly ensures cookies bake uniformly, and pressing the thumbprints gently prevents cracking.
When it comes to icing, use gel food coloring instead of liquid. Gels provide bold Halloween shades without thinning the mixture. For the smoothest centers, spoon a small amount of icing into each cookie and let it settle on its own before adding more. This prevents air bubbles and creates that glossy finish.
Mistakes to Avoid
A few small missteps can make or break these cookies. The most common mistake is pressing too hard when making the indentations, which causes cracks along the sides. Press lightly, then press again after 10 minutes of baking to deepen the center without breaking the dough.
Another mistake is runny icing. If your icing spreads too much, add more powdered sugar until it thickens. On the flip side, if it’s too stiff, add a drop of milk at a time until it loosens. Finally, don’t overbake. These cookies should stay pale and only slightly golden on the edges to keep their tender texture.
Creative Variations
One of the joys of these cookies is how adaptable they are. For a spooky thumbprint cookie look, fill the centers with bright green icing and add candy eyes for monster-inspired treats. For pumpkins, tint icing orange and add a tiny chocolate chip stem. You can even use melted dark chocolate or ganache instead of icing for a richer, indulgent twist.
For families, turning these into thumbprint cookies for kids can be a fun activity. Let kids choose icing colors, sprinkle combinations, and decorations to create their own edible Halloween masterpieces. Pair them with chewy Halloween Monster Brownies for a dessert table that’s colorful, creative, and guaranteed to impress.
Whether you stick to the classic icing-filled design or experiment with spooky decorations, these festive Halloween cookies offer endless possibilities to keep your baking both delicious and fun.
FAQs
What is the secret to thumbprint cookies not cracking?
The key to avoiding cracks in Halloween thumbprint cookies is handling the dough gently. Always cream the butter and sugar thoroughly so the dough is soft and pliable, then roll balls evenly to avoid rough edges. When making the indentations, press lightly and gradually. If cracks still appear, smooth them with your fingers before baking. Chilling the dough for 20–30 minutes can also help stabilize the texture.
Why do my thumbprint cookies spread?
Cookies spread when the butter is too warm or the dough isn’t firm enough. To prevent this, make sure your butter is softened but not melted. Chilling the dough before baking is a foolproof step—it helps cookies hold their round shape. For extra insurance, bake on a parchment-lined baking sheet and keep your oven fully preheated. That way, these festive Halloween cookies stay tall and neat.
How do you fill thumbprint cookies?
The beauty of spooky thumbprint cookies is in their colorful centers. For icing, make sure cookies are completely cooled before filling. Use a spoon or piping bag to add the icing gradually so it doesn’t overflow. If you want a cleaner look, tap the baking sheet gently after filling to let the icing settle smoothly. For variety, you can fill with melted chocolate, tinted ganache, or even jam for a fruity twist.
Can you freeze Halloween thumbprint cookies?
Yes! These cookies freeze beautifully. You can freeze unbaked dough balls (before adding sprinkles) for up to 3 months, then thaw slightly before rolling and baking. Baked cookies also freeze well—just wait until the icing is fully set, then layer them with parchment in an airtight container. When ready to serve, thaw at room temperature for an hour. It’s an easy way to prep easy Halloween thumbprint cookies ahead of time.
Are thumbprint cookies shortbread?
Yes, thumbprint cookies are essentially a variation of shortbread. The base uses a similar butter-sugar-flour ratio, which creates a tender, melt-in-your-mouth texture. What makes thumbprint cookies for kids especially fun is the icing-filled center, which adds both flavor and color to the classic buttery cookie.
Conclusion
Halloween thumbprint cookies are the perfect mix of fun, flavor, and festivity. With their buttery base, colorful sprinkles, and bright icing centers, these cookies capture everything we love about Halloween baking—playfulness, creativity, and a touch of spooky flair. They’re easy to make, kid-friendly, and versatile enough to decorate for any theme, from pumpkins to monsters.
What sets Halloween thumbprint cookies apart is how they balance simplicity and wow factor. The dough uses basic ingredients, yet the end result looks bakery-ready. Add a splash of gel coloring or a few candy eyes, and suddenly your tray becomes the star of any Halloween party. Whether you bake them with family, prep them ahead for a celebration, or share them as gifts, these cookies never fail to impress.
For even more inspiration, pair them with my Halloween Cupcakes with Candy Corn. Together, they create a dessert spread that’s playful, colorful, and perfectly on theme for October festivities.
So grab your sprinkles and food coloring—it’s time to bake a batch of spooky thumbprint cookies that will steal the show this Halloween.