Introduction
Halloween cut-out cookies are more than just a dessert—they’re a tradition. Every fall, the kitchen fills with the smell of butter, sugar, and vanilla as kids gather around the counter to roll out dough and choose their favorite spooky shapes. Ghosts, pumpkins, bats, and black cats come to life, ready for colorful decorations that bring the holiday spirit straight to the table.
What makes Halloween cut-out cookies so special is how versatile they are. The dough is simple, yet sturdy enough to hold detailed shapes without spreading too much. That means your pumpkins will look like pumpkins and your bats will keep their wings sharp after baking. For families, these cookies are more than a sweet treat—they’re an activity. Kids love cutting out shapes, sprinkling on jimmies, and squeezing icing bags filled with orange, black, and purple frosting. Adults love that these cookies can be prepped ahead, baked in big batches, and decorated to fit any theme, from elegant spiderwebs to silly monster faces.
If you’re looking for an easy recipe to bring to school parties or to keep the kids entertained on a crisp fall afternoon, these easy Halloween cookies check all the boxes. And for bakers who love decorating, this recipe opens the door to endless designs with royal icing, sprinkles, and edible decorations.
For even more icing inspiration, take a look at my Halloween Sugar Cookies with Royal Icing. It’s a step-by-step guide to making designs that dry glossy and smooth, perfect for both beginners and seasoned bakers.
Table of Contents
Halloween Cut-Out Cookies
- Total Time: 42 mins (+chill)
- Yield: 24 cookies 1x
Description
Buttery, crumbly shortbread cookies dressed up with festive sprinkles, chocolate chips, and candy eyes. Perfect Halloween shortbread cookies for cut-outs or slice-and-bake fun.
Ingredients
- 1 cup unsalted butter, room temperature
- ⅔ cup powdered sugar
- 1 large egg yolk, room temperature
- 1 tsp vanilla extract
- 2 ¼ cups all-purpose flour
- ¼ tsp salt
- ½ cup mini semisweet chocolate chips
- ⅓ cup Halloween sprinkles (divided)
Instructions
1. Cream butter and sugar until fluffy.
2. Mix in egg yolk and vanilla.
3. Add flour and salt, mixing until just combined.
4. Stir in chocolate chips and sprinkles.
5. For slice-and-bake: roll into log, wrap, and chill 2 hours; slice into rounds.
6 For cut-outs: roll dough ¼ inch thick, chill, cut shapes, then chill 20 mins.
7. Bake at 350°F for 10–12 mins until edges turn golden.
8. Cool slightly, then decorate with candy eyes, melted chocolate, or extra sprinkles.

Notes
- Don’t overmix; it makes cookies tough.
- Chill dough thoroughly for clean edges.
- Freeze dough up to 1 month, baked cookies up to 1 week.
- Prep Time: 30 mins (+2 hrs chilling)
- Cook Time: 12 mins
- Category: Dessert, Holiday Baking
- Method: Baking
- Cuisine: American
Nutrition
- Serving Size: per 1 cookie
- Calories: 164 kcal
- Sugar: 7 g
- Sodium: 26 mg
- Fat: 10 g
- Carbohydrates: 17 g
- Fiber: 1 g
- Protein: 2 g
- Cholesterol: 28 mg
The Basics of Halloween Cut-Out Cookies
Why Cut-Out Cookies Work for Halloween
Halloween is one of those holidays that begs for creativity, and cut-out cookies are the ideal blank canvas. Unlike drop cookies, which are scooped and baked without much shaping, cut-out Halloween cookies let you control the look from the start. The dough rolls out smoothly, holds its form, and creates a sturdy base for decorating once cooled.
The beauty of this recipe is in its reliability. A mix of butter, granulated sugar, and brown sugar gives the cookies structure while adding just the right amount of sweetness. The combination of all-purpose flour and baking powder ensures the cookies bake evenly without puffing up too much. This is why they’re considered the foundation for so many Halloween sugar cookies recipes—the end result is crisp on the edges but soft enough to enjoy with a glass of milk.
Beyond flavor, cut-out cookies are one of the most fun Halloween cookies for kids. They’re hands-on from the beginning: rolling dough, pressing cookie cutters, and transferring shapes to baking sheets. Even little helpers can feel like part of the process. Decorating afterward with icing and sprinkles just adds to the experience.
Ingredients that Make the Perfect Dough
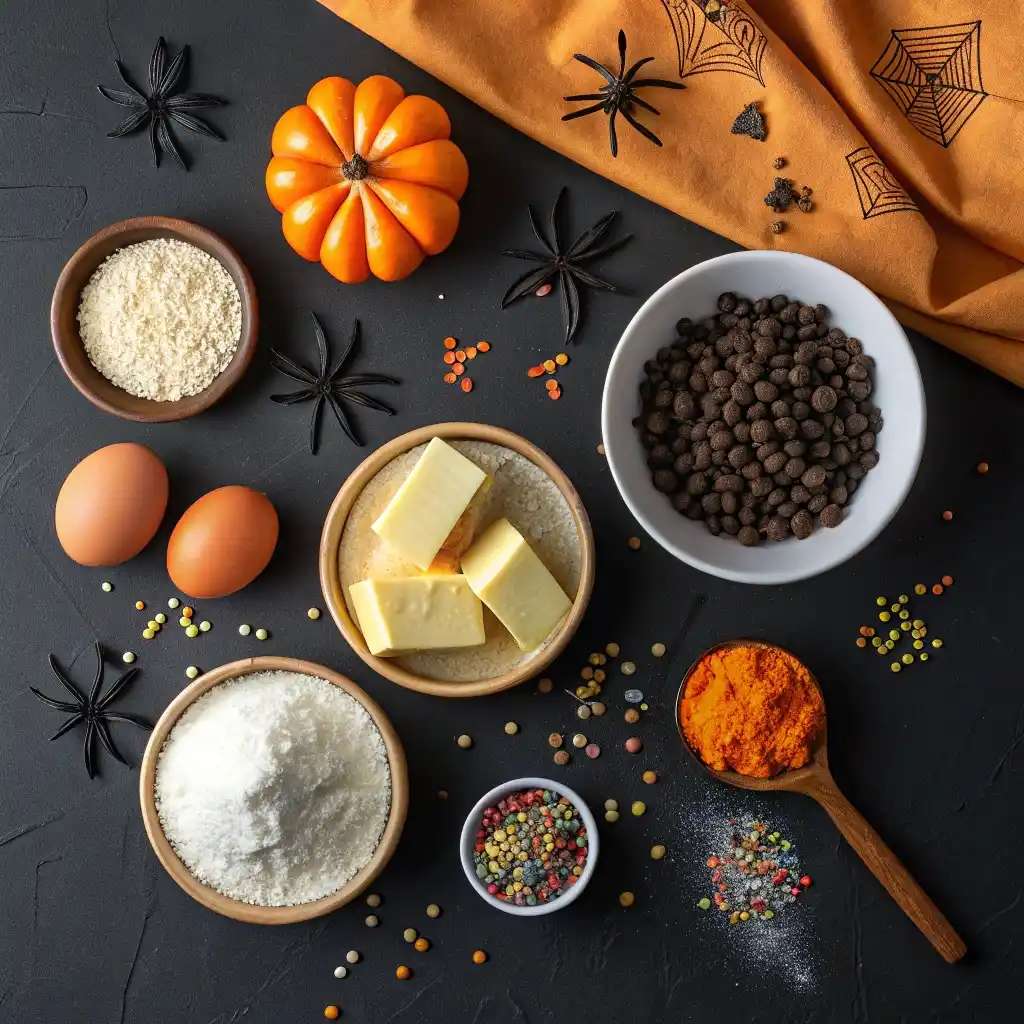
The dough for Halloween cut-out cookies is deceptively simple, but each ingredient plays a role in success. Butter provides richness and structure, while sugar not only sweetens but helps with texture. Using both white and brown sugar, as in this recipe, adds depth of flavor and a hint of chewiness.
Eggs act as a binder, giving the dough strength so it can be rolled out without crumbling. Vanilla extract adds warmth, a flavor note that pairs beautifully with fall spices if you want to add a pinch of cinnamon or nutmeg to the mix.
The flour must be measured properly—either with a kitchen scale or the spoon-and-level method—to avoid dense cookies that lose their shape. Baking powder ensures just enough lift without distortion, while a pinch of salt balances the sweetness. Mini chocolate chips and sprinkles make the dough playful, giving each bite bursts of color and texture.
To prevent spreading, the dough needs to chill for at least an hour before rolling and cutting. This step also makes the dough easier to handle, especially when kids are involved. The result is clean, sharp cookies ready for decorating.
For another kid-friendly Halloween baking project, check out my Frankenstein Halloween Rice Krispie Treats. Like these cookies, they’re a hands-on treat that combines fun with festive flavors.
Shaping & Baking Halloween Cut-Out Cookies
Best Tools for Halloween Shapes
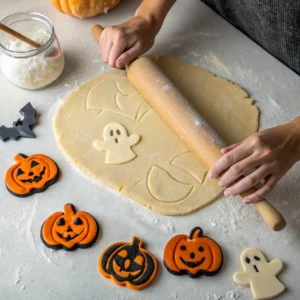
The real fun of Halloween cut-out cookies begins once the dough is chilled and ready to roll. Having the right tools makes all the difference between cookies that look professional and ones that lose their charm in the oven.
A sturdy rolling pin is essential for even dough thickness—aim for ¼ inch. Too thin and the cookies will crisp up too much, too thick and they’ll lose their shape. Lightly dust the countertop, rolling pin, and dough with flour to prevent sticking, but avoid adding too much or you’ll dry out the dough.
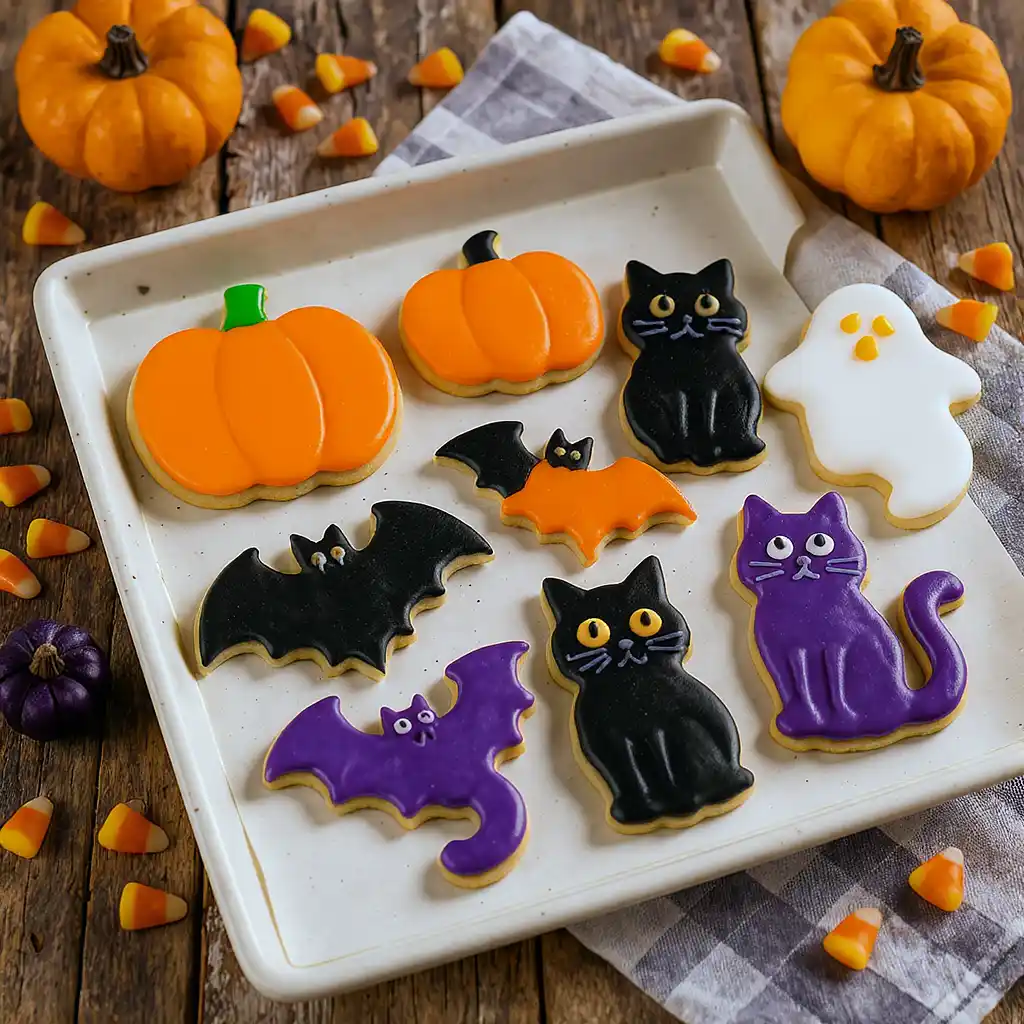
Halloween-themed cookie cutters are where creativity comes alive. Pumpkins, bats, cats, ghosts, and even witch hats make a tray of cookies look like a festive assortment. For sharp edges, press firmly and lift the cutter straight up without twisting. Transfer the cut-outs to a parchment-lined baking sheet using a thin spatula to keep their shapes intact.
For those who want to decorate multiple batches, investing in silicone baking mats is smart—they help cookies bake evenly and reduce spreading compared to greased pans. These tools ensure your cut-out Halloween cookies look sharp before they’re even decorated.
Troubleshooting Baking Issues
Even the best dough can misbehave if skipped steps or shortcuts sneak in. One common problem with Halloween sugar cookies recipes is spreading. If your cookies come out looking like blobs instead of pumpkins or bats, the dough wasn’t chilled long enough. Always give it at least one hour in the fridge, or chill the cut-out shapes on the baking sheet for 10 minutes before baking.
Another issue is uneven baking. To avoid burnt edges and underdone centers, bake cookies on the middle rack of a fully preheated oven at 350℉. Rotate pans halfway through for even results. If cookies look pale, don’t wait for them to turn golden—the goal is a light edge with a tender center, not browned shortbread.
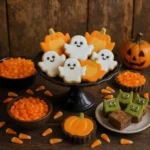
With a little patience, you’ll pull out trays of spooky Halloween cookies that are crisp, colorful, and ready for icing. For another crowd-pleasing Halloween bake that holds its shape and wow factor, check out my Halloween Monster Brownies. Pairing them with cut-out cookies creates a dessert spread that’s as fun to look at as it is to eat.
Decorating Ideas for Halloween Cut-Out Cookies
Royal Icing Magic
Once the Halloween cut-out cookies have cooled, the fun really begins. Royal icing is the classic choice for decorating because it dries hard with a glossy finish, allowing you to stack or package cookies without smudging. The secret to royal icing success is mastering consistency. Thick icing works best for outlining shapes, while thinner “flood” icing fills in designs smoothly.
For beginners, start with three colors—orange, black, and white. These basics cover pumpkins, ghosts, spiderwebs, and bats. Mix gel food coloring into your icing to achieve bold shades without making it runny. Use piping bags fitted with small round tips for clean lines, or even resealable bags with the corner snipped off for a quick DIY option.
Royal icing may sound intimidating, but once you’ve piped your first pumpkin or ghost, you’ll see how approachable it really is. Kids especially love flooding shapes with bright icing and then adding finishing touches like edible glitter or candy eyes. For more guidance on smooth, professional-looking icing, check out my Halloween Marshmallow Pops, where candy coating and sprinkles create festive designs with minimal effort.
Creative Decorating Themes
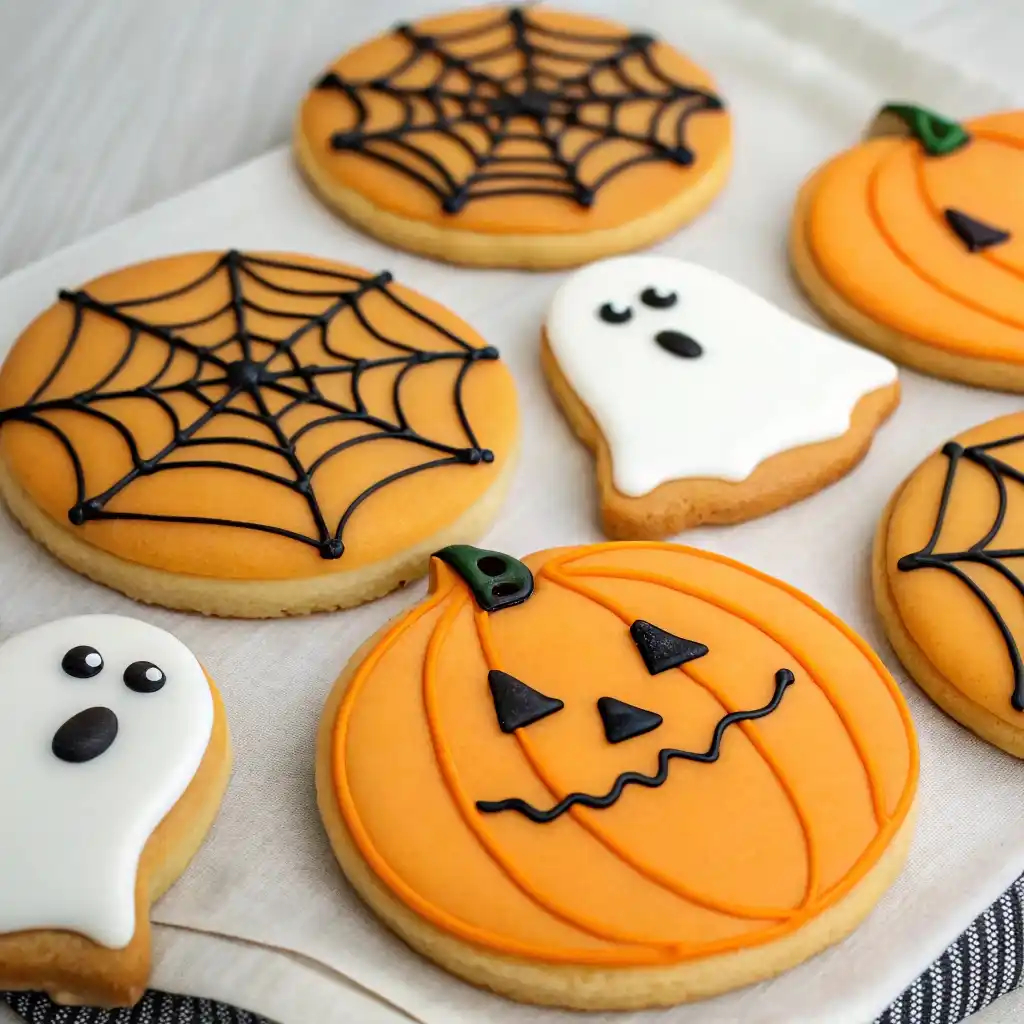
The best part of Halloween cookie decorating ideas is that there are no rules. Pumpkins can be happy or scary, ghosts can be silly or spooky, and spiderwebs can be as intricate or simple as you like. Here are a few decorating themes to try:
- Pumpkins & Jack-o’-Lanterns: Outline in black, flood with orange, and pipe on faces for a playful touch.
- Spooky Ghosts: Flood with white icing, then dot on black eyes and mouths for a classic Halloween cookie.
- Spiderwebs: Flood with white, then pipe thin black lines from center to edge and drag a toothpick through to create a web effect.
- Candy Corn Colors: Flood triangles with yellow, orange, and white bands to mimic the classic candy.
- Monster Faces: Add candy eyes, use bright colors like purple or green, and pipe goofy smiles.
These themes make easy decorated Halloween cookies that look bakery-worthy but are fun for kids and adults alike.
To keep things festive, set up a cookie-decorating station at your party. Provide bowls of sprinkles, edible glitter, and colored icings so guests can design their own spooky Halloween cookies. Not only does it double as entertainment, but everyone gets to take home their edible artwork.
Expert Tips & Fun Variations
One of the secrets to success with Halloween cut-out cookies is patience—especially with the dough. Always chill for at least an hour before rolling and cutting. If you’re baking with kids and want to keep things moving, prep the dough the night before so it’s ready to roll when the fun begins.
For extra flavor, try adding a teaspoon of pumpkin spice or cinnamon to the flour mixture. It gives the cookies a subtle autumn warmth that pairs perfectly with the sweetness of royal icing. If you want darker cookies, replace ¼ cup of flour with unsweetened cocoa powder for a spooky twist.
Dietary needs? No problem. Swap regular butter for plant-based butter and use flax eggs to make vegan-friendly cookies. Gluten-free bakers can substitute a 1:1 gluten-free flour blend with great results. These adjustments ensure that everyone can enjoy easy Halloween cookies, no matter the diet.
Pair these with playful Halloween Pumpkin Protein Balls to balance indulgence with a healthier option on your Halloween spread.
FAQs
What is the secret to good cut-out cookies?
The secret is proper dough handling: cream the butter and sugars well, measure flour correctly, and chill before rolling. This keeps shapes sharp and textures tender.
Why do my cut-out cookies spread?
Cookies spread when dough is too warm or flour is packed incorrectly. Chill dough, measure flour with the spoon-and-level method, and always bake on parchment or silicone mats.
How do you keep shapes from losing detail?
Use cold dough, sharp cookie cutters, and bake on the middle rack. You can even chill the cut-out shapes on the baking sheet for 10 minutes before baking to keep edges crisp.
Can you freeze cut-out cookie dough?
Yes! Wrap discs of dough tightly in plastic wrap and freeze for up to 3 months. Thaw in the fridge before rolling and baking. You can also freeze baked cookies before decorating for up to 2 months.
What’s the difference between cut-out cookies and drop cookies?
Cut-out cookies are rolled and shaped, holding detailed designs for decorating. Drop cookies, like chocolate chip, are scooped directly onto the tray and bake into softer, round shapes.
Conclusion
Halloween cut-out cookies are the kind of recipe that never goes out of style. They’re buttery, festive, and endlessly customizable—whether you’re baking pumpkins with cheerful faces, spooky spiderwebs, or ghosts that glow with white icing. The dough is simple, yet strong enough to hold its shape, making it ideal for bakers of all skill levels.

What makes Halloween cut-out cookies truly special is how they double as an activity. Rolling dough, cutting shapes, and decorating with royal icing turns baking into a celebration. Kids get to unleash their creativity, while adults can enjoy the satisfaction of cookies that look as good as they taste. With a little planning, these cookies can be prepped ahead, stored, or even frozen so you’re always ready to whip up a batch when the holiday spirit hits.
For the ultimate dessert table, pair these with my Halloween Chocolate Chip Cookies. Together, they create a spread that’s playful, colorful, and perfect for trick-or-treat gatherings, school parties, or cozy nights at home.
So grab your cutters, sprinkles, and food coloring—it’s time to bake spooky, fun, and festive Halloween cut-out cookies that will be remembered long after the last bite.