Why no-bake wins
As soon as October arrives, I reach for no bake Halloween treats because they turn a quiet afternoon into a little kitchen party. One year, the kids were already in costumes when we realized the dessert tray was still empty. We set out sandwich cookies, candy melts, and sprinkles, then dipped and drizzled our way to a platter of bats, mummies, and tiny “graveyards.” We showed up with sticky fingers and big smiles—and the tray vanished first.

These ideas work because they’re fast, affordable, and easy to share. You can pull together no bake Halloween desserts for a classroom, trunk-or-treat, or last-minute game night without turning on the oven. Think oreo bat cookies no bake for crunch and chocolate, glossy white chocolate halloween bark with candy bits, or cute halloween marshmallow pops little helpers can decorate. Keep candy melts, pretzels, sprinkles, candy eyes, and parchment on hand, and you’ll have easy halloween treats no bake in minutes—leaving plenty of time to enjoy the night.
Table of Contents
Make 3 No-Bake Halloween Treats Tonight (Fast Plan)
If you want a quick win, pick one recipe from each lane: a cookie build, a glossy chocolate tray, and a grab-and-go pop. This trio gives you crunch, color, and something fun for little helpers—no oven, minimal cleanup.
- Cookie lane: Start with oreo bat cookies no bake. Break extra cookies into wings, “glue” with chocolate, and press on candy eyes. You’ll plate two dozen in minutes and get that perfect crunchy-creamy bite people love.
- Chocolate tray lane: Make white chocolate halloween bark on parchment. Spread, top with candies or cookie crumbs, chill, and snap. It looks dramatic, slices clean, and anchors the dessert table. If you need more variety, rotate in pretzel rods as white chocolate halloween treats with quick colored drizzles.
- Pop lane: Finish with halloween marshmallow pops. Dip, drizzle, and let kids add a few sprinkles. These stay tidy on sticks and pack well for classroom parties.
That simple trio reads like no bake halloween desserts for the sweet tooth and no bake halloween snacks for easy hand-held grazing. If you’re truly racing the clock, choose just two lanes—easy halloween treats no bake still feel complete when you mix cookies with bark or pops.
Oreo & Cookie-Base Crowd-Pleasers (Assemble & Chill)
When time is tight, cookie builds are the fastest no bake Halloween treats on the table. Think crunchy-creamy Oreo spider cookies, easy graveyard cookie cups, and party-perfect Oreo bat cookies you can plate in minutes. These easy Halloween treats no bake are classroom-friendly, kid-friendly Halloween treats, and ideal for last-minute guests. Keep candy eyes, sprinkles, and melts on hand, and you’re set for a full no oven Halloween desserts platter.
No-Bake Oreo Bat Cookies
These “instant applause” bites bring crisp Oreo crunch, glossy chocolate “wings,” and candy eyes that make everyone grin. You’ll assemble a tray in minutes, and they stack perfectly for travel.
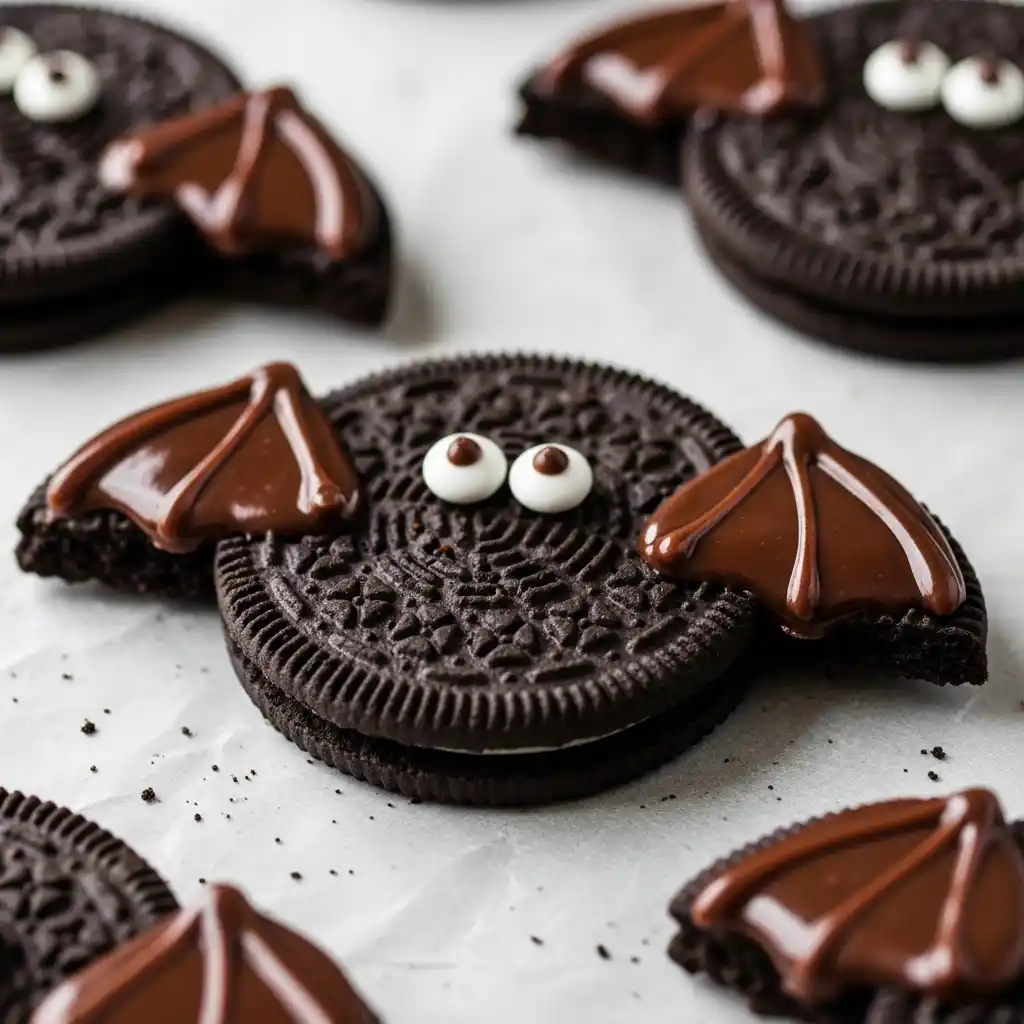
Get the full walkthrough once and you’ll remake them every October: No-Bake Oreo Bat Cookies.
Oreo Spider Bites
Little on effort, big on drama. These spiders look like you spent all afternoon, but you’ll fly through a dozen in minutes. The combo of creamy cookie center, crunchy “legs,” and a pop of sprinkle color makes them a fast favorite for kids’ tables and classroom trays.
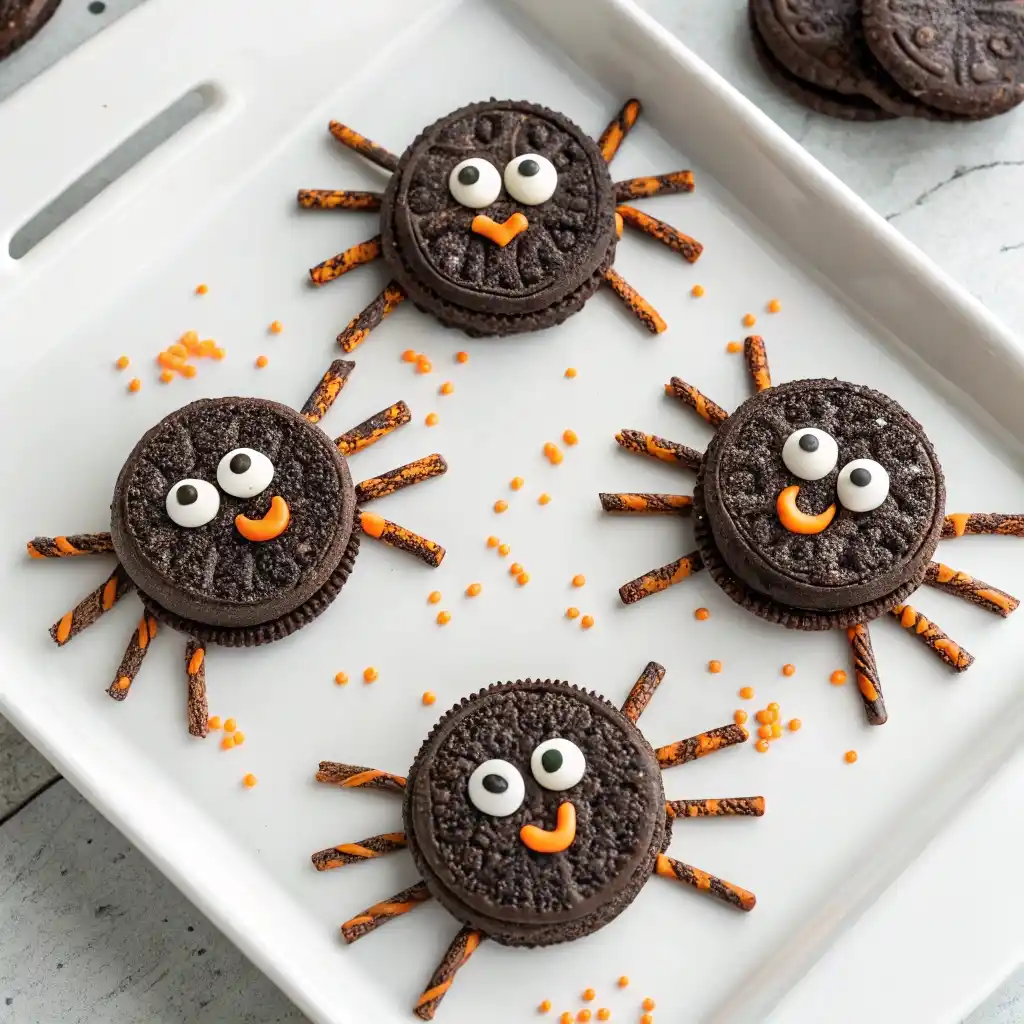
What you’ll need (makes ~16):
- 16 Oreos (regular, mint, or gluten-free)
- 64 short pretzel sticks (or chocolate wafer sticks), for “legs”
- 1 cup chocolate chips or melts (for “glue”)
- 32 mini candy eyes
- Orange/black sprinkles (optional)
Steps:
- Prep the parts: Line a tray with parchment. Microwave chocolate in 20-second bursts, stirring until smooth and glossy.
- Build the legs: Twist each Oreo open. Lay 4 pretzel “legs” on the cream of each half so they stick out evenly.
- Seal the spider: Dab a little melted chocolate over the cream and gently press the cookie top back on to secure the legs.
- Face time: Dot a tiny chocolate “glue” spot on top. Place two mini eyes. Add a pinch of sprinkles at the seam for color.
- Set & serve: Chill 10 minutes just to firm the chocolate. Plate and go.
Smart swaps & tips:
- Allergy-friendly: Use GF sandwich cookies and gluten-free pretzels.
- Flavor twist: Add a whiff of cinnamon to the melted chocolate for warmth.
- Make-ahead: Store in a lidded tin between parchment layers up to 2 days at room temp (cool, dry spot).
Graveyard Cookie Cups
Theater without the oven. These cups deliver creamy-chocolate comfort with a crunchy “dirt” top and a tombstone that always gets a laugh. They’re perfect when you need individual, grab-and-go servings for parties or school events.
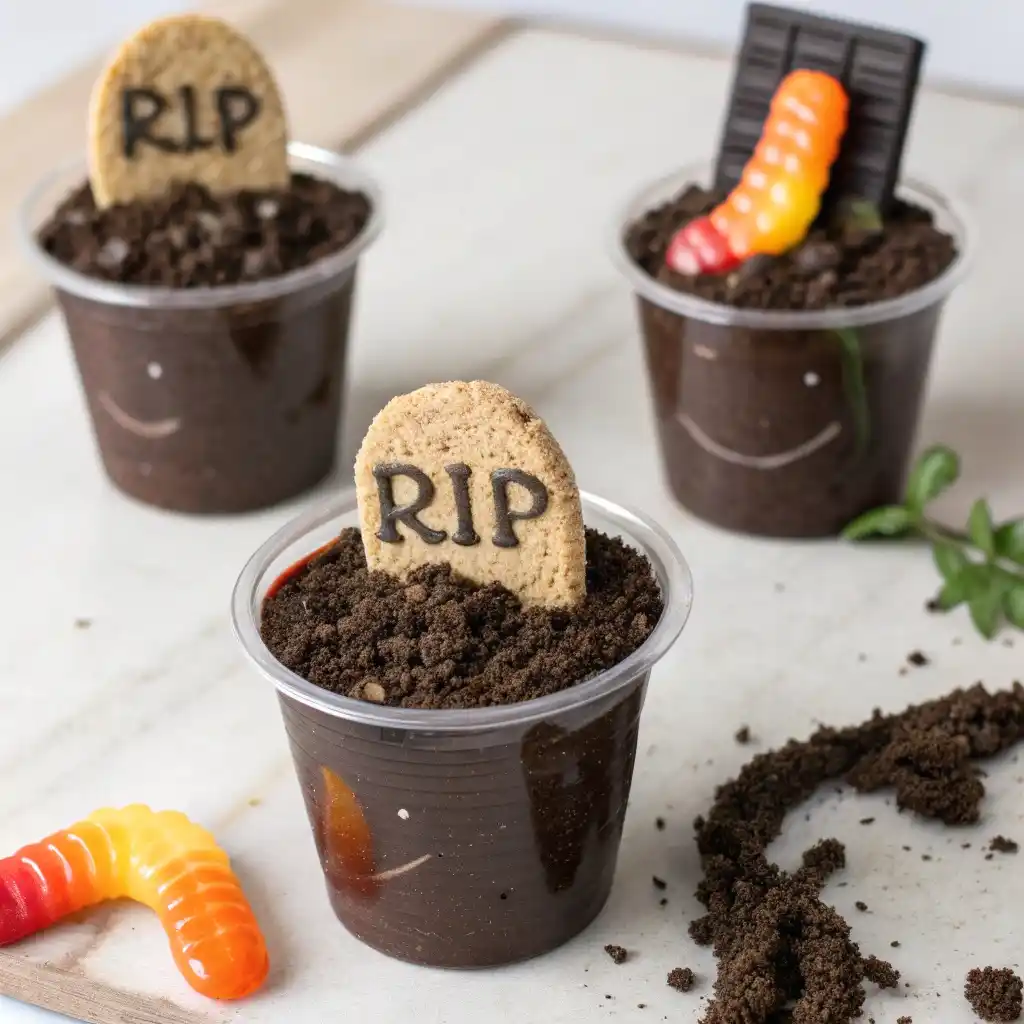
What you’ll need (serves 8):
- 8 chocolate pudding cups (or chocolate Greek yogurt cups)
- 1 cup finely crushed chocolate cookies (“dirt”)
- 8 oval/rectangular cookies for tombstones (e.g., Milano-style)
- Black writing gel or edible marker (for “RIP”)
- Candy bones and gummy worms (optional)
Steps:
- Top with dirt: Open each cup and spoon 2–3 tablespoons of cookie crumbs over the surface to create a crumbly “yard.”
- Add tombstones: Pipe or write “RIP” on each oval cookie. Press one into every cup at a slight angle so it stands upright.
- Dress the scene: Tuck in a candy bone or a gummy worm. Wipe the rim for a clean finish.
Smart swaps & tips:
- Lighter option: Use chocolate Greek yogurt instead of pudding; the tang balances the sweet “dirt.”
- Theme variations: Orange sanding sugar = “pumpkin patch.” Green-tinted coconut = “haunted lawn.”
- Transport & storage: Chill cups on a rimmed tray; cover loosely with wrap. Keep refrigerated up to 24 hours. Add tombstones just before serving so they stay crisp.
Monster Sandwich Cookies
For bold, neon color with minimal effort, sandwich thick swirls of tinted frosting between two chocolate cookies, roll the edges in sprinkles, and press on candy eyes so they peek around the seam. Chill to set for clean edges and easy stacking. Use dairy-free frosting and dark-chocolate wafers for a dairy-free platter. For a playful look, tint half the frosting slime-green and half purple, then alternate on the tray.
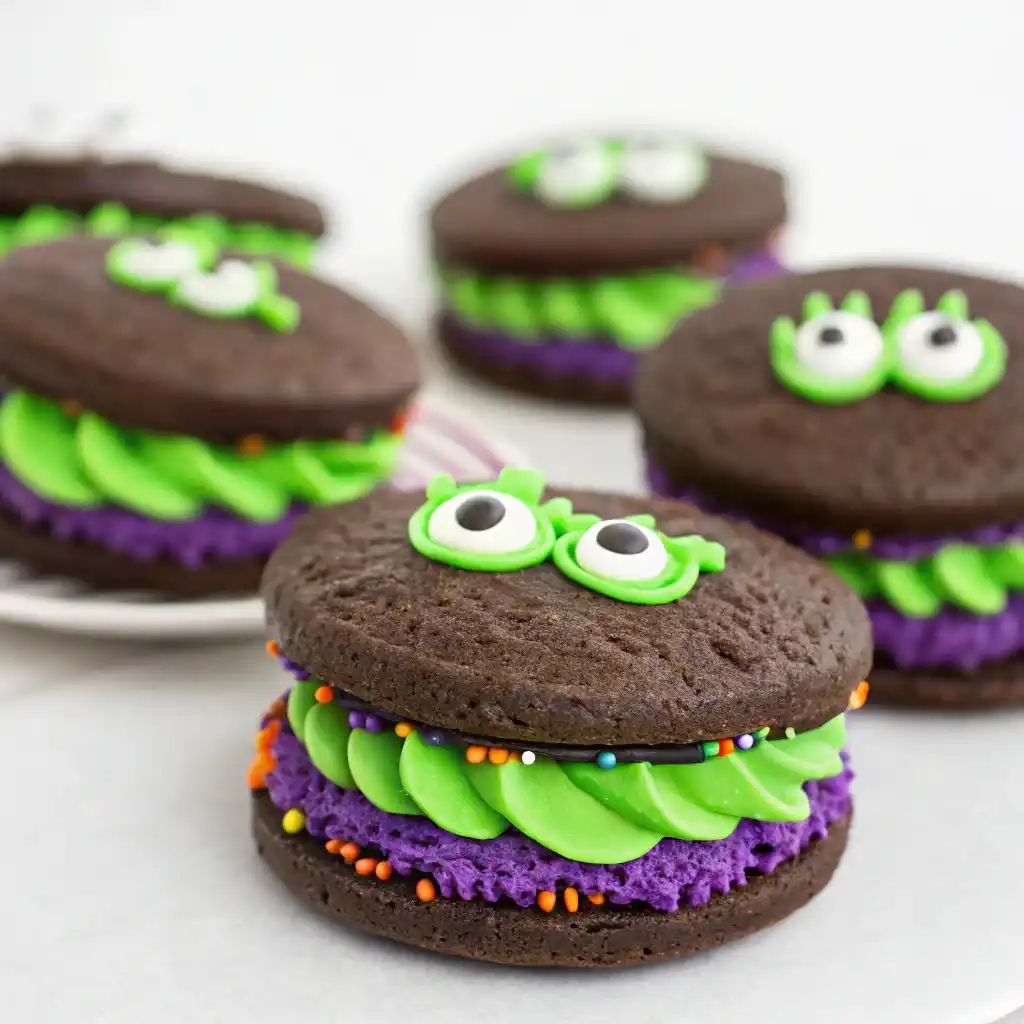
Explore step-by-step ideas here: monster sandwich cookies
Quick Party Platter Tip
Anchor the front row with bats for visual order, cluster spiders in the center for texture, and stage graveyard cups at the back for height. Then scatter a few candy eyes and a pinch of orange sprinkles across the tray. You’ll get a styled, high-impact no-bake Halloween desserts board that feels fun and looks polished—without ever turning on the oven.
White Chocolate Dips & Drizzles (Glossy, Cute, 10–15 Minutes)
If you love glossy finishes, these white chocolate Halloween treats melt fast and set firm. Make shiny white chocolate pretzel rods, candy-studded white chocolate Halloween bark, and cute white chocolate mummy truffles in 10–15 minutes. They’re perfect no bake Halloween desserts for parties and bake sales, and they pack like a dream. Add candy eyes or pumpkin sprinkles for instant “wow.”
White Chocolate Mummy Truffles
The crowd-pleaser that looks bakery-made. You crush cookies, mix a soft center, dip, then “bandage” with skinny drizzles so the candy eyes peek through. They’re creamy inside, snappy outside, and hold up beautifully on a buffet.
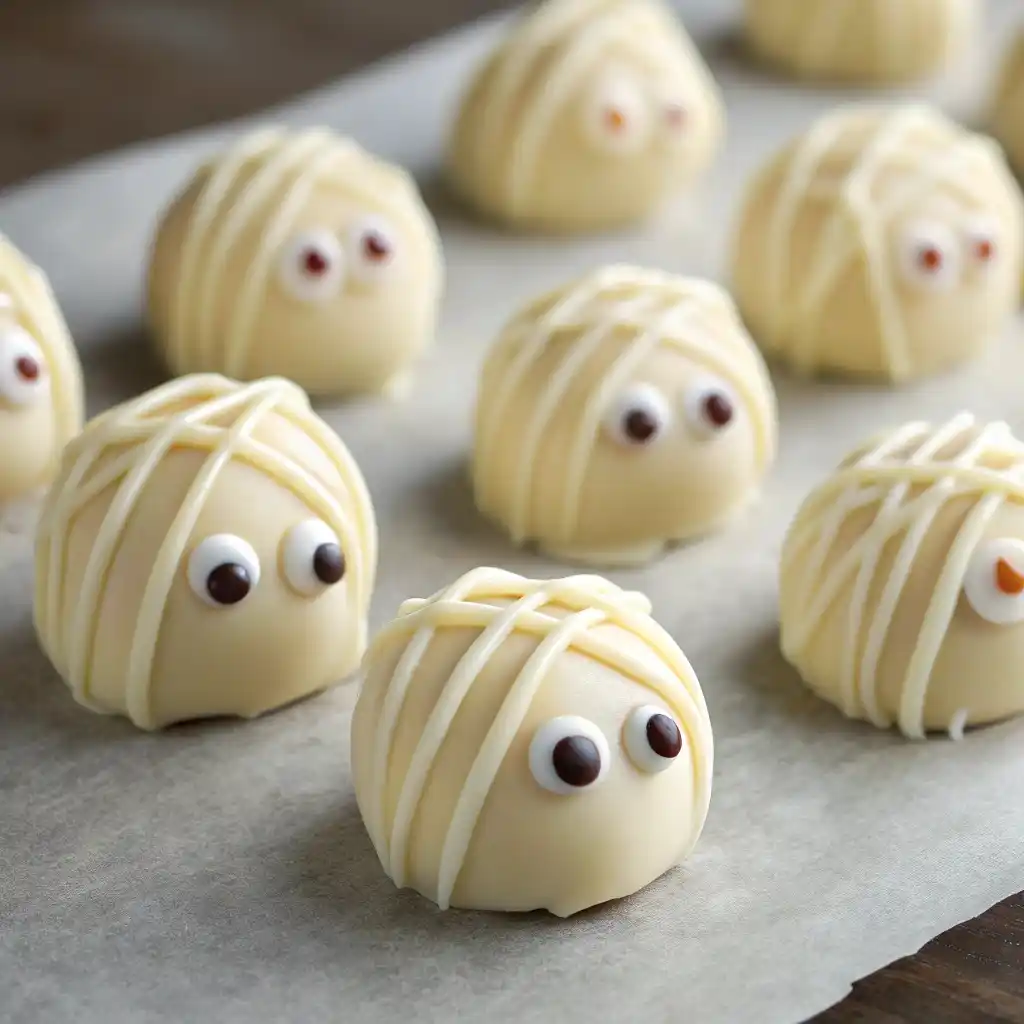
Full walkthrough: White Chocolate Mummy Truffles.
Pumpkin Patch Bark
Little effort, big payoff. These orange-tinted shards fill a platter fast and look like you planned for days.
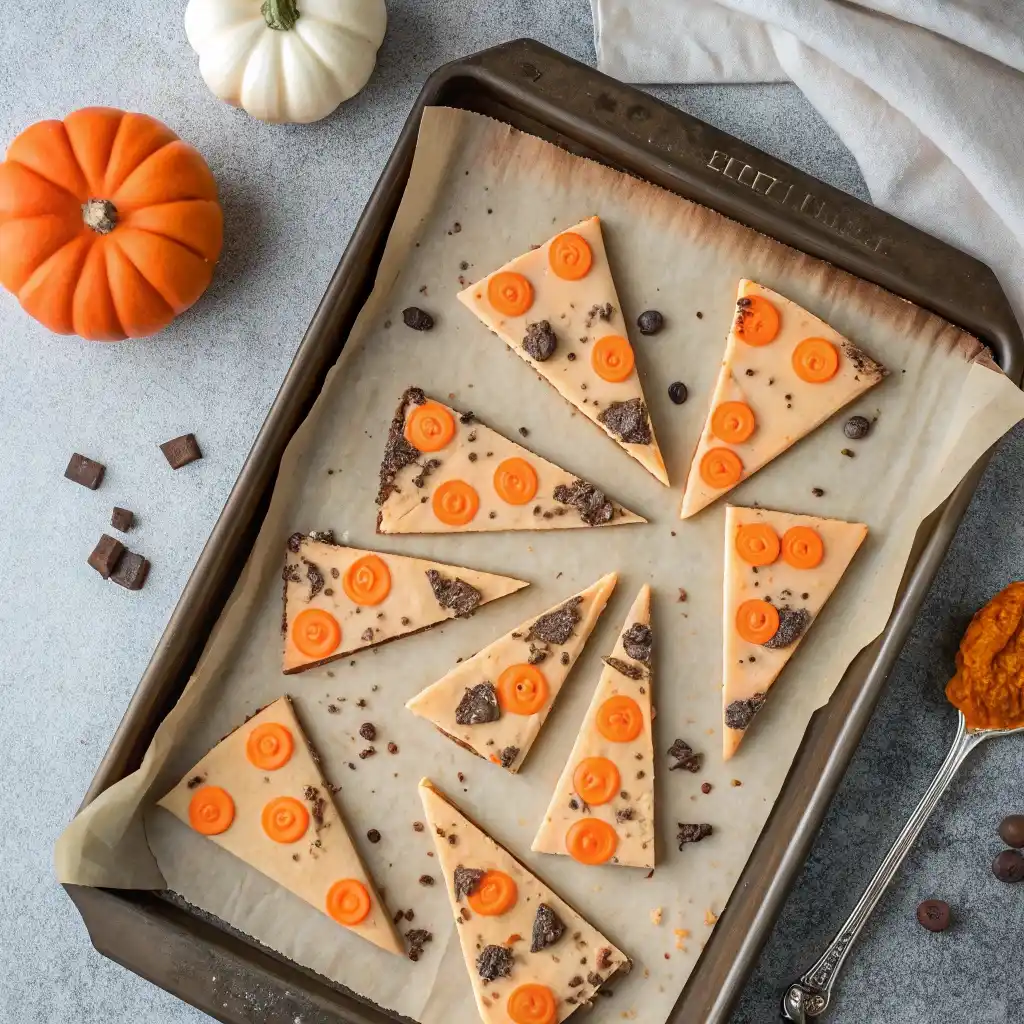
What you’ll need (1 sheet pan):
- 16 oz orange candy melts (or white chocolate + orange oil-based coloring)
- 1 cup crushed chocolate cookies (chunky, not powder)
- 1 cup mini pumpkin candies or pumpkin sprinkles
- Optional: 3–4 oz dark chocolate for marbling
Steps:
- Melt & spread: Line a sheet pan with parchment. Melt orange melts until smooth; spread ¼-inch thick.
- Top it: Sprinkle crushed cookies and pumpkin candies evenly.
- Optional marble: Drizzle melted dark chocolate; pull a skewer through for swirls.
- Set & snap: Chill 10–15 minutes; break into irregular pieces.
Smart swaps & tips:
- Flavor switch: Stir a pinch of pumpkin pie spice into the melts.
- Allergy-friendly: Use dye-free sprinkles if needed.
- Storage: Airtight, cool/dry spot, 3–4 days.
Candy-Corn Drizzle Pretzel Rods
Sweet-salty, crunchy, and unbelievably fast—perfect for favors and bake sales.

What you’ll need (about 18 rods):
- 18 pretzel rods
- 8 oz white melts (base)
- 4 oz orange melts + 4 oz yellow melts (drizzles)
- Halloween sprinkles (optional)
Steps:
- Dip base: Melt white; dip rods ⅔ of the way, let excess drip, lay on parchment.
- Add stripes: Melt orange and yellow; drizzle quick diagonal stripes.
- Finish: Sprinkle lightly before the base sets; chill 10 minutes.
Smart swaps & tips:
- Flavor boost: Add a drop of vanilla bakery emulsion to the white melts.
- Gifting: Wrap 2–3 rods in a clear bag with ribbon.
- Storage: Room temp, airtight, 3–5 days.
Pops & Krispie Treats (Party-Perfect On Sticks)
Grab-and-go treats win at crowded tables, and these no bake Halloween treats on sticks never fail. Whip up fluffy Halloween marshmallow pops, classic ghost krispie pops, and playful Frankenstein rice krispie treats with bright colors and clean cuts. They’re sturdy, kid-friendly Halloween treats, and ideal Halloween treats for classroom parties—no oven, low mess, big smiles.
Halloween Marshmallow Pops
Fluffy marshmallows, shiny coating, and a sprinkle finish—these five-ingredient wonders look pro with zero fuss, and the sticks make serving a breeze.
Grab the walkthrough here: Halloween Marshmallow Pops.
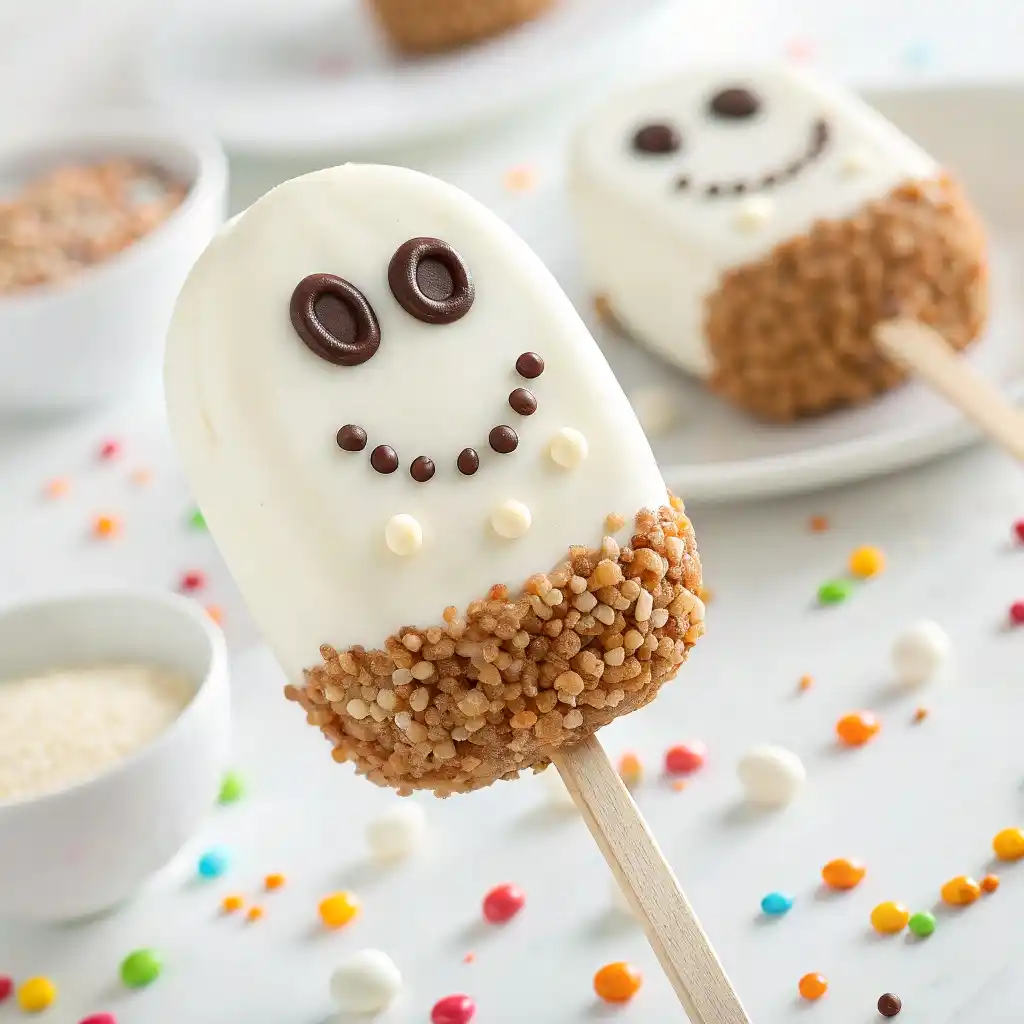
Mummy Marshmallow Pops
Soft, sweet, and just spooky enough. These mummies fly off party trays and pack well for classroom treats.
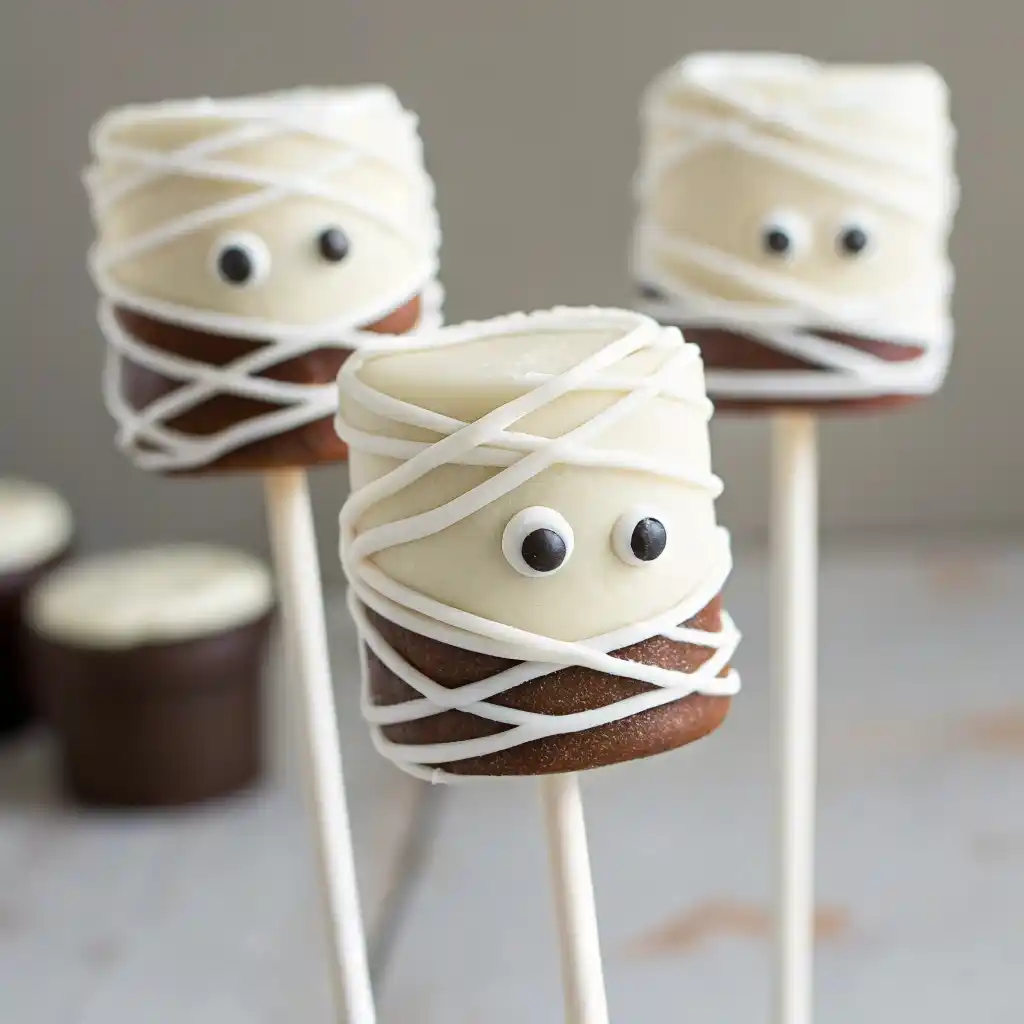
What you’ll need (makes 12):
- 12 large marshmallows
- 12 lollipop or popsicle sticks
- 8 oz white candy melts (plus 2 oz more for “bandages”)
- 24 mini candy eyes
How it comes together:
- Skewer & dip: Insert sticks; dip each marshmallow in melted white until coated. Tap to remove excess; set on parchment.
- Bandage up: Re-melt 2 oz white; drizzle thin lines across each marshmallow to mimic wraps.
- Add the stare: Press on two mini eyes while the drizzle is still tacky.
Why it works: The crisp shell + pillowy center is irresistible, and the light drizzle gives detail without heavy sweetness. Best within 24–36 hours stored at cool room temp.
Witch’s Cauldron Krispie Bites
All the charm of decorated treats with a 10-minute timeline. These bite-size “cauldrons” stack clean and make great favors.
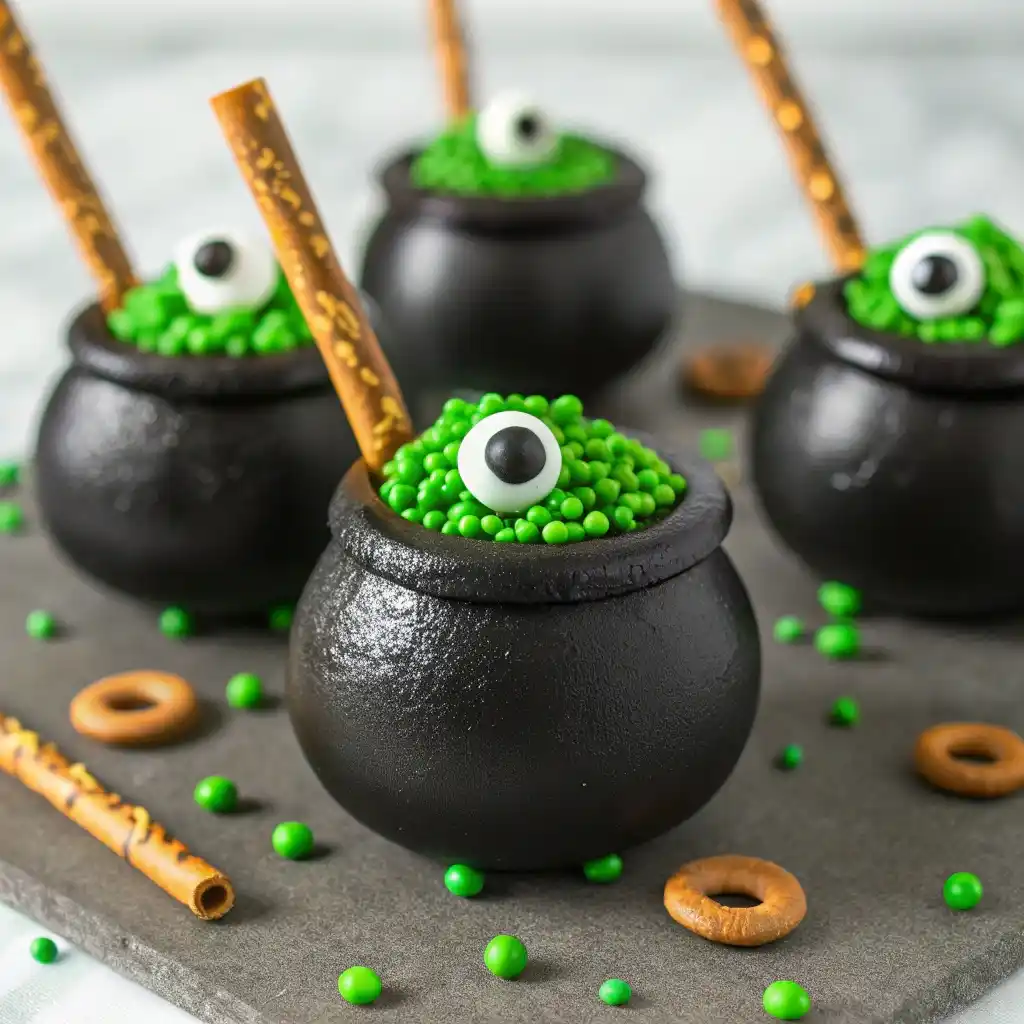
What you’ll need (about 18 bites):
- 4 cups warm cereal-treat mixture (classic crispy rice + marshmallow)
- 6 oz black candy melts (or dark chocolate + a drop of black oil-based color)
- Green nonpareils or sanding sugar (“bubbles”)
- 18 mini pretzel sticks (stirrers)
- Optional: 18 candy eyes
How it comes together:
- Shape: Roll still-warm mixture into 1½-inch balls; set on parchment.
- Dip tops: Melt black candy; dip the top third of each ball.
- Bubble & stir: Sprinkle green “bubbles,” press in one candy eye like it’s floating, and add a pretzel “stirrer.”
Why it works: Sweet-salty notes, chewy-crisp texture, and a dramatic look with almost no decorating tools. Room-temp airtight up to 2 days; for dairy-free, use vegan marshmallows + plant butter.
Frankenstein Rice Krispie Bars
Same no-bake ease, maximum Halloween personality. Tint your cereal-treat base green, press into a pan, then top with chocolate “hair,” candy eyes, and a stitched smile. They slice neatly for parties and hold up during transport.
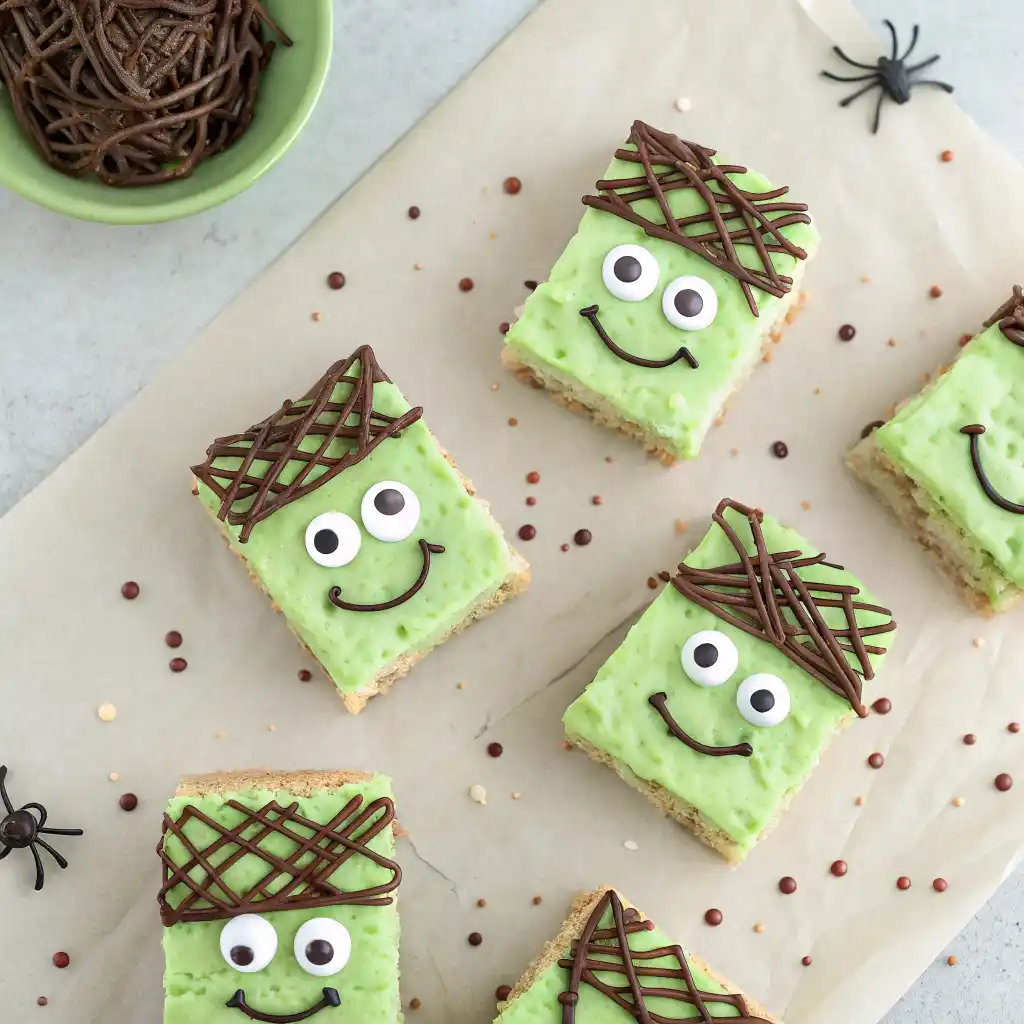
Full recipe: Frankenstein Halloween Rice Krispie Treats.
Want the classic ghost look on a stick?
Oval Krispie shapes dipped in white with simple chocolate faces are iconic—and ridiculously photogenic.
For shaping and face templates, explore ghost krispie pops when you’re ready to add a second pop style to your platter.
Bars, Cups & “Set & Slice” Treats (Minimal Hands-On)
Need volume fast? These tray- and cup-based no bake Halloween desserts chill to set and slice clean. Build creamy no bake cheesecake cups Halloween style, crunchy-chewy chocolate haystacks Halloween, and fun peanut butter monster bites for protein-ish balance. They’re ideal last minute Halloween treats and pack perfectly for potlucks or party trays.
No-Bake Cheesecake Cauldrons
Creamy, cute, and surprisingly fast—these little “cauldrons” look fancy in small cups and hold beautifully on a buffet.
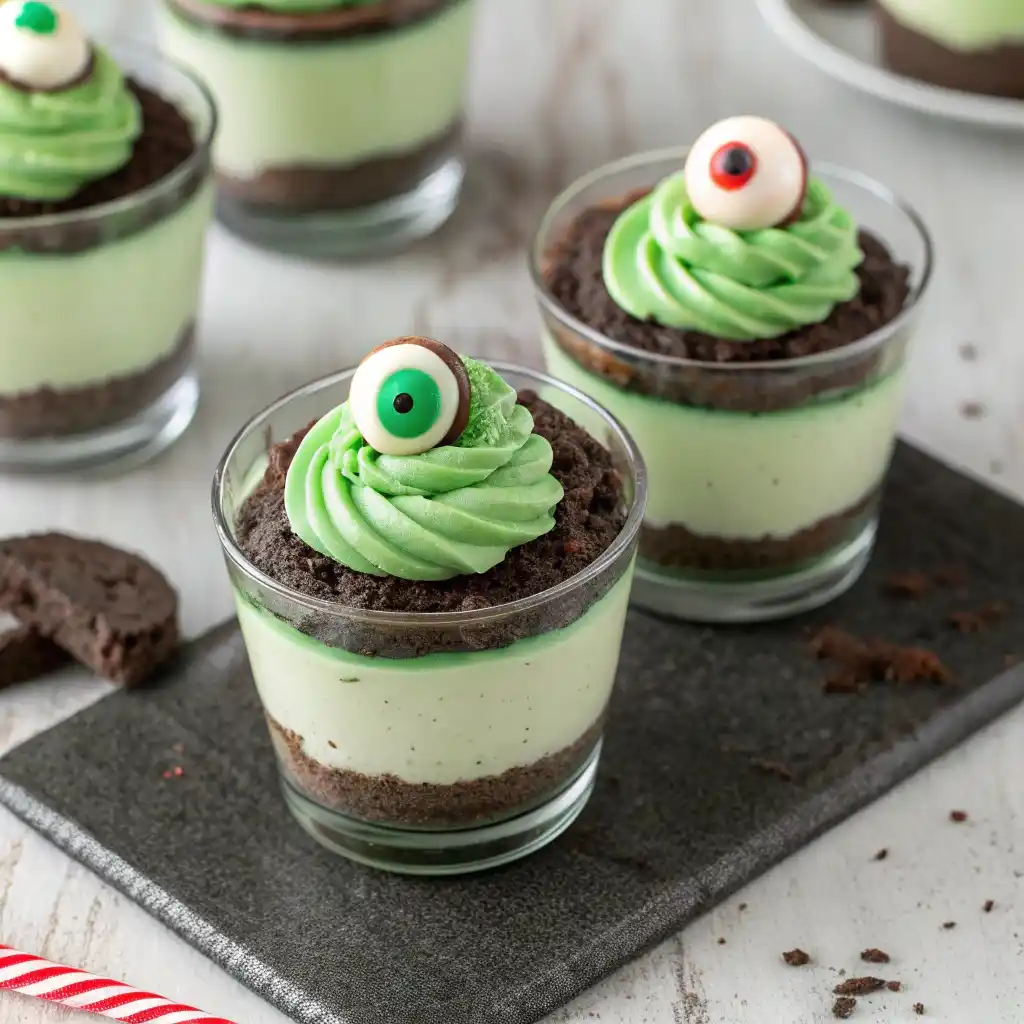
What you’ll need (serves 6):
- 1¼ cups chocolate cookie crumbs + 3 tbsp melted butter (base)
- 8 oz cream cheese, ¼ cup sugar, 1 tsp vanilla (filling)
- 1 cup whipped topping (fold-in)
- Green gel or curd for “potion,” candy eyes
How it comes together:
- Base: Mix crumbs with butter; press into 6 small cups.
- Filling: Beat cream cheese, sugar, vanilla until smooth; fold in whipped topping. Pipe or spoon over bases.
- Potion: Swirl green gel on top; add 1–2 candy eyes.
Smart swaps & tips: Use plant-based cream cheese + coconut whip for dairy-free; color half the filling purple for a two-tone effect; chill up to 24 hours.
Peanut Butter Monster Bites
Soft, chewy, and studded with chocolate—high-yield, kid-approved, and freezer-friendly.
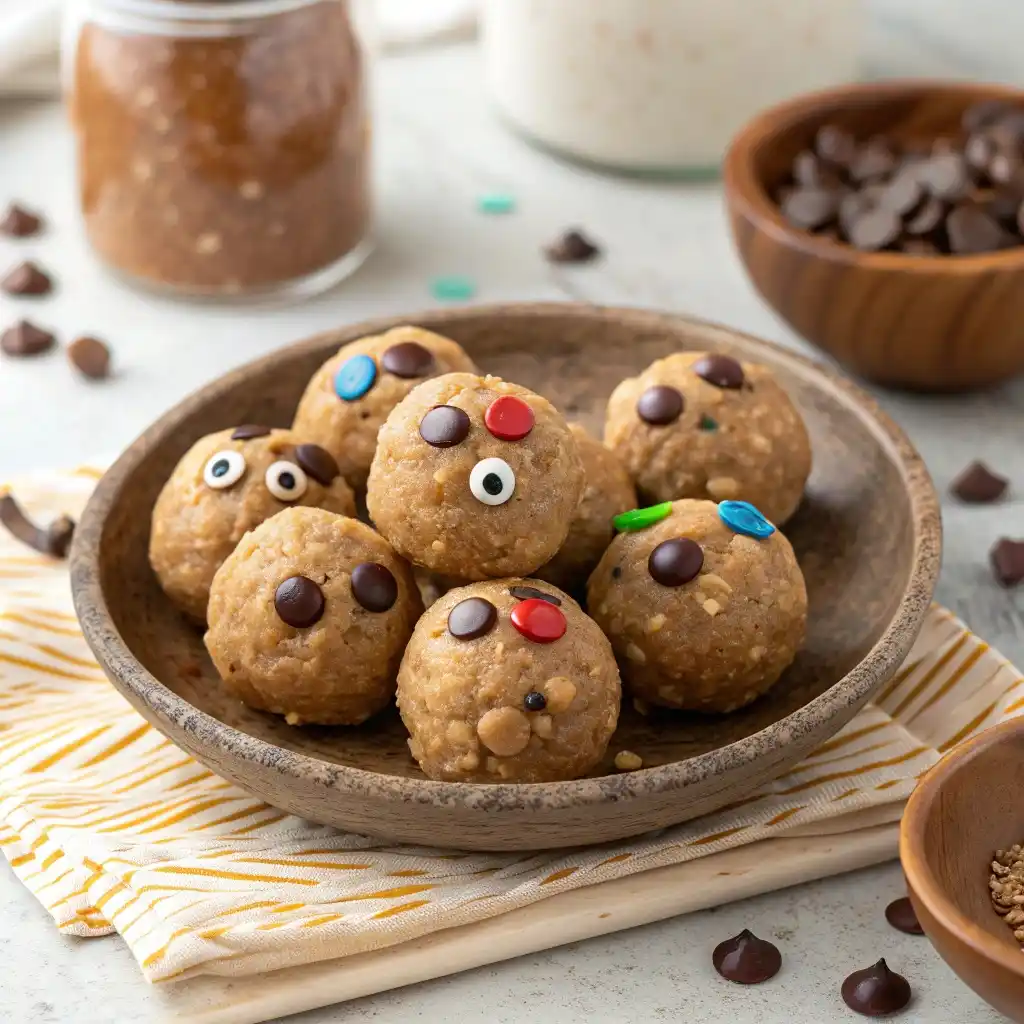
What you’ll need (makes ~20):
- 1½ cups quick oats
- ¾ cup creamy peanut butter (or sunflower seed butter)
- ¼ cup honey or maple syrup
- ⅓ cup mini chocolate chips
- Candy eyes
How it comes together:
- Mix: Stir oats, peanut butter, and honey until combined; fold in chips. Chill 10 minutes.
- Shape: Scoop 1 tbsp portions; roll into balls.
- Monsters: Press in 1–2 candy eyes per bite.
Smart swaps & tips: Nut-free? Use sunflower butter. Add a pinch of salt + splash of vanilla for bakery flavor. Store in the fridge up to 6 days; freeze up to 2 months.
Chocolate Spider-Nest Haystacks
All crunch, no fuss—these “nests” look spooky with zero decorating skills required.
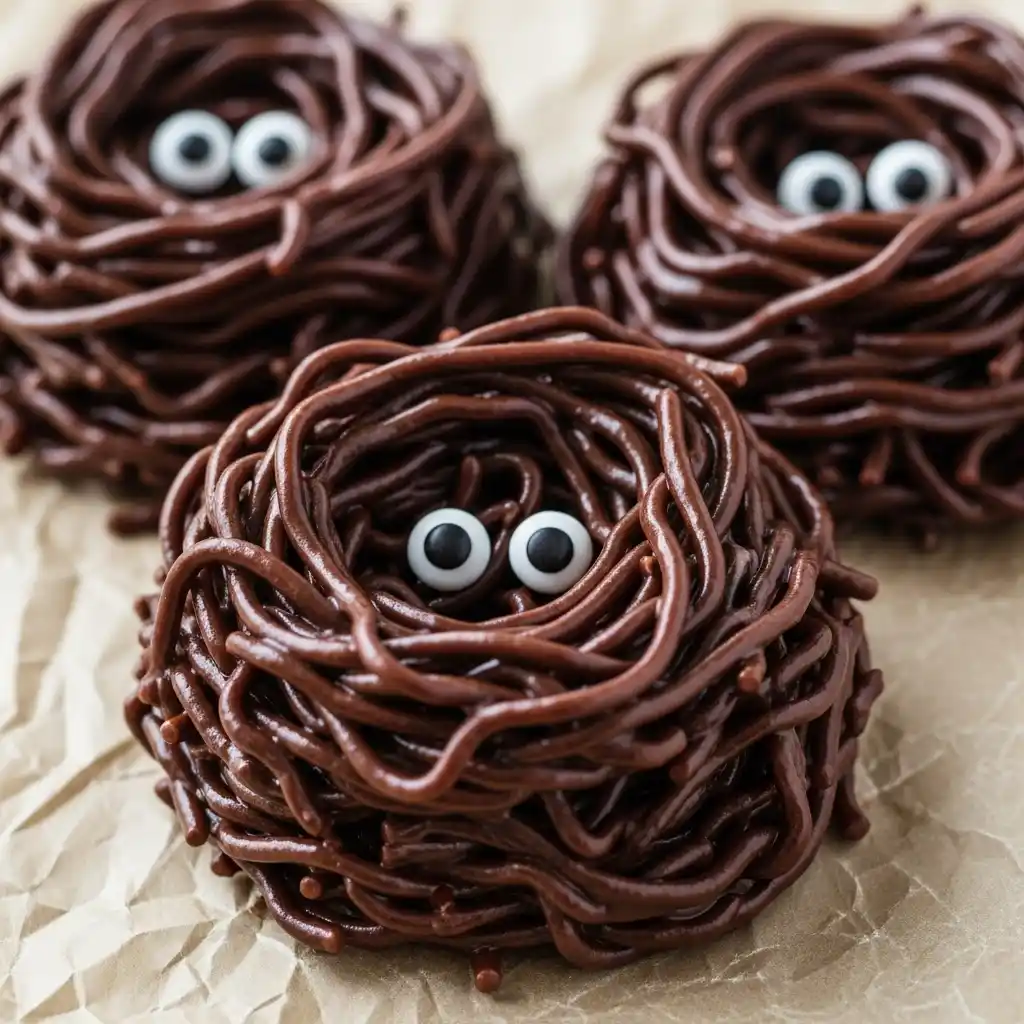
What you’ll need (makes ~18):
- 2 cups chow mein noodles (or pretzel sticks, broken)
- 1½ cups chocolate chips or melts
- ½ cup crushed chocolate cookies (optional, for texture)
- Mini candy eyes
How it comes together:
- Coat: Melt chocolate until glossy. Fold in noodles (and cookie crumbs, if using) to coat.
- Nest: Spoon mounds onto parchment, making a slight well in the center.
- Finish: Add 2–3 candy eyes per nest; chill 10–15 minutes to set.
Smart swaps & tips: Use half milk/half dark chocolate for depth. Add a pinch of flaky salt to pop the sweetness. Store airtight at cool room temp 2–3 days.
Candy-Corn Parfaits
Want a layered look in minutes? Build cups with yellow pudding, then orange yogurt, then a dollop of whipped cream for the “white tip.” Top with a single candy corn and a sprinkle of glitter sugar for shine.
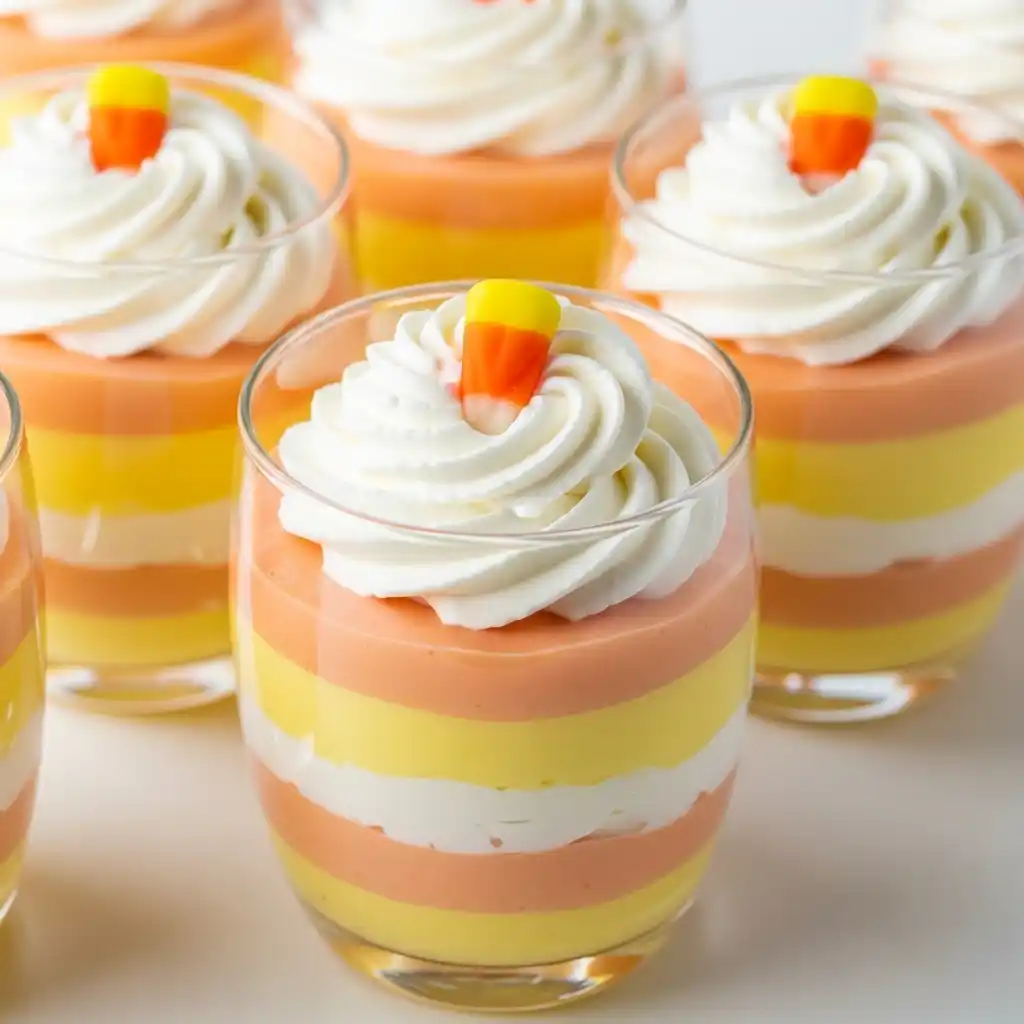
For shaping and color ratios, explore candy corn parfaits when you’re ready to add a showy, spoonable option to the table.
Quick Tray-Bake Cameo (Optional, Crowd-Size)
If you’re serving a large group and don’t mind a brief bake, M&M-studded bars are unbeatable for speed and travel. Slice into neat squares and they hold up for hours on a party table.
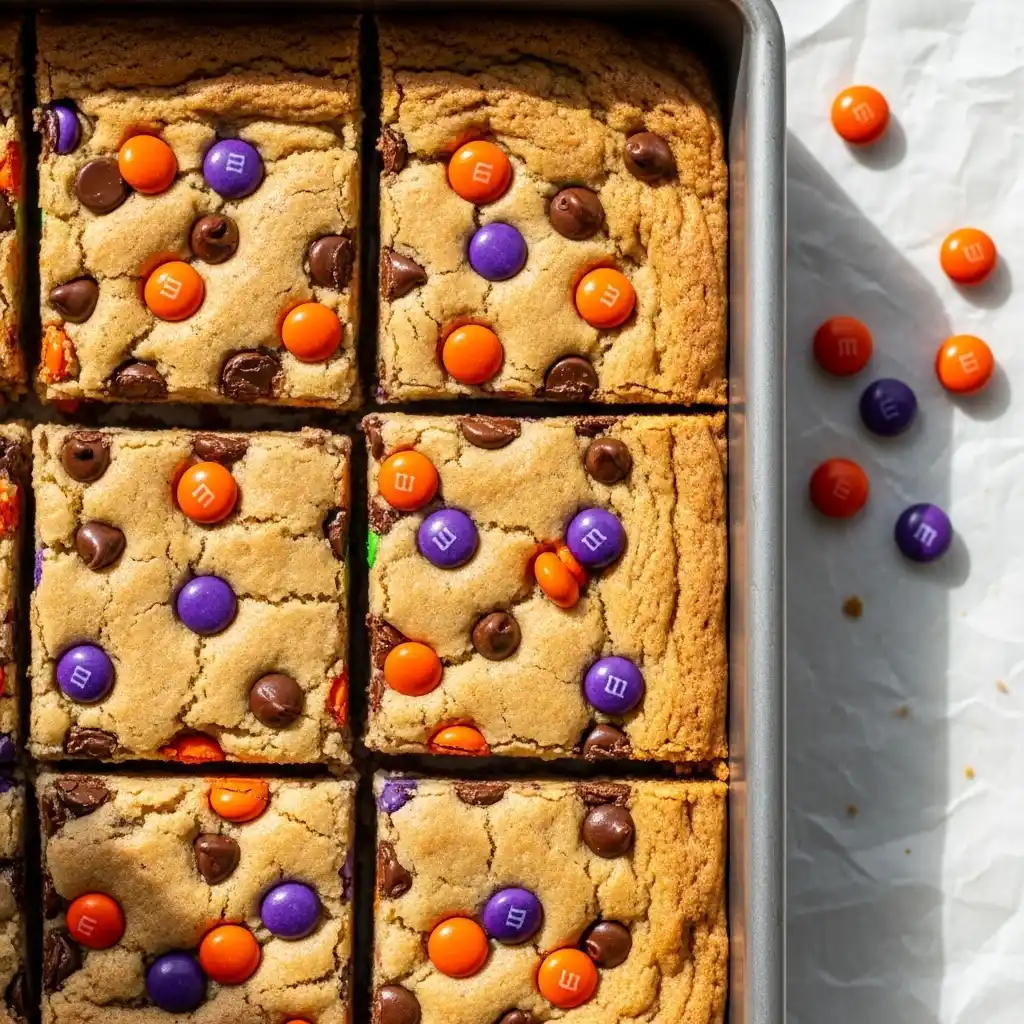
Full recipe: M&M Halloween Cookie Bars.
Non-Sweet Snack Ideas (Zero Oven, Crowd-Friendly)
Balance the sugar with no bake Halloween snacks that guests actually crave. Assemble a quick Halloween snack board with witch broom pretzels, jack o lantern hummus, and pumpkin deviled eggs Halloween style for protein and crunch. These kid-friendly Halloween treats (no candy required) round out your spread and keep everyone nibbling between desserts.
Jack-O’-Lantern Hummus Plate
Creamy, colorful, and done in five. Spread hummus over a dinner plate, smooth the top, and “carve” a face with veggies.
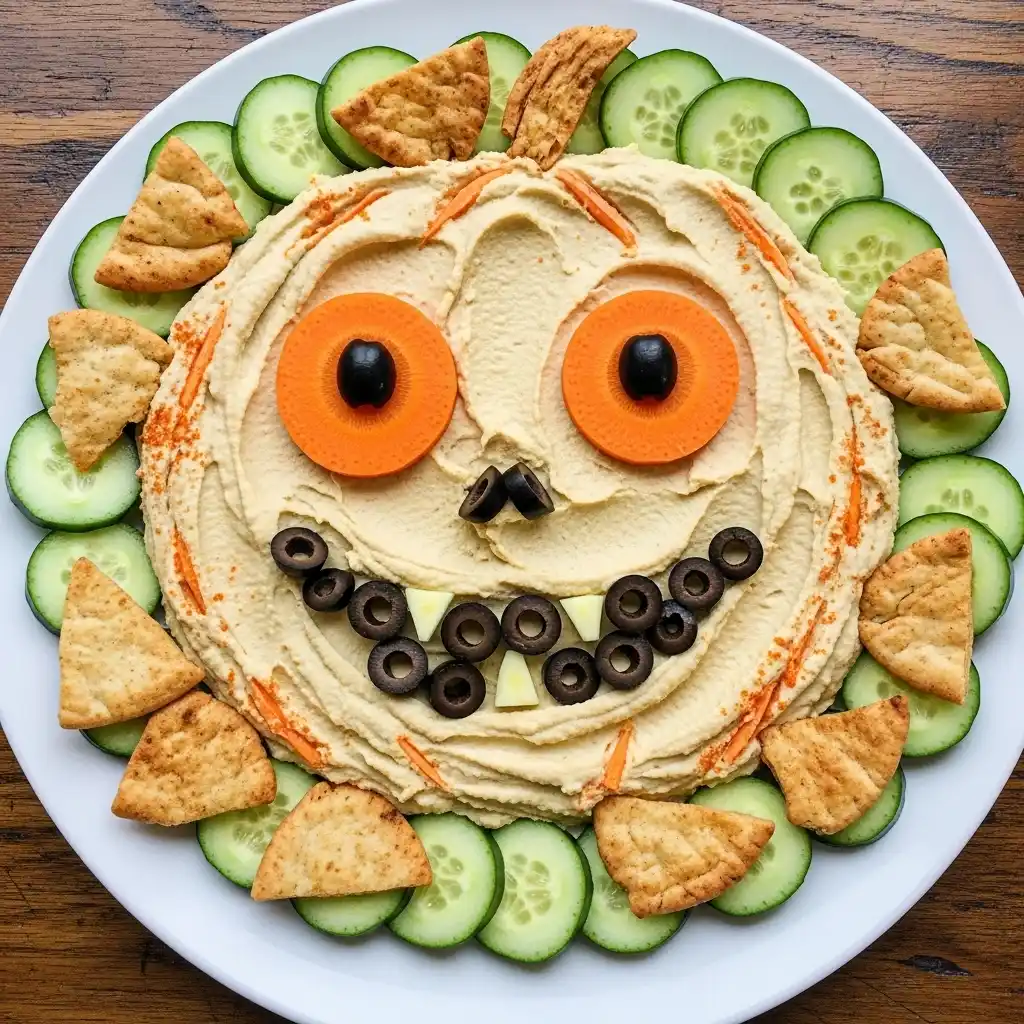
What you’ll need (serves 6–8): 1½–2 cups hummus, carrot coins/triangles, sliced black olives, mini bell peppers, pita chips and cucumbers for dipping
How it comes together:
- Smooth hummus into a round.
- Press in carrot triangles for eyes and nose; arrange olive slices for a smile.
- Ring with pita chips and cucumber sticks for scooping.
Smart tips: Dust with smoked paprika for a pumpkin tint; drizzle olive oil for shine. Building a bigger board? See sweet-and-savory layout cues in my Halloween snack spread here: you’ll find them inside Halloween Charcuterie Board Ideas.
Mummy Wrap Bites
All the “aww,” none of the oven. These pinwheels layer and slice clean for trays and lunchboxes.
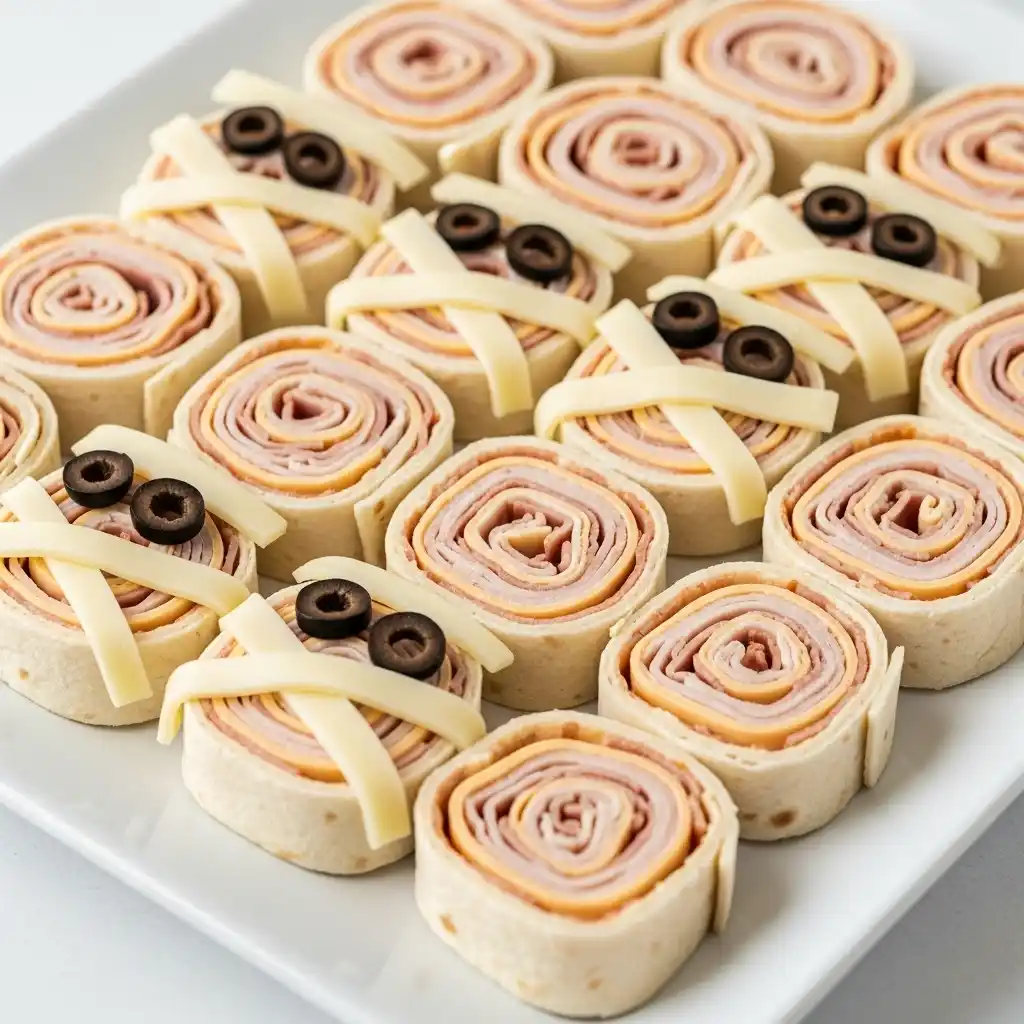
What you’ll need (makes ~20 slices): 4 large tortillas, 8 slices turkey or ham, 4 slices cheese, 4 tbsp mayo or hummus, 10 pitted olive slices (eyes), 2 cheese sticks (for “wrap” strips)
How it comes together:
- Spread tortillas with a thin layer of mayo/hummus.
- Layer meat and cheese; roll tightly into logs.
- Slice 1-inch rounds. Use thin cheese strips to “wrap” a few pieces; press in olive “eyes.”
Smart tips: Spinach tortillas make “ghouls.” Add a dab of mustard under each eye so they stay put. For on-the-go lunch trays, I share mini-format inspo inside Halloween Lunchbox Charcuterie Board.
Witch-Broom Pretzels
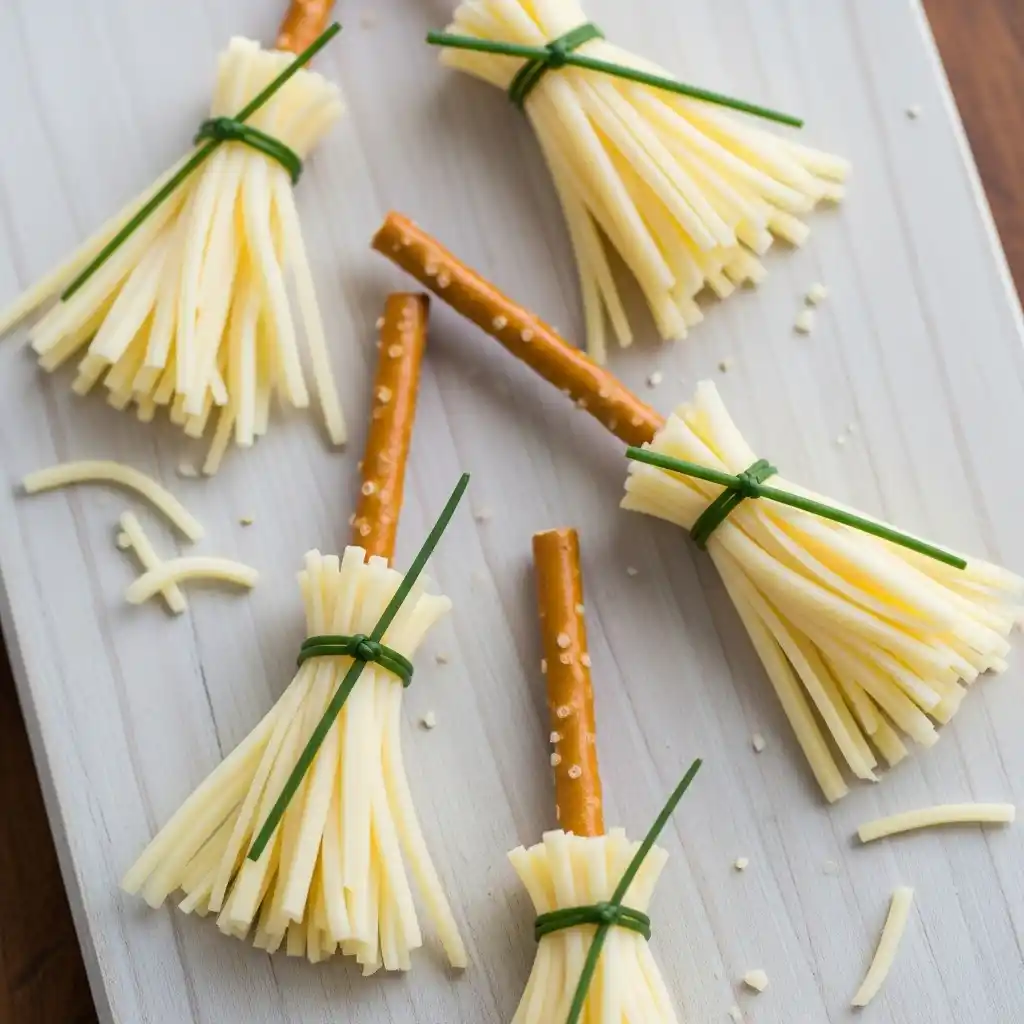
Three ingredients, instant smiles.
What you’ll need (makes 16): 8 string cheese sticks, 16 pretzel sticks, fresh chives (or thin scallion strips)
How it comes together:
- Cut each string cheese in half.
- Fringe one end with a paring knife; insert a pretzel stick in the non-fringed end.
- Tie a chive around the “broom.”
Smart tips: Pat cheese dry so the chive holds. Assemble close to serving. For morning platters or brunch boards, styling ideas live inside Halloween Breakfast Charcuterie Board.
Pumpkin Deviled Eggs
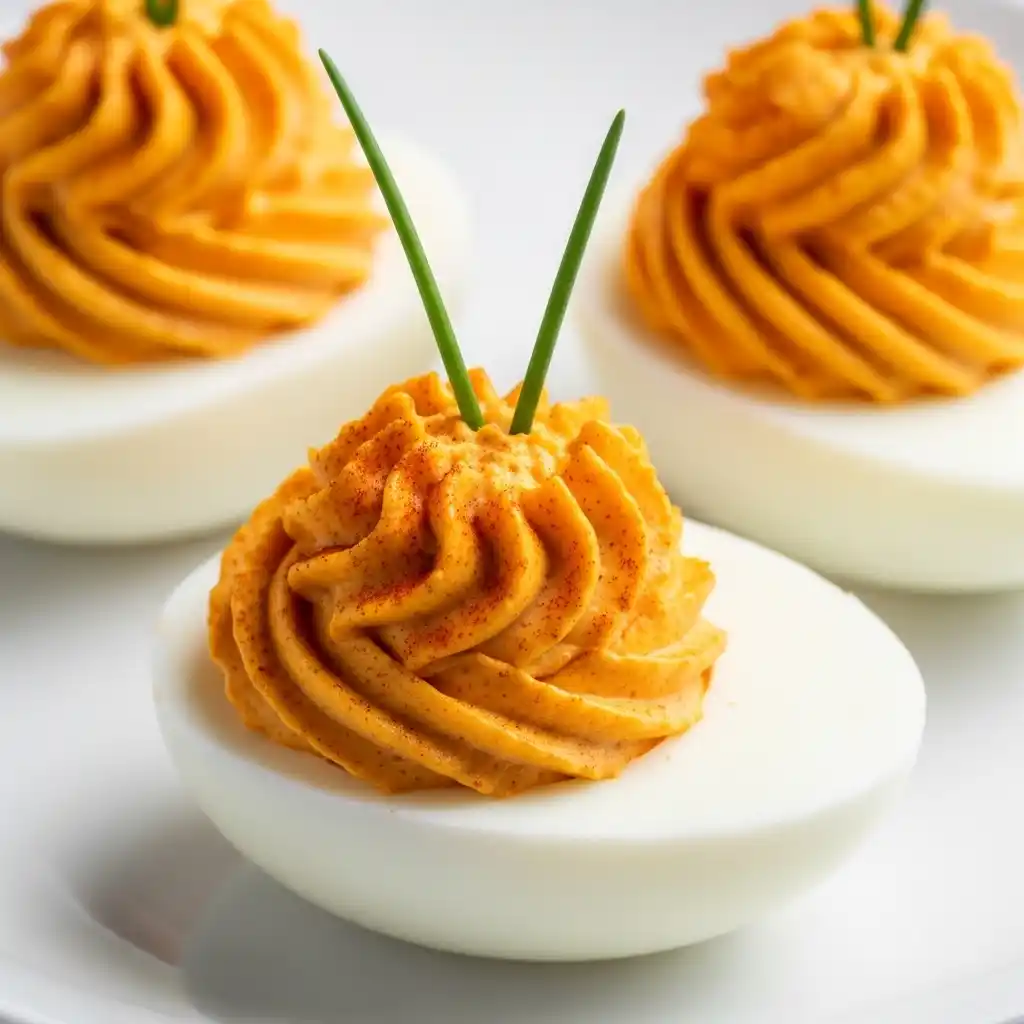
Savory, cute, and protein-forward.
What you’ll need (12 halves): 6 hard-boiled eggs, 3 tbsp mayo or Greek yogurt, 1 tsp mustard, salt/pepper, paprika, tiny chive bits (stems)
How it comes together:
- Halve eggs; mash yolks with mayo, mustard, and seasoning.
- Tint the filling with paprika to a soft pumpkin orange; pipe back in with a star tip.
- Drag a toothpick to create “ribs;” add a chive stem.
Smart tips: Keep well-chilled. For dinner-hour grazing (no stove), see arrangement ideas in Halloween Dinner Charcuterie Board.
15-Minute No-Bake Game Plan (Pro Tips)
When time is tight, process beats perfection. Here’s how to crank out three trays before guests arrive:
- Stage first: Line two sheet pans with parchment; set out melts, bowls of eyes/sprinkles, and tools (toothpicks, squeeze bottles).
- Melt smart: Microwave in 15–20 second bursts, stirring to glossy smooth. Split a big bowl into two smaller bowls so one stays warm while you decorate.
- Batch it: Dip everything in round one, decorate in round two, then chill 10–15 minutes. Rotate trays so something is always setting.
- Travel clean: Use shallow tins with parchment layers; keep cool packs under the tin (not on top) to avoid condensation.
- Label allergens: Mark nuts, gluten, and dairy; place a savory bowl between two sweet trays to reset palates.
- Display trick: Mix heights—cups at the back, flats in front, pops in a jar. A quick sprinkle “confetti” ties the whole table together.
FAQs
What is the best non candy Halloween treat?
Go for no bake halloween snacks that travel well and please most crowds: cheese “witch brooms,” hummus jack-o’-lantern plates, or fruit cups with silly faces. If you need a sweet add-on, small halloween marshmallow pops make it feel special without a big sugar bomb.
How to celebrate Halloween without candy?
Build a snack board, then add one or two easy halloween treats no bake for fun. A tray of crackers, cheese, veggies, and dips handles the nibbling, while mini cups of white chocolate halloween bark shards or a few oreo bat cookies no bake give a festive touch.
What is the most popular food for Halloween?
Bite-size, hand-held sweets win. Think no bake halloween desserts like white chocolate halloween treats, simple bark trays, and quick halloween marshmallow pops. They look festive, set fast, and move easily at parties.
What are non sweet Halloween snacks?
Savory boards and protein-forward bites shine here: charcuterie minis, deviled “pumpkins,” or veggie monsters. Pair them with just one sweet (such as white chocolate halloween bark) so you satisfy both camps without overdoing sugar.
What is the top 10 best Halloween candy?
Lists change by year, but chocolate bars and peanut-butter cups usually lead. If you’d rather lean homemade, skip heavy candy bowls and serve approachable no bake halloween desserts alongside a small mixed candy dish.
What do you give for a trick or treat?
Pre-pack simple no bake halloween snacks in clear bags (pretzel rods, popcorn mixes) or hand out tiny halloween marshmallow pops. Add a non-food choice (glow sticks, stickers) so every kid gets something they enjoy.
Conclusion
You don’t need an oven to make October feel special—you just need a smart mix of textures and color. Lead with oreo bat cookies no bake for crunch and charm, anchor the tray with a pan of white chocolate halloween bark, and add halloween marshmallow pops so helpers can decorate. That trio covers the sweet tooth while leaving room for no bake halloween snacks like cheese “brooms” or a quick hummus face for balance.
When time is tight, reach for easy halloween treats no bake and keep candy melts, eyes, sprinkles, and parchment in a small “party box.” In 15–20 minutes you’ll have no bake halloween desserts that look polished, travel well, and disappear fast. If guests ask for one more bite, finish the night with a few extra white chocolate halloween treats—simple, shiny, and always a hit.