Fall’s Favorite Flavors in Every Bite
There’s something magical about fall — the crisp air, cozy sweaters, and of course, the irresistible combo of caramel and apples. If you’re looking for a quick, no-bake dessert that wraps up all that autumn warmth into a sweet, creamy treat, look no further than Caramel Apple Dessert Cups.
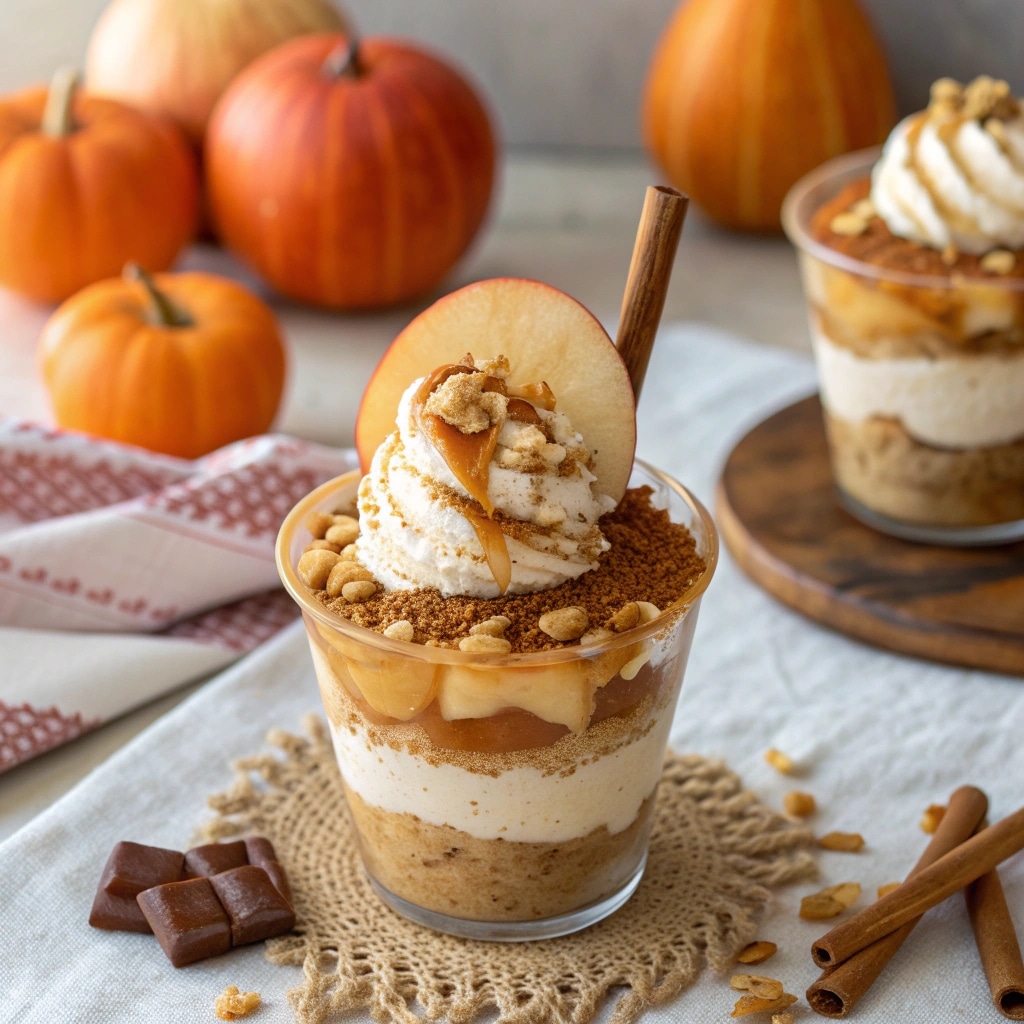
Perfect for potlucks, parties, or just a little seasonal indulgence, these individual dessert cups layer buttery vanilla wafer crusts, silky caramel mousse, and tender cinnamon-spiced apples. No oven, no fuss — just layered comfort in every spoonful.

Whether you’re a seasoned baker or just want an easy fall dessert to impress your guests, these caramel apple mini trifles are a go-to. Plus, they’re make-ahead friendly, beautifully portable, and totally customizable.
Table of Contents
Why Caramel Apple Dessert Cups Are a Must-Try
The Ideal No-Bake Fall Dessert for Any Occasion
Let’s be honest — nobody wants to deal with baking trays and oven timers during a busy holiday. That’s where Caramel Apple Dessert Cups shine. They’re easy to prep, beautiful to serve, and satisfying enough to replace any baked pie on your fall dessert table.
Why they work:
- Sweet + tart flavor from fresh cinnamon apples
- Creamy salted caramel mousse with no cooking required
- Perfect individual servings for crowds, potlucks, and meal prep
- Ready in under 30 minutes (plus chilling!)
From Thanksgiving dessert boards to casual family dinners, these no-bake cups are the fuss-free fall dessert you’ll return to again and again.
Caramel + Apple = The Flavor Match Made for Fall
Caramel and apples have been paired together for generations — and for good reason. The rich, buttery sweetness of caramel perfectly balances the crisp, slightly tart flavor of apples, creating a flavor combo that’s timeless yet elevated.
Think of these cups as your grown-up caramel apple moment — soft, spoonable, and utterly luxurious.
Love single-serve fall treats? Try our No Bake Pumpkin Cheesecake Cups next.
Print
Caramel Apple Dessert Cups
- Total Time: 2 hours 35 minutes
- Yield: 28 mini cups 1x
- Diet: Vegetarian
Description
These creamy, crunchy, no-bake caramel apple dessert cups are a dreamy fall treat layered with cinnamon apples, salted caramel mousse, and a vanilla wafer crust. Perfect for entertaining, holidays, or just a cozy indulgence, they’re easy to prep and always impress.
Ingredients
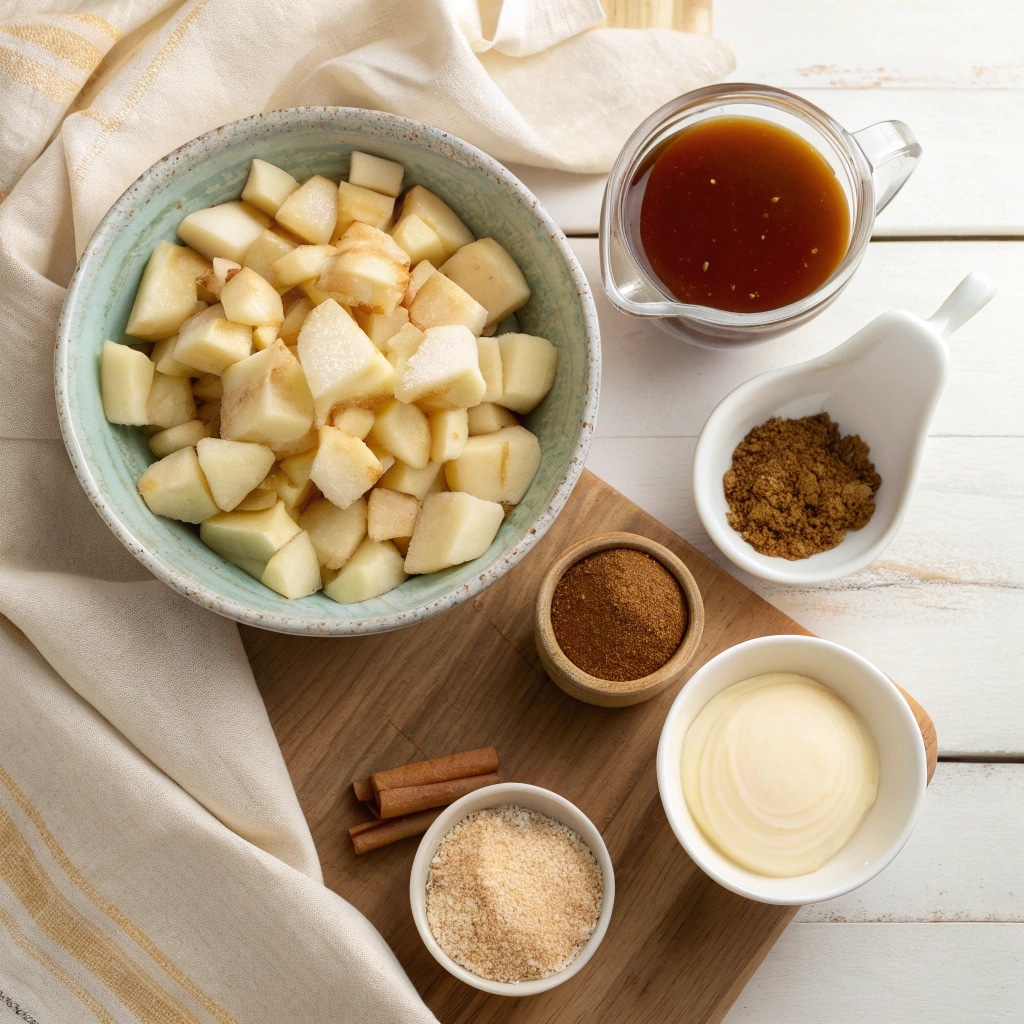
Cinnamon Apple Layer
- 4 cups (500 g) apples, peeled and chopped (Granny Smith or Honeycrisp recommended)
- ½ cup (110 g) light brown sugar
- 1 tsp (2 g) cinnamon
Vanilla Wafer Crust
- 2 cups (220 g) vanilla wafer crumbs
- ¼ cup (57 g) salted or unsalted butter, melted
Salted Caramel Mousse
- 1 package (96 g) instant vanilla pudding mix (3.4 oz)
- 1 cup (244 g) milk
- ⅓ cup (75 g) salted caramel sauce (homemade or store-bought)
- 1½ cups (357 g) heavy cream
Garnish (Optional)
- Additional caramel sauce for drizzling
- Crushed cookies or whipped topping
Instructions
- Cook Cinnamon Apples
In a medium saucepan, combine peeled, chopped apples, brown sugar, and cinnamon. Stir and cook over medium heat for 8–10 minutes until apples are softened and mixture thickens. Set aside to cool completely. - Make the Crust Layer
In a bowl, mix vanilla wafer crumbs and melted butter until well combined. Divide evenly into 28 two-ounce plastic cups and press firmly to create a crust base. - Prepare Salted Caramel Mousse
In a large mixing bowl, whisk vanilla pudding mix with milk. Let sit for 5 minutes. Add salted caramel sauce and mix using an electric mixer until smooth. Pour in heavy cream and whip for 3–5 minutes until thick and fluffy. - Layer & Chill
Transfer mousse into a piping bag and pipe over each crust layer. Spoon cooled cinnamon apples on top of the mousse. Drizzle with extra caramel if desired. Seal with lids and refrigerate for at least 2 hours, or up to 3 days.
Notes
- For an extra treat, stir chopped Snickers into the mousse or apple layer for a twist on caramel apple dessert with Snickers.
- For shooters or party platters, use small plastic shot glasses to make caramel apple dessert shooters.
- Make sure the apples cool fully before layering to avoid melting the mousse.
- Prep Time: 25 minutes
- Chill Time: 2 hours
- Cook Time: 10 minutes
- Category: Dessert
- Method: No Bake
- Cuisine: American
Nutrition
- Serving Size: 1 cup
- Calories: 143 kcal
- Sugar: 13 g
- Sodium: 84 mg
- Fat: 8 g
- Carbohydrates: 18 g
- Fiber: 1 g
- Protein: 1 g
- Cholesterol: 20 mg
Ingredients You’ll Need for Easy Caramel Apple Dessert Cups
Caramel Apple Dessert Cups may look elegant and impressive, but the ingredient list is refreshingly simple. Each layer adds flavor and texture — from the buttery base to the spiced apples and cloud-like caramel mousse. Here’s everything you need to bring this sweet fall dessert to life.
Apple-Cinnamon Compote
The apple layer gives these cups their cozy, familiar flavor. When cooked down with brown sugar and cinnamon, the apples become tender, syrupy, and slightly tangy — the perfect match for the sweet caramel.
You’ll need:
- 4 cups apples, peeled and chopped (about 4–5 medium apples)
- ½ cup light brown sugar
- 1 tsp ground cinnamon
For best results, choose apple varieties that hold their shape when cooked. Granny Smith adds a bright tartness, while Honeycrisp and Fuji offer natural sweetness. You can even mix a few for a balanced flavor.
Many readers wonder: What kind of apples does Chick-fil-A use in their fruit cup? The answer is mostly Fuji and red apples — both perfect options here if you like a softer texture.
Simply peel, chop, and simmer your apples with sugar and cinnamon until they’re soft but not mushy. Let the compote cool completely before layering into your dessert cups.
Vanilla Wafer Crust
This crust is pure simplicity — and it doesn’t require any baking. Vanilla wafers give a buttery, mildly sweet crunch that sets the stage for the creamy layers to come.
You’ll need:
- 2 cups vanilla wafer crumbs
- ¼ cup melted butter (salted or unsalted)
Combine and press into the bottom of small 2 oz plastic dessert cups. You can use a cookie scoop for even portions and the bottom of another cup to flatten the crust for clean, consistent results.
This layer acts like the base of a no-bake cheesecake — giving each spoonful a delicious buttery bite that complements the caramel and apples.
Salted Caramel Mousse Layer
The star of the show is this ultra-luxurious mousse. Made from instant vanilla pudding, whipped cream, and real caramel sauce, it’s light, creamy, and totally irresistible.
You’ll need:
- 1 (3.4 oz) package instant vanilla pudding
- 1 cup cold milk
- ⅓ cup salted caramel sauce (homemade or store-bought)
- 1 ½ cups heavy cream
Start by making the pudding base, then whip in the caramel. Finally, fold in whipped cream or beat until thick and fluffy for a mousse-like consistency. This salted caramel layer balances out the tangy apples with its velvety sweetness.
Wondering how to make an apple crumble or what makes the best mousse texture? It’s all in the layering — and this combination is smooth and light without being overly rich.
Looking for something similar? These Salted Caramel Apple Crumble Bars are a more rustic cousin to these elegant cups.
How to Assemble Caramel Apple Dessert Cups
Assembling these Caramel Apple Dessert Cups is the most rewarding part of the process — the layers come together to create a visually stunning and crave-worthy dessert. Each spoonful offers the perfect mix of textures and fall-inspired flavor. Here’s exactly how to do it.
Step 1 – Cook Cinnamon Apples
Start by peeling and chopping about 4 cups of apples. Simmer them in a saucepan with ½ cup brown sugar and 1 teaspoon cinnamon over medium heat. Stir often until the apples are fork-tender and the sauce has thickened to a syrupy glaze.

Let the cinnamon apples cool completely. This step is essential — warm fruit will melt your mousse and ruin the clean layered look of your caramel apple dessert cups.
This method also works beautifully in other easy caramel apple dessert recipes. You could spoon these apples over ice cream, pancakes, or even into a caramel apple dessert dip for parties.
Step 2 – Make the Vanilla Wafer Crust
While your apples cool, prepare the no-bake crust. Mix 2 cups of vanilla wafer crumbs with ¼ cup of melted butter until fully combined. The texture should resemble wet sand — it will hold together when pressed.
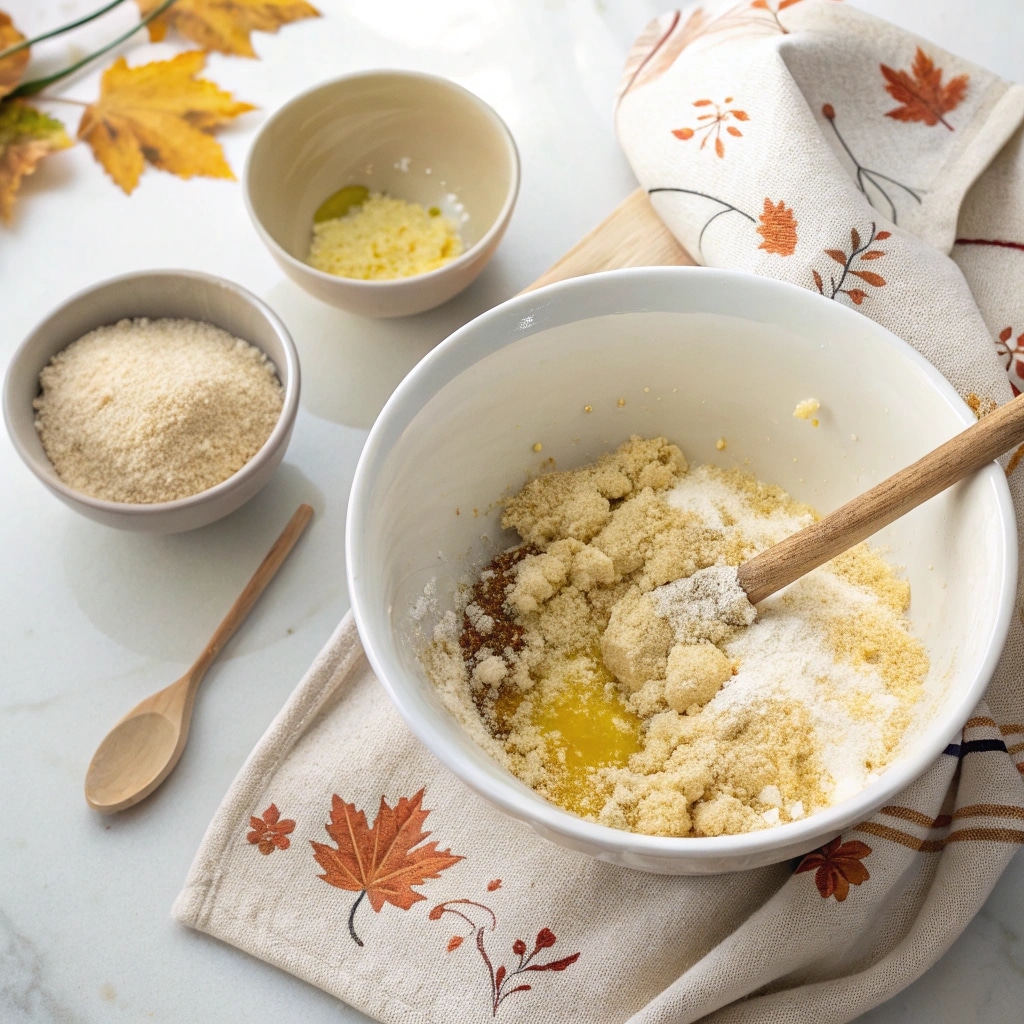
Scoop about 1–1.5 tablespoons of the crumb mixture into each dessert cup. Use the bottom of a second cup or the back of a spoon to press the crust firmly into the bottom.
This simple base gives you that cheesecake-style bite in each cup — buttery, crumbly, and perfectly sweet. It’s a nostalgic nod to graham cracker crusts, but the vanilla wafer brings something smoother and more delicate.
Step 3 – Prepare the Salted Caramel Mousse
In a large mixing bowl, whisk together 1 package (3.4 oz) of instant vanilla pudding mix with 1 cup of cold milk until thickened — about 2–3 minutes.
Next, blend in ⅓ cup of salted caramel sauce until the pudding is evenly golden and smooth. For added flavor, use homemade salted caramel — but store-bought works perfectly too.
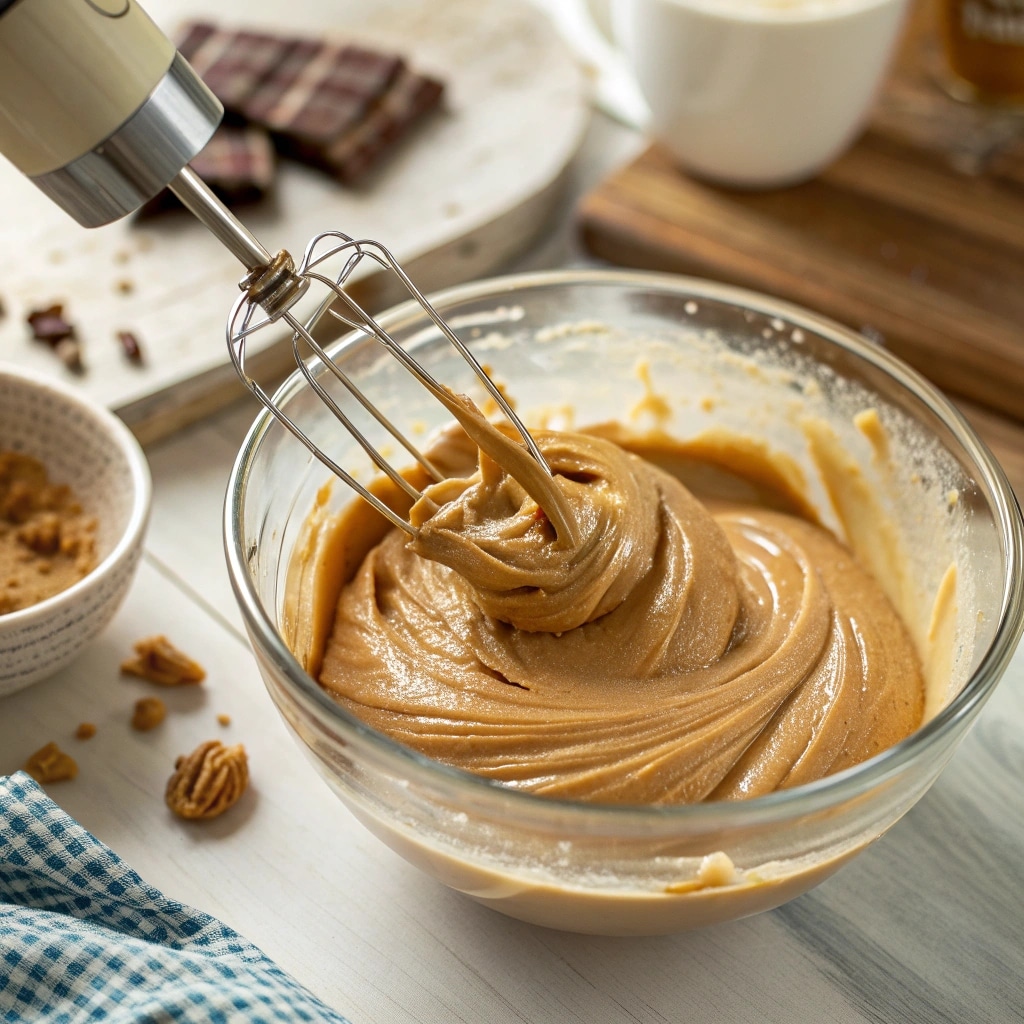
Pour in 1½ cups of cold heavy cream, and beat with an electric hand mixer until light, airy, and mousse-like. The texture should be thick enough to hold shape when piped but still soft and creamy.
This mousse is the soul of these salted caramel apple dessert cups — the sweet caramel richness balances the tart apples, creating a luxurious spoonable treat.
This layer also shares similarities with other recipes for individual dessert cups, like no-bake cheesecakes and layered mousse parfaits.
Step 4 – Layer and Chill
Now it’s time to build your dessert cups:
- Add the crust – scoop and press into each cup.
- Pipe in the mousse – use a large piping bag for a clean, professional look. Fill about ⅔ of the cup.
- Top with cinnamon apples – spoon a heaping tablespoon on top of the mousse.
- Drizzle with extra caramel sauce – for an elegant, glossy finish.
Cover each cup with a lid or plastic wrap and refrigerate for at least 2 hours before serving. This allows the mousse to set and the flavors to meld beautifully.
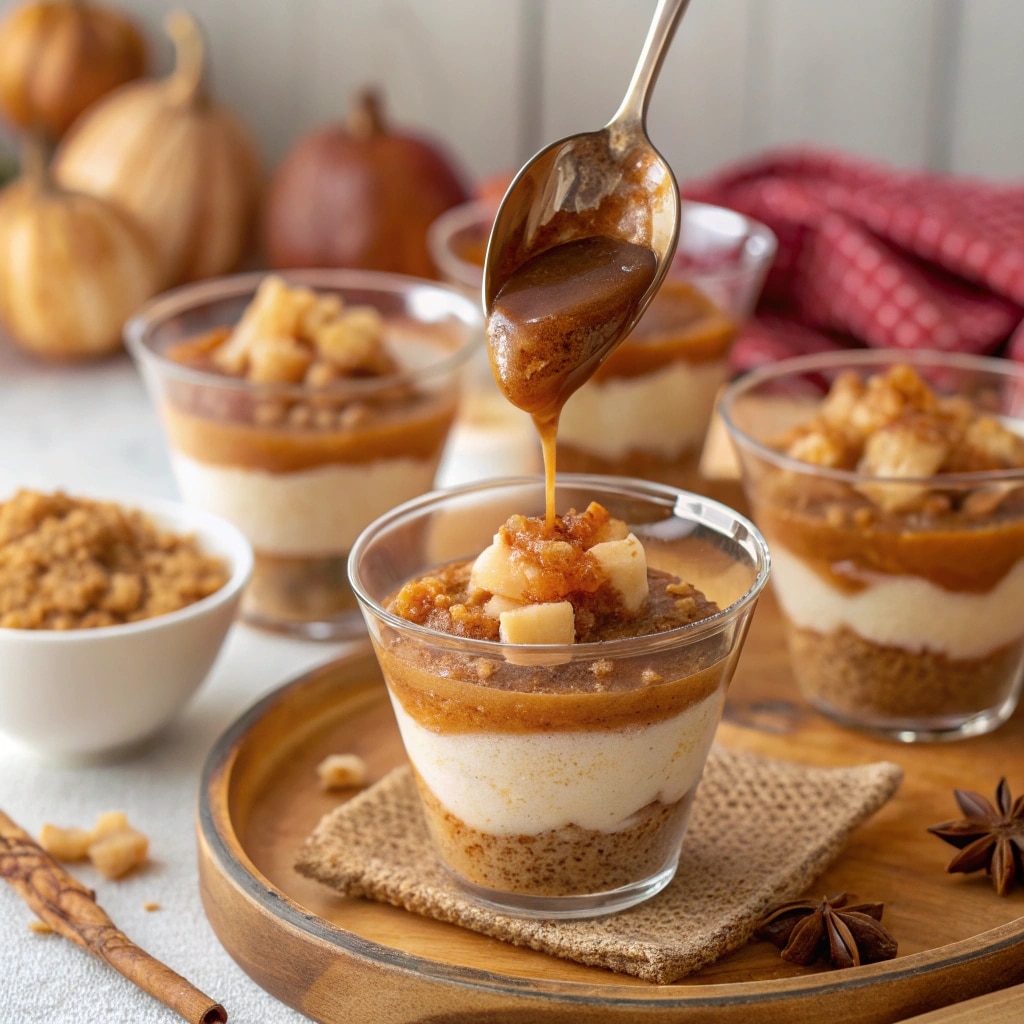
These easy caramel apple dessert cups are a great make-ahead option for parties, potlucks, or just a cozy weekend indulgence. The individual serving size makes them ideal for everything from Thanksgiving to baby showers.
Looking for another no-bake crowd favorite? Try these White Chocolate Haystacks for a similar mix of ease and visual appeal.
Make It Your Own – Fun Variations
One of the greatest things about caramel apple dessert cups is how simple they are to customize. Whether you’re hosting an autumn gathering or just want a quick treat that feels special, these variations will help you get creative in the kitchen while staying true to that sweet-tart caramel apple flavor combo everyone loves.
Easy Caramel Apple Dessert Variations
Let’s start with flavor twists that take your base recipe and make it even more indulgent, nostalgic, or playful.
Caramel Apple Dessert with Snickers
If you love a mix of sweet, salty, and nutty, try chopping up mini Snickers bars and layering them over the cinnamon apple filling. It turns your cups into a caramel apple dessert with Snickers that’s chewy, crunchy, and impossible to resist. This version is always a hit with teens and adults alike at fall gatherings or game-day spreads.
Graham Cracker or Gingersnap Crust
Swap the vanilla wafer base for crushed graham crackers or even gingersnaps. Both options create a deeper flavor base — graham for that classic cheesecake vibe, and gingersnap for a spicy, festive twist that works especially well around Thanksgiving. These changes still keep your recipe in the easy, no-bake zone.
Apple Crisp Inspired Topping
Instead of spooning cinnamon apples on top, you can bake up a quick apple crisp topping with oats, cinnamon, brown sugar, and butter. Sprinkle this crispy mixture over your caramel mousse layer for a salted caramel apple dessert cup that’s soft, crunchy, and full of fall comfort.
Mini & Shooter Cup Options
If you’re hosting a larger event or creating a fall-themed dessert table, consider making caramel apple dessert shooters. Just use smaller 1–2 ounce shot glasses instead of full-size cups. You’ll stretch your batch further and create a beautiful, bite-sized dessert that’s perfect for buffet displays, weddings, or open houses.
Top each shooter with a whipped cream swirl and mini pretzel for a playful crunch. These look especially charming on rustic wood trays or tiered displays.
This format is similar to the idea behind the Pear Gingerbread Dessert Cups — individual, seasonal desserts that are both convenient and visually impressive.
Serving Tips + Storage
After crafting your delicious caramel apple dessert cups, it’s time to serve and store them like a pro. Whether you’re making them ahead for a holiday or prepping a quick weekday indulgence, these tips ensure they look as good as they taste.
Serving Caramel Apple Cups
These no-bake desserts are best enjoyed chilled, especially when the mousse has had time to firm up and the flavors meld together. If you’re hosting, take them out of the fridge about 5–10 minutes before serving so the caramel layer softens slightly for that dreamy, spoonable texture.
For presentation:
- Top with a drizzle of caramel sauce just before serving. This enhances both the visual appeal and that salted caramel flavor hit.
- Add a dollop of whipped cream and a sprinkle of crushed vanilla wafers or cinnamon for a pretty finish.
- Garnish with a thin apple slice or cinnamon stick for a rustic fall vibe.
Want to elevate it even more? Serve them alongside other fall favorites like Pumpkin Rice Krispie Treats for a fully themed dessert board that’ll impress at any gathering.
These apple dessert cups recipes are also great for DIY dessert bars—just set out the mousse, cooked apples, toppings, and crust base separately and let guests build their own personalized parfait.
Storage & Make-Ahead Tips
Caramel apple dessert cups are the perfect make-ahead treat. They actually taste better after a few hours in the fridge, allowing the layers to set and the flavors to deepen.
Here’s how to store them:
- Refrigerator: Store tightly covered or sealed with lids for up to 3 days. They’re ideal for prepping a day before your event.
- Freezer (optional): While the texture of whipped mousse may change slightly after freezing, you can freeze the cinnamon apple compote separately. Let it cool fully, place it in a freezer-safe container, and store for up to 2 months. Just thaw in the fridge before using.
If you’re making a double batch, use disposable plastic cups with lids—great for stacking and storing.
Wondering about apple prep ahead of time? Yes, you can freeze apples for later use, especially for cooking purposes. Peel and chop them, toss with a little lemon juice to prevent browning, then freeze in airtight bags.
For more grab-and-go fall snacking, check out the Caramel Apple Snack Mix, another seasonal favorite that travels well and delivers big flavor.
FAQs About Caramel Apple Dessert Cups
What dessert can you make with eating apples?
Eating apples, like Honeycrisp, Fuji, Gala, and Pink Lady, are excellent for caramel apple desserts because they hold their shape and provide a sweet-tart balance. When used in apple dessert cups recipes, these varieties create a texture contrast that pairs beautifully with creamy caramel mousse and crunchy vanilla crust.
Other easy caramel apple desserts you can make with eating apples include:
Salted caramel apple dessert cups
Caramel apple dessert dip for parties
Mini caramel apple shooters layered in small plastic cups
How many apples do I need for 4 cups?
You’ll typically need 3 to 4 medium-sized apples to yield 4 cups once they are peeled, cored, and chopped. For best results in your caramel apple dessert cups, measure the apples after chopping to ensure accuracy.
TIP: A digital kitchen scale can help if you want to go by weight—500 grams is just about right for this recipe.
What kind of apples does Chick-fil-A use in their fruit cup?
Chick-fil-A uses red and green apple varieties in their fruit cups, typically a mix of Gala and Granny Smith for a perfect balance of sweetness and tartness. You can recreate that harmony in your salted caramel apple dessert cups by mixing sweet apples like Fuji with a tart variety like Granny Smith.
This combo ensures that each bite of your layered dessert is bursting with depth and contrast—exactly what makes caramel apple dessert shooters and cups so irresistible.
How to make an apple crumble?
Though not the same as this no-bake dessert, apple crumble involves baking chopped apples under a mixture of butter, flour, oats, and sugar until golden. If you love the texture of baked crumbles but want an easier prep, you can top your apple dessert cups with crumble topping instead of cooked apples for a creative twist.
That gives your easy caramel apple dessert a cozy, rustic vibe without the oven.
Should you peel apples for apple crisp?
Yes, peeling apples is typically recommended for apple crisp and also for caramel apple dessert cups, especially since the skin can become chewy or tough when cooked. Peeled apples offer a smoother texture that blends seamlessly into the silky mousse and layered crust.
That being said, if you’re making caramel apple dessert dip or prefer a more rustic look, you can leave the skins on—just chop them finely for easier eating.
Can you freeze apples for later use?
Absolutely! Freezing apples is a great way to prep ahead for fall desserts.
Here’s how to do it:
Peel and chop apples.
Toss with a little lemon juice to prevent browning.
Place in freezer bags or containers, remove excess air, and freeze for up to 2 months.
When you’re ready to make your salted caramel apple dessert cups, simply thaw the apples in the fridge and cook them into your cinnamon compote as normal.
Final Thoughts: Why You’ll Fall in Love with These Dessert Cups
There’s something timeless and comforting about the flavors of caramel apple dessert cups. The creamy mousse, buttery vanilla crust, and tender cinnamon apples come together in a layered treat that’s both nostalgic and refreshingly modern. If you’re someone who grew up enjoying baked apple pies or warm crisps, this no-bake option feels like a convenient nod to tradition—without the hassle of the oven.
What makes these salted caramel apple dessert cups a favorite, especially for busy women looking for quick yet elegant dessert ideas, is their versatility. Whether you’re serving them at Thanksgiving, taking them to a potluck, or preparing a fun caramel apple dessert shooter platter for a fall gathering, they look impressive and taste like something straight from a bakery.
Here’s a quick recap of why they shine:
- Sweet and tart apple compote provides the perfect contrast to the creamy caramel mousse
- No bake = no stress – ready in under 30 minutes plus chilling time
- Individual servings make them easy to transport, serve, and store
- The recipe is adaptable for dietary needs and flavor preferences
- Great way to use up seasonal apples, even leftovers
These little cups of joy prove that you don’t need to spend hours baking to create something special. With just a few pantry staples and fresh apples, you’re minutes away from a dessert that’s creamy, crunchy, comforting—and absolutely crave-worthy.
So go ahead—pin it, print it, or prep it this weekend with your favorite apple variety. You might just find yourself making these easy caramel apple desserts on repeat all season long.