Class parties have a way of arriving without warning, which is exactly why halloween class party treats need to be fast, tidy, and teacher-friendly. One Friday, a note surfaced at breakfast: “Treats due today.” We pulled out candy melts, sprinkles, candy eyes, pretzels, parchment, and sandwich cookies, then set up a small assembly line. Thirty minutes later, a bin of individually wrapped halloween treats was ready—cute enough for kids, organized enough for the teacher, and simple to share. That’s the goal here: easy halloween treats no bake that you can portion, label, and transport without stress, plus smart tips for allergies and storage so your no bake halloween snacks for class are always welcome.

Table of Contents
The classroom rules that actually matter
These basics decide whether your halloween class party treats get served quickly or held back at the teacher’s desk.
1) Packaging that keeps hands clean (and teachers happy)
- 4 × 6 in treat bags: ideal for 1–2 cookies, bark shards, monster bites, or mini Krispie squares.
- 3 × 8 in pop sleeves: perfect for pretzel rods and pops; they protect decorations and keep desks neat.
- 2–4 oz lidded cups: best for pudding cups, snack mixes, fruit cups, or 1–2 truffles (no smushing).
- Fast finish: clear tape on the back seam + a small circle label on the front; ribbon only if you have time.
Portion guide (24–30 students):
- Pops/rods: 1 per child (+3–5 extra).
- Bark: 1–2 small pieces per child (about 1.5–2 in).
- Small cookies/bites: 2 per child.
- Cups: 1 per child with a wrapped spoon.
2) Labels that answer questions before they’re asked
Clear labels speed up hand-outs and give staff confidence.
Simple label template:
- Name: Pumpkin Patch Bark
- Ingredients (parent list): white chocolate coating, cookie crumbs (wheat), seasonal sprinkles
- Contains: dairy, soy, wheat
- Made: Oct 26
Pro tips:
- Snap photos of packaging (melts, sprinkles, cookies) before tossing—instant reference if the teacher asks.
- If you used GF pretzels or dairy-free coating, add a small note (“GF pretzels,” “DF coating”) on the label.
3) Allergy basics (make it safe without losing the fun)
Many classrooms require or prefer nut free halloween treats for school. You can still deliver delicious.
- Nuts: swap peanut butter for sunflower seed butter; use seed mixes (sunflower, pumpkin) instead of nut mixes.
- Gluten: choose labeled GF pretzels/crackers; check cookie brands if you’re crushing “dirt” or bark toppings.
- Dairy: pick dairy-free “white-style” coating; keep fillings light if rooms run warm.
- Sesame: note “contains sesame” if using hummus or seed mixes.
- Food dyes: use gel colors or naturally tinted sprinkles; bright but not heavy on hands.
Quick checklist for nut-aware trays: GF pretzels, seed butter (SunButter-style), seed mixes, DF coating if needed, dye-light sprinkles.
4) Transport & storage (how to keep everything picture-perfect)
These habits turn cute ideas into truly travel friendly halloween desserts:
- Set, then bag: let coatings set fully (10–20 minutes chilled) before packaging.
- Parchment layers: place sheets between rows in the bin so treats don’t stick or slide.
- Cool packs UNDER the bin: keeps the base cool without condensation on top.
- Flat ride: trunk or footwell, not a sloped seat.
- At school: give the teacher two containers—one for the class set, one small bag/plate for staff—so headcounts stay clean.
5) A 60-minute plan (night before or morning of)
- 00:00–00:10 Set up: parchment trays, bowls of melts/sprinkles/eyes, bags, labels, tape.
- 00:10–00:30 Dip or assemble item #1 (rods or pops); tray and chill.
- 00:30–00:40 Make a second quick item (bark or mini bites); tray and chill.
- 00:40–00:55 Bag the first tray while the second sets; label as you go.
- 00:55–01:00 Load bins, add spoons/napkins, snap packaging photos, go.
6) Your small “party box” (keep it ready all October)
Candy melts (white + one color), candy eyes, seasonal sprinkles, pretzel rods, sandwich cookies, pop sleeves, 4 × 6 bags, mini cups with lids, parchment sheets, squeeze bottles or zip bags for drizzle, sharpie + circle stickers, offset spatula, two cooling racks.
Cookie Builds That Bag Beautifully (No Oven, High Yield)
Cookie builds are the fastest way to make no bake halloween snacks for class that look festive, portion cleanly, and pack in minutes. This set gives you one internal recipe to follow step-by-step (used once only) plus two deeply detailed mini-recipes you can execute with pantry staples. Every item includes yield, timing, packaging sizes, allergy notes, and storage windows—so your individually wrapped halloween treats are truly classroom-ready and travel friendly halloween desserts.
1) No-Bake Oreo Bat Cookies
Crisp, chocolatey, and irresistibly cute—ideal easy halloween treats no bake when the class note arrives the morning of. You’ll assemble in batches, chill briefly, then bag one bat per child for tidy hand-outs.
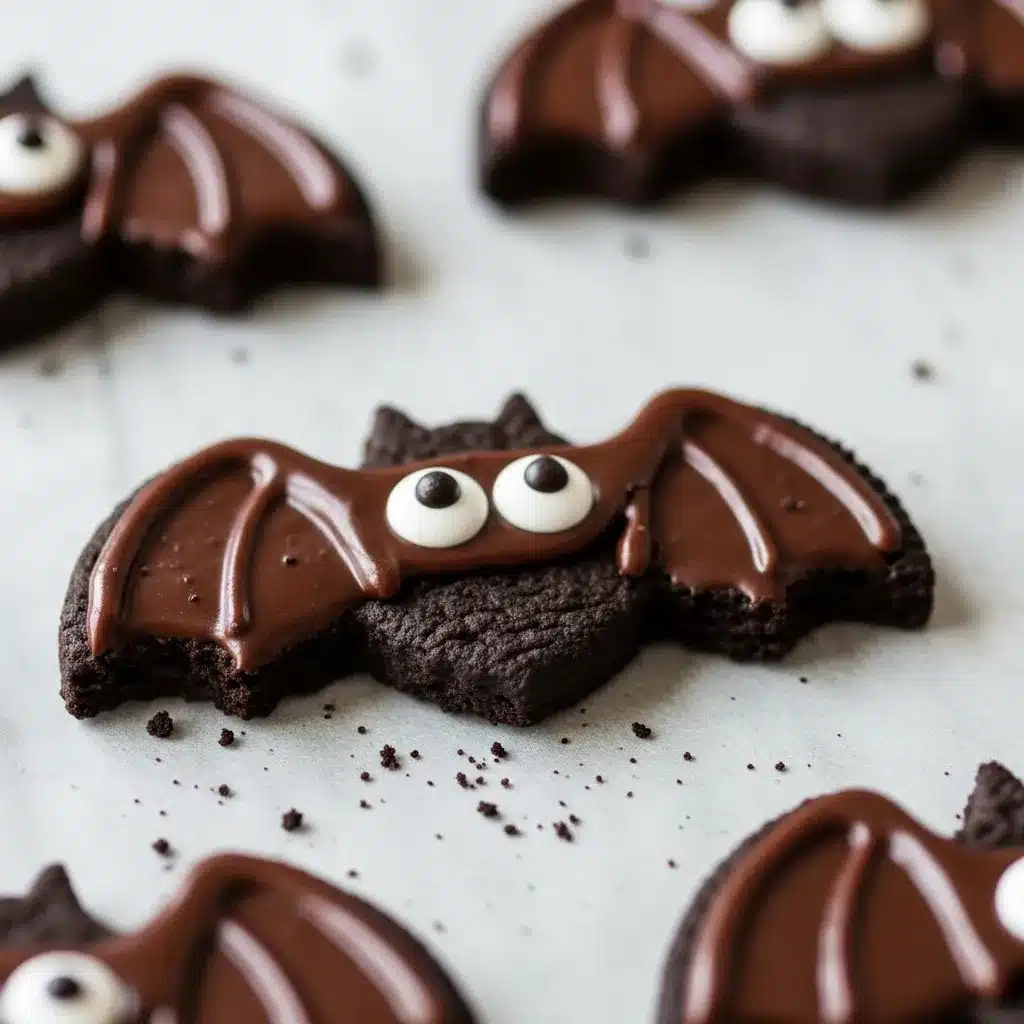
- Yield & Timing: 24 bats in ~25 minutes (working in two 12-cookie batches).
- Classroom Packaging: 1 bat per 4×6 in clear treat bag; seal with tape + small circle label.
- Transport: Single layer on parchment in a shallow bin; cool pack under the bin if your drive is warm.
- Allergy Notes: Contains wheat/soy/dairy (check coating + cookie brand). For GF classes, use GF sandwich cookies; for dairy-free, use a dairy-free coating.
Full walkthrough (once only): No-Bake Oreo Bat Cookies
Teacher tip: Count out your bagged bats into sets of 25 (24 kids + 1 for teacher). This keeps headcount and distribution simple.
2) Oreo Spider Bites
These look elaborate but fly together fast—creamy cookie center, crunchy pretzel “legs,” and a tiny sprinkle pop. They’re perfect no bake halloween snacks for class because they stack neatly and bag in seconds.
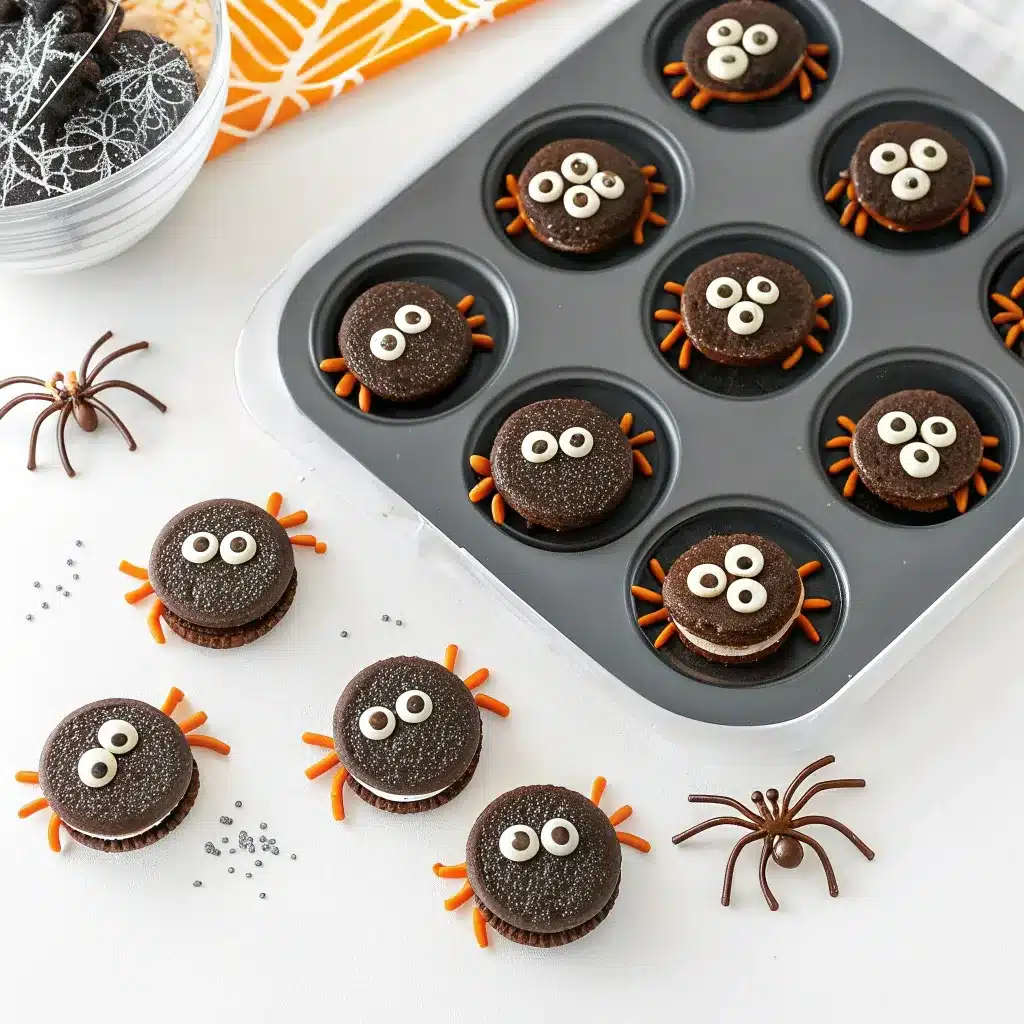
You’ll need (makes ~20):
- 20 Oreo-style sandwich cookies (classic, mint, or GF)
- 80 short pretzel sticks (or thin chocolate wafer sticks) for legs
- 1 cup chocolate candy melts (or chips)
- 40 mini candy eyes
- Orange/black nonpareils (optional)
- Parchment sheets + 4×6 in bags
Equipment: Microwave-safe bowl, small offset spatula or spoon, toothpick for detail
Steps (10–12 min active, 10 min set):
- Prep & melt (3 min): Line two trays with parchment. Melt chocolate in 20-second bursts, stirring until smooth and glossy.
- Build legs (5 min): Twist cookies open. On the cream side, set 4 pretzel legs per side so they extend evenly.
- Seal (3 min): Dab a little melted chocolate over the cream; gently press the cookie lid back on to lock the legs.
- Face & finish (2–3 min): Dot a tiny chocolate bead on top; add 2 mini eyes. Sprinkle a pinch of nonpareils at the seam.
- Set (10 min): Chill trays just until firm.
Classroom packaging: 1–2 spiders per 4×6 in bag. Label “Contains: wheat/soy; check pretzel brand.”
Allergy swaps:
- Gluten-free: GF sandwich cookies + GF pretzels.
- Dairy-free: Use DF dark-style coating; confirm sprinkles are DF.
- Nut-aware: These are naturally nut-free (verify manufacturing labels).
Troubleshooting:
- Legs falling out? Add a little extra chocolate “glue” to the cream before closing.
- Eyes sliding? Wait 30–60 seconds after dotting chocolate so it thickens slightly, then add eyes.
3) Graveyard Cookie Cups
Zero oven, maximum theater. These spoonable cups read like travel friendly halloween desserts because lids keep them neat and distribution is painless.
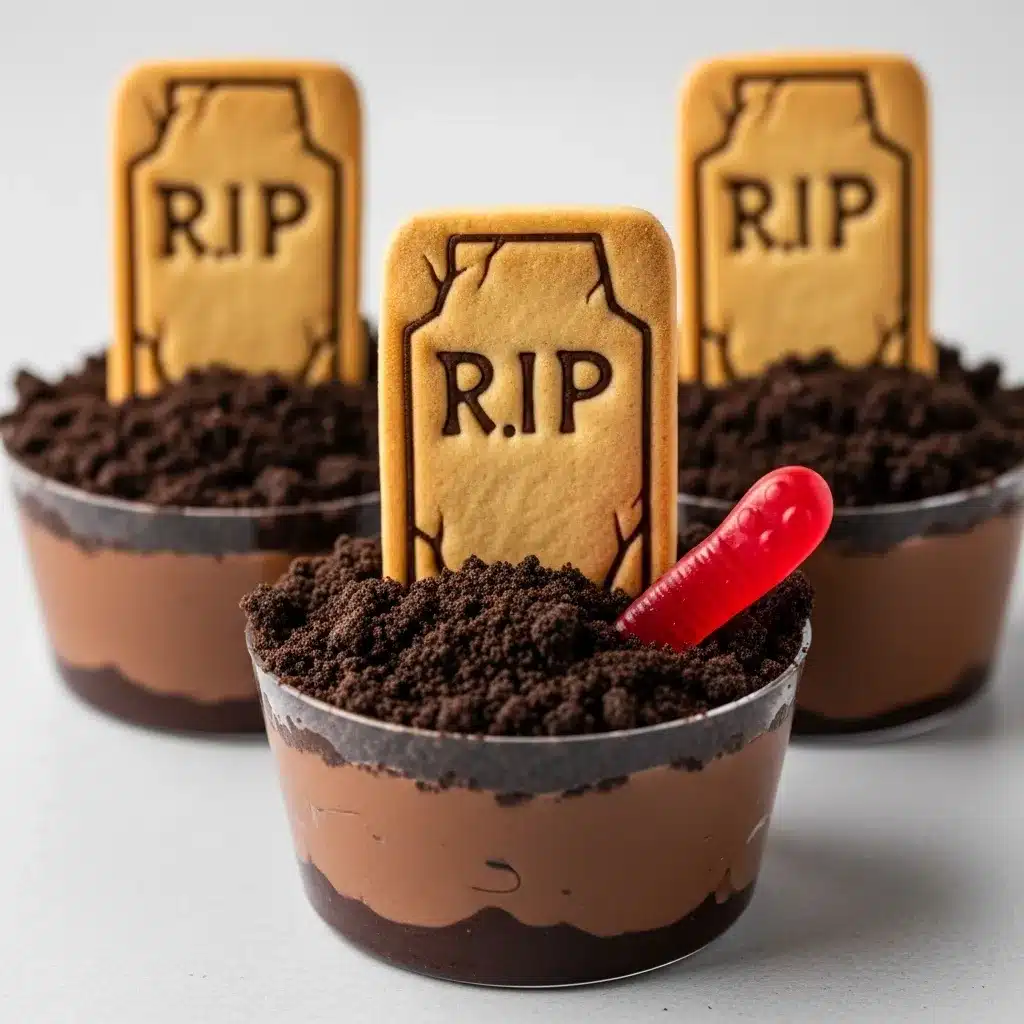
You’ll need (12 cups):
- 12 chocolate pudding cups (or chocolate Greek yogurt for a lighter option)
- 1½ cups crushed chocolate cookies (“dirt”) — aim for small pebbles, not powder
- 12 oval/rectangular cookies for tombstones (e.g., Milano-style)
- Black writing gel or edible marker (for “RIP”)
- Optional: gummy worms, candy bones
- 12 wrapped spoons + 12 lids (if using reusable cups)
Steps (8–10 min active):
- Top with dirt (3 min): Open all cups. Spoon 2–3 Tbsp cookie crumbs over each to cover.
- Letter the stones (3–4 min): Write “RIP” or a tiny jack-o’-lantern face on each tombstone cookie.
- Assemble the scene (3 min): Press one cookie upright into each cup at a slight angle; add a gummy worm or a few bones.
Classroom packaging:
- If using store pudding cups, just add the tombstone at home and place a wrapped spoon under a rubber band around the cup.
- If using 3–4 oz reusable cups, snap on lids and tape a spoon to the side. Label the lid with ingredients and “Contains.”
Allergy swaps:
- Gluten-free: Use GF chocolate sandwich cookies for “dirt” + a GF tombstone cookie.
- Dairy-free: Use DF pudding and a DF cookie crumb (or chocolate sandwich cookies that are DF).
- Dye-light: Skip bright gels; use edible marker or leave stones plain.
Transport:
- Pack cups snugly in a flat bin (12 fits a standard 9×13 pan with a lid).
- Keep a cool pack under the carrier for a long drive.
Time-saver:
- Set up a mini assembly line: one person crumbs all cups; one writes stones; one plants stones and adds worms. You’ll finish 12 in under 10 minutes.
Quick chooser (what to make when the clock is brutal)
- 15 minutes total: No-Bake Oreo Bat Cookies (batch once, chill, bag)
- 20 minutes total: Oreo Spider Bites (set while you bag bats)
- 10 minutes + chill: Graveyard Cookie Cups (spoon “dirt,” plant stones, lid, done)
Why teachers love this trio: tidy portions, clear labels, individually wrapped halloween treats that hand out fast—and all three are truly easy halloween treats no bake.
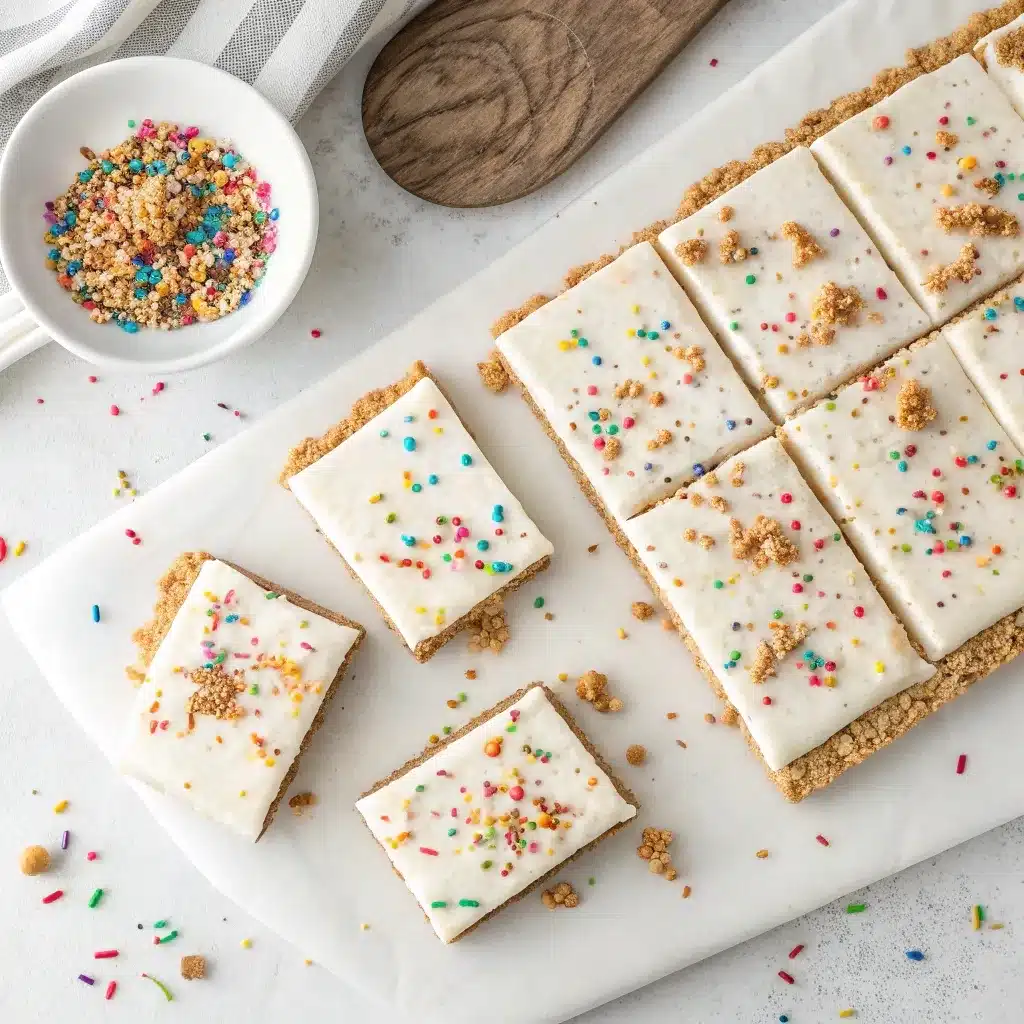
White Chocolate Winners (Fast Set, Glossy Finish)
White coating is the classroom MVP: it melts in a minute, takes color beautifully, and sets firm so you can bag and label without smears. These white chocolate halloween treats are tidy, quick, and perfect as individually wrapped halloween treats that teachers can hand out in seconds.
4) White Chocolate Halloween Bark
Bark is your fastest win for white chocolate halloween treats: spread, sprinkle, set, snap. It looks dramatic, but you can finish a class set in under 20 minutes.
- Yield & Timing: 1 rimmed sheet pan makes ~36 small “snack squares” (1.5–2 in); ~15 minutes including chill.
- Classroom Packaging: 1–2 squares per 3×4 or 4×6 in bag; add a simple ingredient label.
- Allergy Notes: Coating may contain dairy/soy; toppings may contain wheat—note brands. GF option: use gluten-free cookie crumbs and dye-free sprinkles.
- Make-Ahead & Storage: Up to 4 days airtight, cool/dry room temp. Avoid heat/humidity.
- Transport: Single layer on parchment in a flat bin; bag at home for fastest hand-out.
Full tutorial (once only): White Chocolate Halloween Bark
Troubleshooting:
- Streaky melt? Microwave in 15–20 sec bursts and stir well; moisture causes seized chocolate, so keep bowls dry.
- Crumbly snap? Spread slightly thicker (¼ in) for uniform squares; score lightly with a knife before chilling for cleaner breaks.
5) White Chocolate Pretzel Rods
Sweet-salty, crunchy, and built for sleeves—these line up beautifully for class bins and scream “October” without mess.
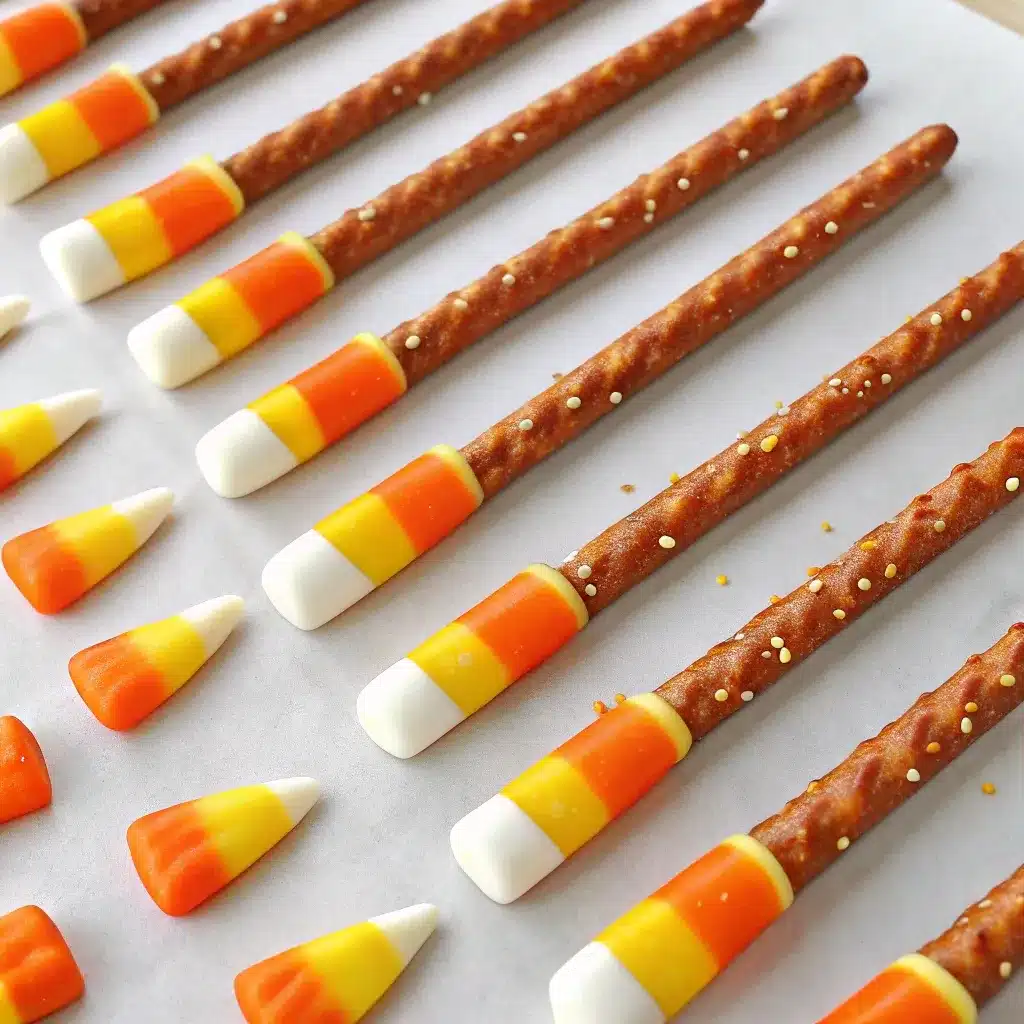
Yield & Timing: ~24 rods in ~20 minutes (work in 2 batches; chill between).
You’ll need: Pretzel rods; white coating; optional orange/yellow melts for stripes; sprinkles (light hand).
Finish & Pack: Dip ⅔ of each rod in white; let excess drip; lay on parchment; stripe orange/yellow; chill 10 minutes. Slip 2 rods into each 3×8 in pop sleeve; label and tie if you have time.
Allergy Notes: Check pretzel brand (wheat/soy facility notes). Dairy-free: use DF coating.
Make-Ahead & Storage: 3–5 days airtight at room temp (cool, dry).
Transport: Rods in sleeves → flat bin → cool pack under the bin; zero breakage on arrival.
Full tutorial (once only): White Chocolate Pretzel Rods
Troubleshooting:
- Bare spots after dipping? Do a quick second dip just on the light area; stripe to hide seams.
- Sprinkles sliding? Add them the moment you place the rod on parchment—before the shell sets.
6) White Chocolate Mummy Truffles
Creamy inside, snappy outside, and irresistibly cute—perfect travel friendly halloween desserts when you need a tidy, special-feeling option.
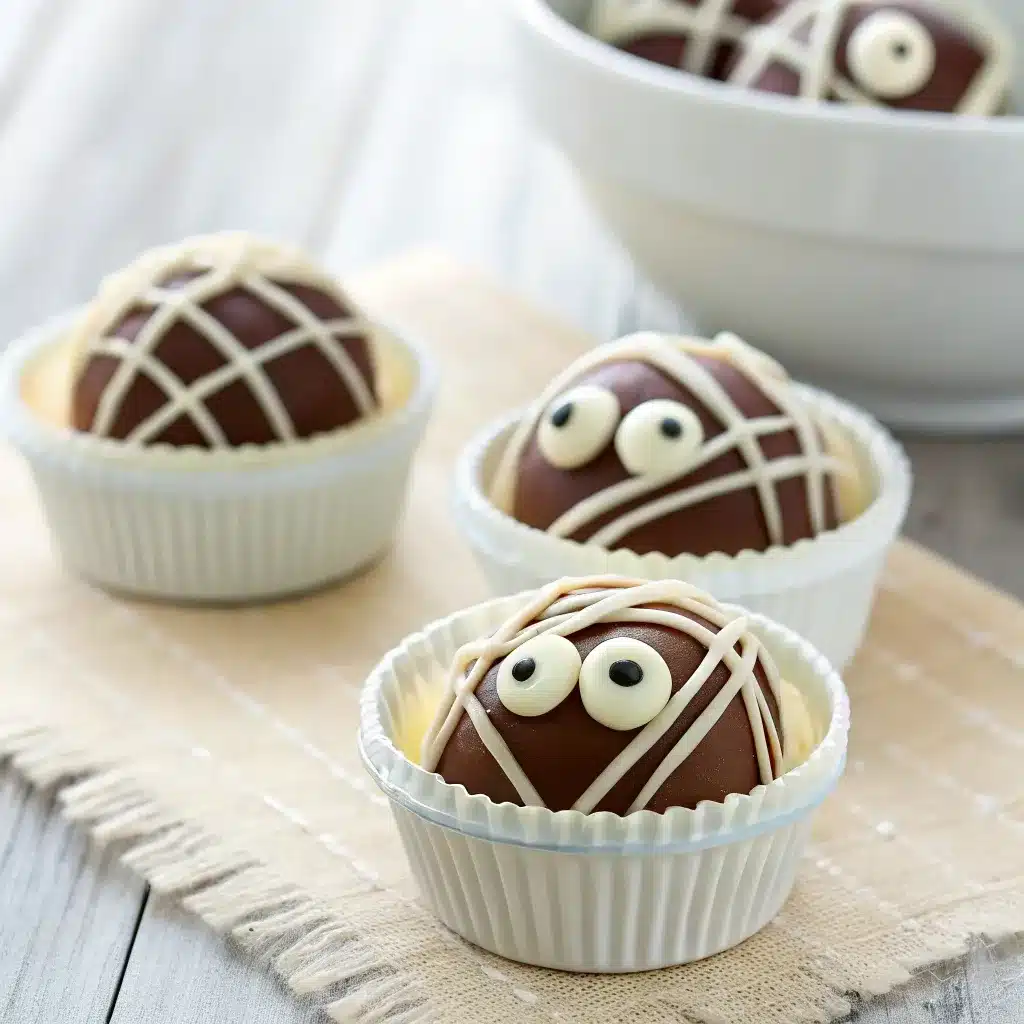
Yield & Timing: ~24 truffles, ~30 minutes including dip and drizzle.
Classroom Pack: Place 1–2 truffles in a 2–4 oz lidded cup (no smush); tiny circle label on lid; add a wrapped spoon if you want “cup service.”
Allergy Notes: Typically wheat/dairy/soy (cookies + coating). GF: use GF sandwich cookies; DF: use DF coating and confirm sprinkles.
Make-Ahead & Storage: 2–3 days refrigerated; transfer to cool room temp for serving.
Transport: Keep cups in a flat bin; cool pack under for long rides.
Full tutorial (once only): White Chocolate Mummy Truffles
Troubleshooting:
- Cracks after setting? Truffle centers were too cold. Let rolled balls sit 5–7 minutes at room temp before dipping.
- Runny drizzle? Let the coating cool 1–2 minutes; drizzle should flow in ribbons, not puddles.
7) White Chocolate Strawberry Ghosts
Fresh fruit meets quick dip—these look premium and still function as individually wrapped halloween treats.
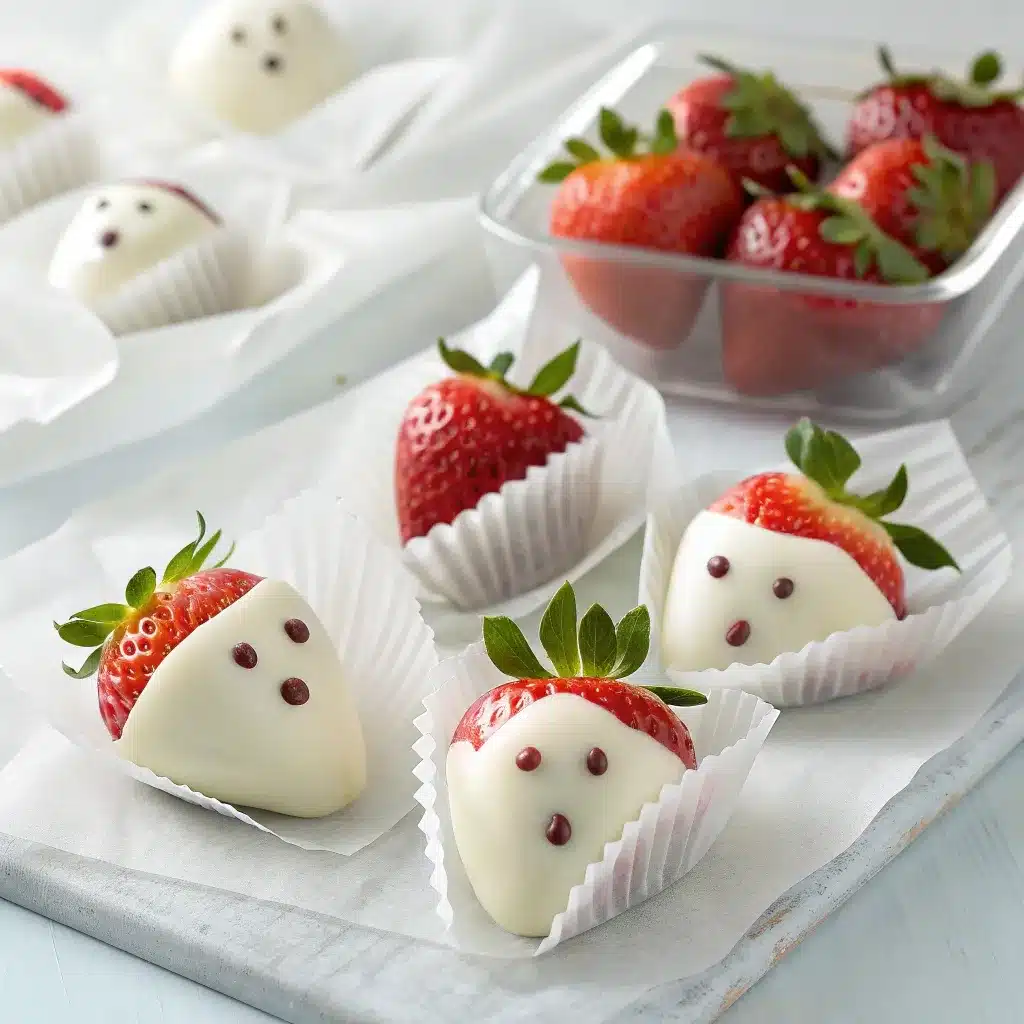
Yield & Timing: ~24 ghosts in ~20 minutes including set time.
Classroom Pack: 1–2 ghosts per 4×6 in bag with a tiny square of parchment inside to prevent sticking; chill to set before bagging.
Allergy Notes: Check coating (dairy/soy). For DF needs, use dairy-free coating.
Make-Ahead & Storage: Best same day; refrigerate up to 24 hours uncovered on parchment to preserve faces; bag right before leaving.
Transport: Keep cold; cool pack under the bin. Hand out early in the party.
Full tutorial (once only): White Chocolate Strawberry Ghosts
Troubleshooting:
- Faces smearing? Dry berries well before dipping; add faces after the shell sets 1–2 minutes.
- Weeping berries? Condensation forms from temp swings—keep chilled and minimize door openings.
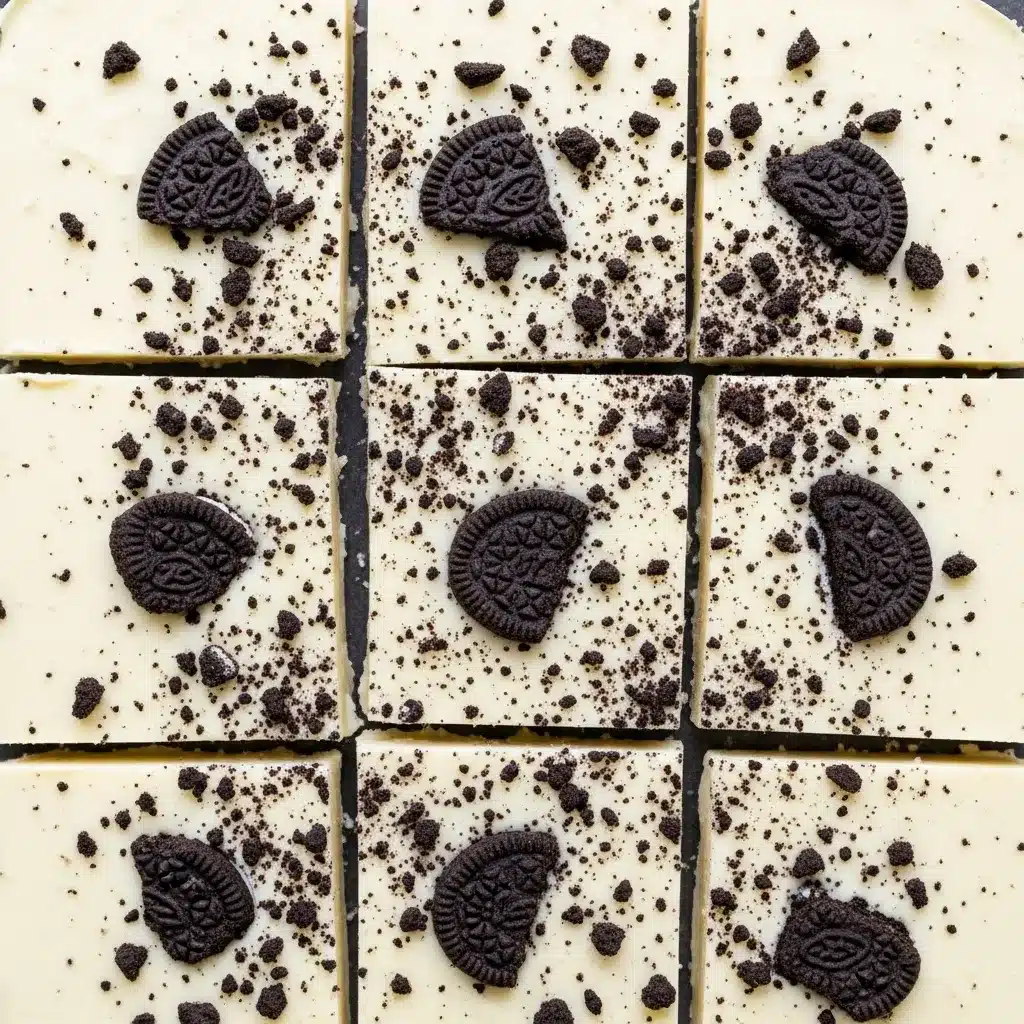
8) Marbled Midnight Bark
A bold variation on white chocolate halloween bark that packs just as easily as squares but gives you that moody Halloween contrast.
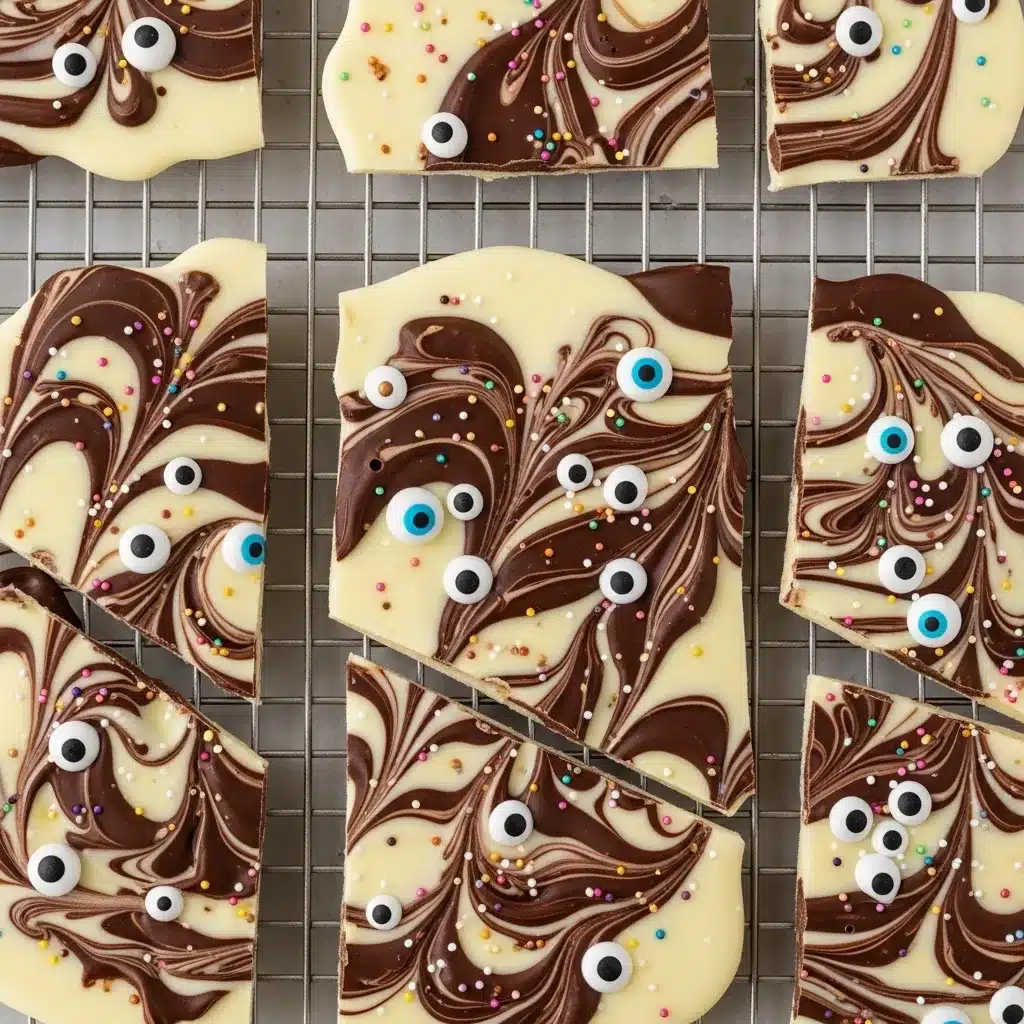
You’ll need (1 sheet pan; ~36 squares):
- 12 oz white coating
- 4 oz dark coating (for marbling)
- ¾ cup mix-ins: mini candy eyes, crushed chocolate cookies (GF if needed), tiny orange/black sprinkles
Steps (12–15 min):
- Melt & base: Line a rimmed sheet pan with parchment. Melt white coating until smooth; spread to ~¼ in thickness.
- Marble: Melt dark coating; drizzle in swooshes. Pull a skewer through in gentle S-curves to marble (don’t overmix).
- Top: Scatter candy eyes, cookie crumbs, and a light sprinkle of nonpareils.
- Set & square: Chill 10 minutes. For cleaner, classroom-sized squares, score the surface lightly with a knife at 1.5–2 in intervals before chilling; snap on the lines.
Classroom Pack: 1–2 squares per small bag. These are ultra-tidy individually wrapped halloween treats.
Allergy Notes: List coating ingredients and cookie brand; GF/DF tweaks as needed.
Make-Ahead & Storage: Up to 4 days airtight, cool/dry; avoid sun and heaters.
Troubleshooting:
- Dull finish? Overheated coating. Next batch: use shorter microwave bursts and stir more often.
- Marble muddied? Use less dark drizzle; two or three passes with the skewer is enough.
Quick chooser (when you’re on the clock)
- 15 minutes: Classic white chocolate halloween bark (score for uniform squares)
- 20 minutes: White chocolate pretzel rods (candy-corn stripes, sleeves, done)
- 30 minutes: White chocolate mummy truffles (cups with lids = no smush)
- 20 minutes: Strawberry ghosts (dip, dot, chill, bag right before you leave)
These four plus the marbled variation give you a glossy, high-yield mix of white chocolate halloween treats that set fast, bag clean, and survive the car ride—everything you need for truly travel friendly halloween desserts in the class bin.
Pops & Krispies (Clean, On-a-Stick, Teacher-Favorite)
Pops and cereal bars shine at school: they’re neat to hold, easy to count, and simple to bag. This set gives you two internal recipes (used once each) plus two fully detailed classroom-specific minis. Every item includes yields, packaging, allergy notes, and storage—so your individually wrapped halloween treats glide through drop-off and hand-outs.
9) Halloween Marshmallow Pops
Why teachers love them: clean hands, simple counting, and tidy sleeves. These are the most reliable no bake halloween snacks for class when you’re short on time.

- Yield & timing: ~24 pops in ~20 minutes (dip twelve, set, then repeat).
- You’ll need: Large marshmallows; lollipop sticks; white or dark coating; sprinkles/candy eyes (light hand).
- How to finish fast: Skewer, dip, tap off excess, sprinkle lightly, set upright in a foam block or on parchment.
- Classroom packaging: 1 pop per 3×8 in pop sleeve; small label on the back seam.
- Allergy notes: Coating may contain dairy/soy; some marshmallows contain gelatin—note on the label.
- Make-ahead & storage: Best within 24–36 hours at cool room temp.
- Transport: Sleeve, then lay flat in a bin; cool pack under the bin for a warm drive.
Full tutorial (once only): Halloween Marshmallow Pops
Troubleshooting:
- Drips down the stick? Hold the pop horizontally and rotate for 6–8 seconds after dipping.
- Sprinkles sliding off? Sprinkle the moment you set the pop on parchment—before the shell sets.
10) Frankenstein Rice Krispie Treats
Green, grinning, and sturdy—these slice into small bars that bag cleanly and still look special. Ideal travel friendly halloween desserts when you want character without mess.
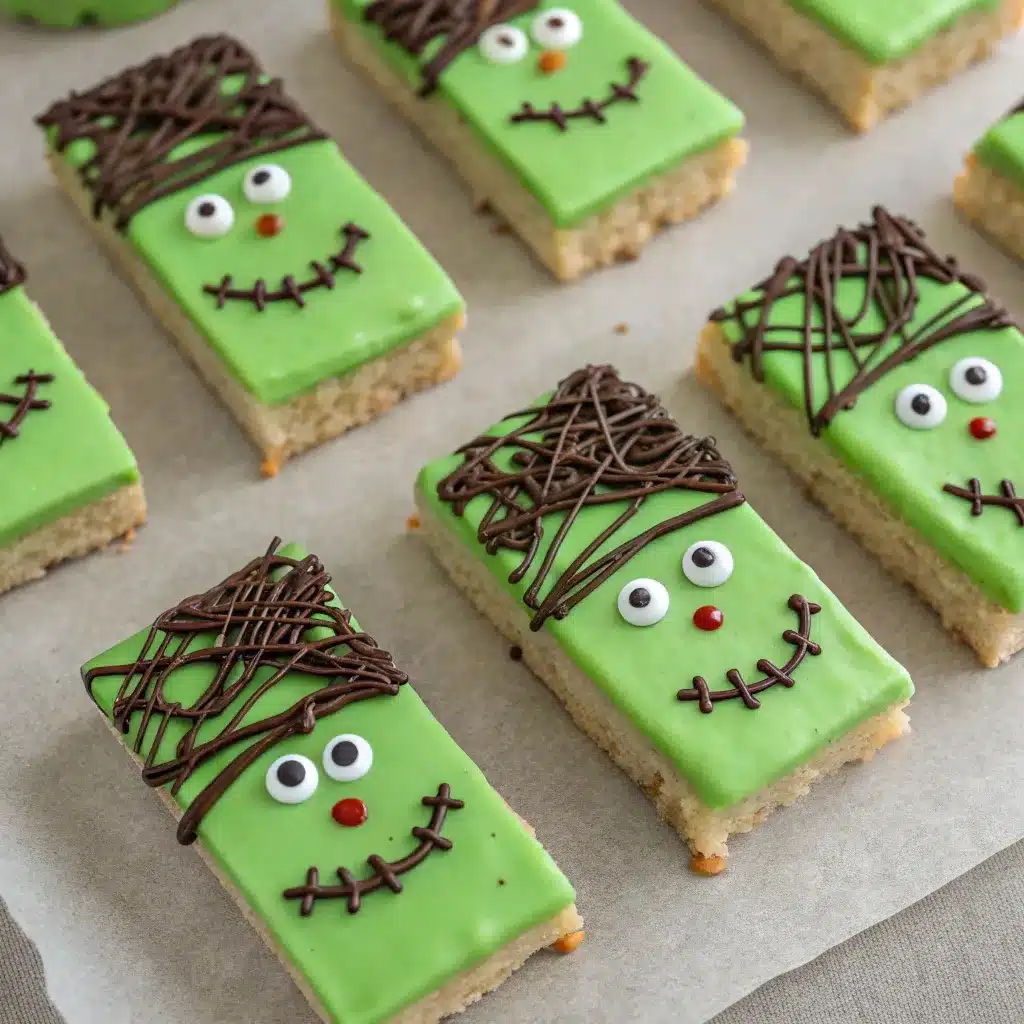
- Yield & timing: 9×13 pan → 24–28 mini bars; ~25 minutes including set.
- Finish: Tint the warm cereal mixture green, press firmly, let cool. Add chocolate “hair,” candy eyes, and a stitched smile.
- Classroom packaging: 1 mini bar per 4×6 in bag; press out air before sealing.
- Allergy notes: Marshmallows + butter (dairy); verify candy eyes; use DF marshmallows/plant butter if needed.
- Make-ahead & storage: Up to 2 days airtight at room temp; don’t refrigerate (softens).
- Transport: Single layer on parchment; pack tight so bars don’t shift.
Full recipe (once only): Frankenstein Halloween Rice Krispie Treats
Troubleshooting:
- Crumbly edges? Press mixture more firmly and let set 10–15 minutes before cutting.
- Smearing “hair”? Pipe hair after bars are fully cool; let it set 5–10 minutes before bagging.
11) Mummy Krispie Pops
Turn the classic bar into a clean, on-a-stick treat with simple “bandages.” These are classroom-ready halloween marshmallow pops in Krispie form.
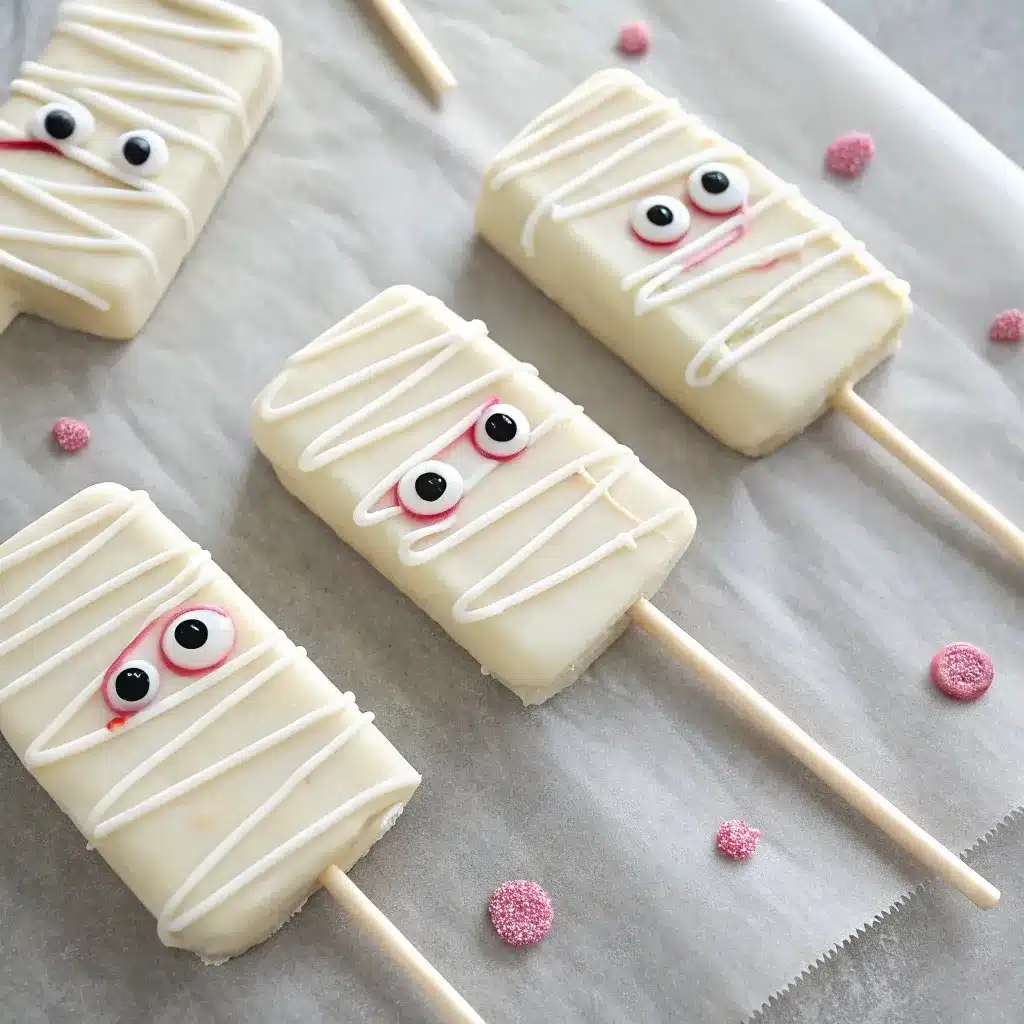
Full recipe: Mummy Krispie Pops
Troubleshooting:
- Coating pooling at the base? Scrape the bottom edge lightly on the bowl rim before setting on parchment.
- Drizzle too thick? Warm in 5-second bursts; aim for ribbon-thin lines.
12) Green “Slime” Krispie Squares
Bright color, zero frosting mess. These read festive and stack like a dream—true no bake halloween snacks for class.
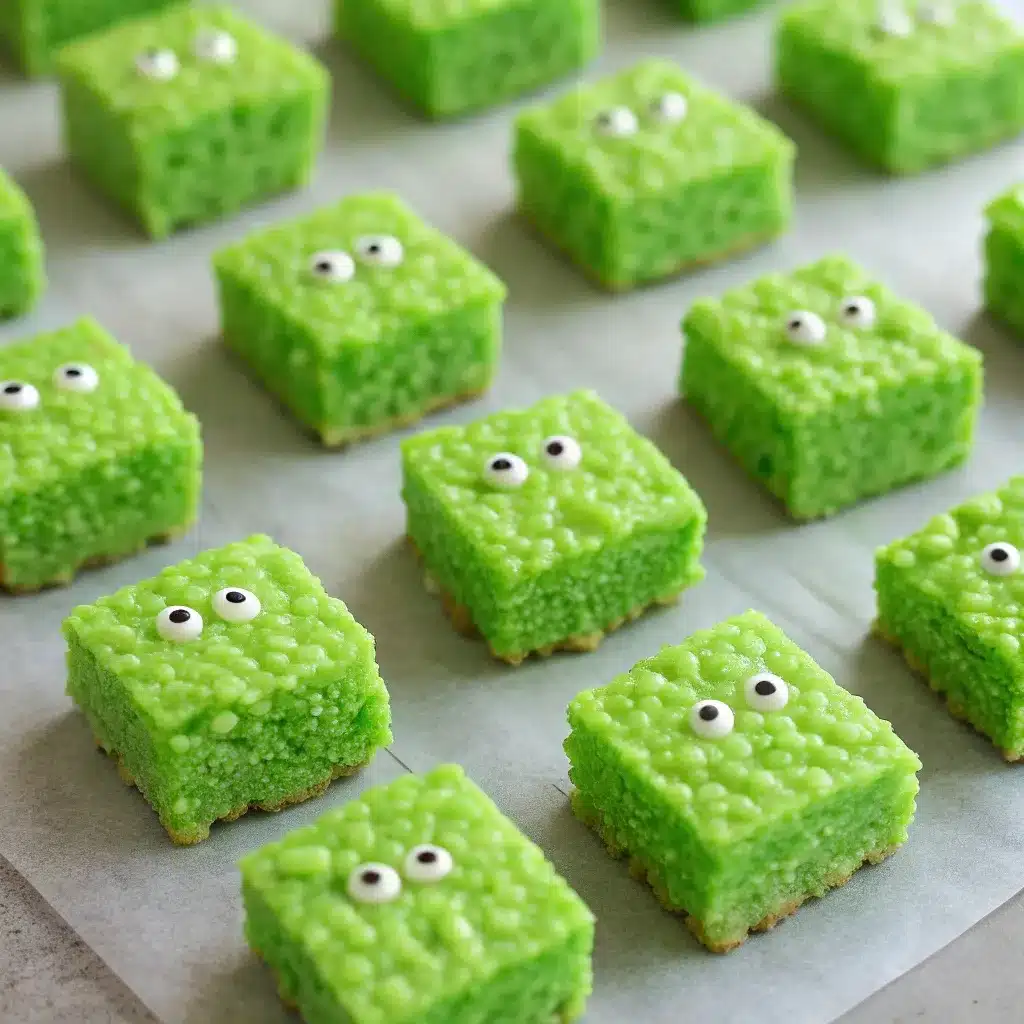
You’ll need:
- 1 standard 9×13 batch of cereal treats
- Oil-based green coloring
- Mini candy eyes (optional)
- Parchment; 4×6 in bags
Steps (20 minutes total):
- Tint (2–3 min): Add 1–2 drops green to the warm marshmallow mix; stir to even slime-green.
- Press (2–3 min): Firmly press into the pan (lay parchment on top and use a measuring cup to compact).
- Top (1–2 min): Sprinkle a few mini eyes while still tacky.
- Set & cut (10–12 min): Cool, then cut 24 squares (about 1.5 in each).
Classroom packaging: 1–2 minis per bag; squeeze out air; seal with a sticker label.
Allergy swaps: DF marshmallows + plant butter for dairy-free; verify eyes for gelatin if needed.
Make-ahead & storage: 2 days airtight at room temp.
Transport: Stack in a snug container with parchment layers; bag at home or at school if you prefer super-crisp edges.
Troubleshooting:
- Loose, saggy squares? You under-pressed. Re-press the next batch firmly with parchment on top.
- Color clumps? Always use oil-based color for candy work; water-based gels can seize coatings.
Quick chooser (when the bell’s about to ring)
- 20 minutes: halloween marshmallow pops (dip, sprinkle, sleeve)
- 25 minutes: Frankenstein mini bars (press, decorate, bag)
- 30 minutes: Mummy Krispie Pops (front-dip + drizzle saves time)
- 20 minutes: Slime squares (tint, press, cut, bag)
Every option here stays sturdy in sleeves or bags, hands out fast, and passes the classroom test for travel friendly halloween desserts.
100% Nut-Aware Swaps (Safe Without Losing the Fun)
Classroom policies vary, but many teachers specifically ask for nut free halloween treats for school. This section gives you two crowd-pleasing, label-ready options that taste great without peanuts or tree nuts, plus clear packaging and storage notes so your halloween class party treats are easy to approve and simple to share. Both recipes are fully no-bake, sturdy in bags or cups, and truly travel friendly halloween desserts.
13) SunButter Monster Bites
Soft, chewy, and just sweet enough, these energy-bite style treats skip nuts entirely by using sunflower seed butter. They’re perfect no bake halloween snacks for class because you can portion exactly two per kid, press in candy eyes for the “monster” look, and bag in minutes.
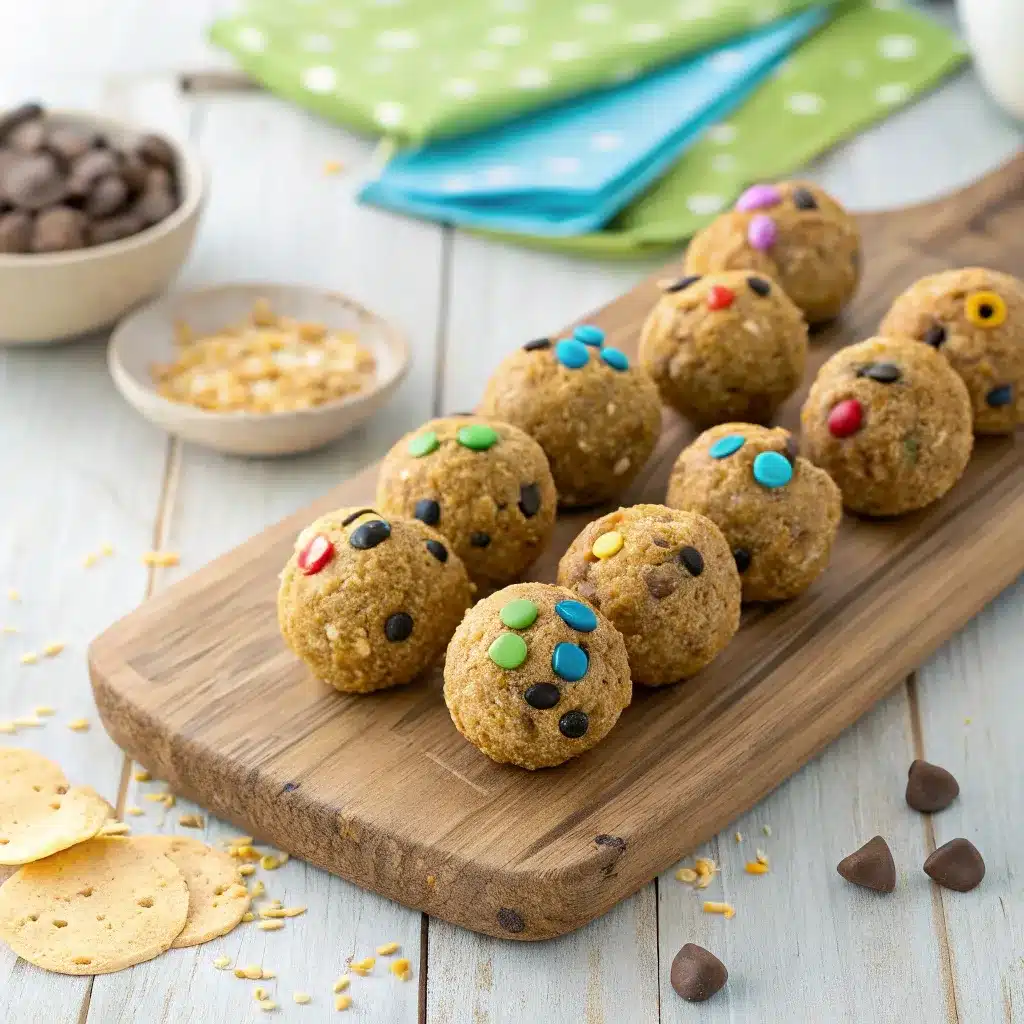
What you’ll need (makes ~22 1-Tbsp bites):
- 1½ cups quick oats (use certified GF if needed)
- ¾ cup smooth sunflower seed butter (stirred until uniform)
- ¼ cup honey or maple syrup (maple for vegan)
- 1 tsp vanilla extract + ¼ tsp fine salt
- ⅓ cup mini chocolate chips (dairy-free if required)
- Candy eyes (gelatin-free brand if needed)
- Optional boost: 2 Tbsp ground flax or chia for texture
Equipment: Medium mixing bowl, sturdy spatula, #60 scoop (or 1 Tbsp), parchment
Steps (15 minutes + 10 minutes chill):
- Mix base (3–4 min): In a bowl, stir oats, salt, and (optional) flax/chia. Add SunButter, honey/maple, and vanilla. Use a firm folding motion until every oat looks glossy—no dry pockets.
- Fold-ins (1–2 min): Stir in mini chips. If the mix feels dry, add 1–2 tsp more SunButter; if too sticky, add 1–2 Tbsp more oats.
- Scoop & shape (6–7 min): Scoop level tablespoons, roll into balls with barely damp hands. Press 1–2 candy eyes into each ball.
- Chill to set (10 min): Place on parchment and chill so the eyes adhere and the bites firm up.
Flavor swaps & special diets:
- Chocolate-free option: Swap mini chips for tiny raisin pieces or dye-free sprinkles.
- DF/Vegan: Choose dairy-free chips and gelatin-free candy eyes; use maple syrup.
- GF: Certified gluten-free oats; confirm eye/candy brand.
Classroom packaging:
- Portion: 2 bites per 4×6 in bag.
- Label: “Sunflower seed butter, oats, mini chocolate chips; Contains: none of the top nut allergens (verify brand labels).”
Troubleshooting:
- Crumbly balls? Add 1–2 tsp SunButter.
- Sticky hands? Lightly dampen palms or chill the bowl 5 minutes and continue.
Why teachers say yes: Clear “sunflower seed butter” labeling reduces confusion, and the tidy two-per-bag portion makes hand-outs fast—ideal individually wrapped halloween treats.
14) Dairy-Free “White” Bark
When you need to avoid dairy but still want that bright, high-contrast look, this dairy-free take delivers. It snaps cleanly, packs like classic bark, and keeps your nut free halloween treats for school list strong.
What you’ll need (1 rimmed sheet; ~36 snack squares):
- 16 oz dairy-free white-style melting wafers (look for coconut-oil or cocoa-butter blends labeled DF)
- ¾–1 cup toppings (choose 2–3): dye-free sprinkles, crushed GF chocolate sandwich cookies, mini marshmallows (gelatin-free brand if required), tiny pretzel bits (GF if needed), a few candy eyes
- Optional drizzle: 2–3 oz DF dark coating for contrast
Equipment: Parchment-lined rimmed sheet pan, microwave-safe bowl, offset spatula, skewer (for drizzle patterns)
Steps (12–15 minutes):
- Melt base (2–3 min): Microwave wafers in 20-second bursts, stirring until just smooth. DF coatings scorch quickly—short bursts matter.
- Spread (1–2 min): Pour onto parchment; spread to ¼-inch thickness (thicker sets sturdier for kid-size squares).
- Top (2–3 min): Sprinkle your chosen toppings evenly; press very lightly so they adhere but don’t sink.
- Optional drizzle (1–2 min): Melt DF dark coating; drizzle in a few zigzags. Swipe a skewer once or twice for a marbled look.
- Set & square (5–8 min): Chill just until firm. Score lightly in a 1.5–2 in grid with a butter knife, then snap for uniform classroom squares.
Allergy-aware combinations (pick one):
- DF + GF: DF wafers + GF sandwich cookie crumbs + dye-free sprinkles.
- DF + Gelatin-free: DF wafers + mini marshmallows (gelatin-free) + pretzel crumbs (GF optional).
- Top-8-leaning: DF wafers + dye-free sprinkles + plain popcorn bits (no butter).
Classroom packaging:
- Portion: 1–2 squares per 3×4 or 4×6 in bag.
- Label: “DF white-style coating, [toppings]; Contains: [list if pretzels = wheat/GF], may contain soy; see brand labels.”
Troubleshooting:
- Soft set or greasy sheen? DF coatings melt at lower temps—chill 2–3 extra minutes and avoid warm rooms.
- Crumbly edges? Spread slightly thicker or score lines before setting fully.
Why it works for school: Bright look, quick setting, and clean snapping equals zero mess and quick hand-outs—exactly what staff want from individually wrapped halloween treats.
Cost, Yield & Time Estimator (so you can plan fast)
- SunButter Monster Bites: ~22 bites; ~15 min mix/roll + 10 min chill; cost ≈ low (oats + seed butter).
- DF “White” Bark: ~36 squares; ~15 min total; cost ≈ medium (DF wafers pricier than dairy versions).
Packing calculator for 24–30 kids:
- Plan 2 monster bites per kid (48–60 bites = 2–3 batches).
- Plan 1–2 bark squares per kid (24–60 squares = 1–2 sheets depending on size).
Teacher-Approved Combo Ideas (nut-aware mix & match)
- Two-Bag Plan: 1 bag with 2 monster bites + 1 bag with 1 DF bark square → clear labels on both.
- Cup Plan: 4 oz lidded cup with 1 monster bite + 1 bark square; a small ingredient sticker on the lid.
- All-DF Plan: DF monster bites (skip chips, add raisins) + DF bark (sprinkles + popcorn bits).
Single-Serve “Charcuterie” for Class (Cups, Not Boards)
Shared grazing boards are a classroom no-go (hands, allergens, chaos). But you can borrow the look with sealed, single-serve cups that pass teacher checks and still feel festive. These cups are fast to assemble, easy to label, and truly no bake halloween snacks for class. Everything below is portioned, kid-friendly, and built to travel as individually wrapped halloween treats (lidded cups), with clear swaps for nut free halloween treats for school.
15) Classroom Charcuterie Cups
Bright, balanced snack cups that pack protein, crunch, and color—zero oven. These disappear fast at class parties and keep desks clean.
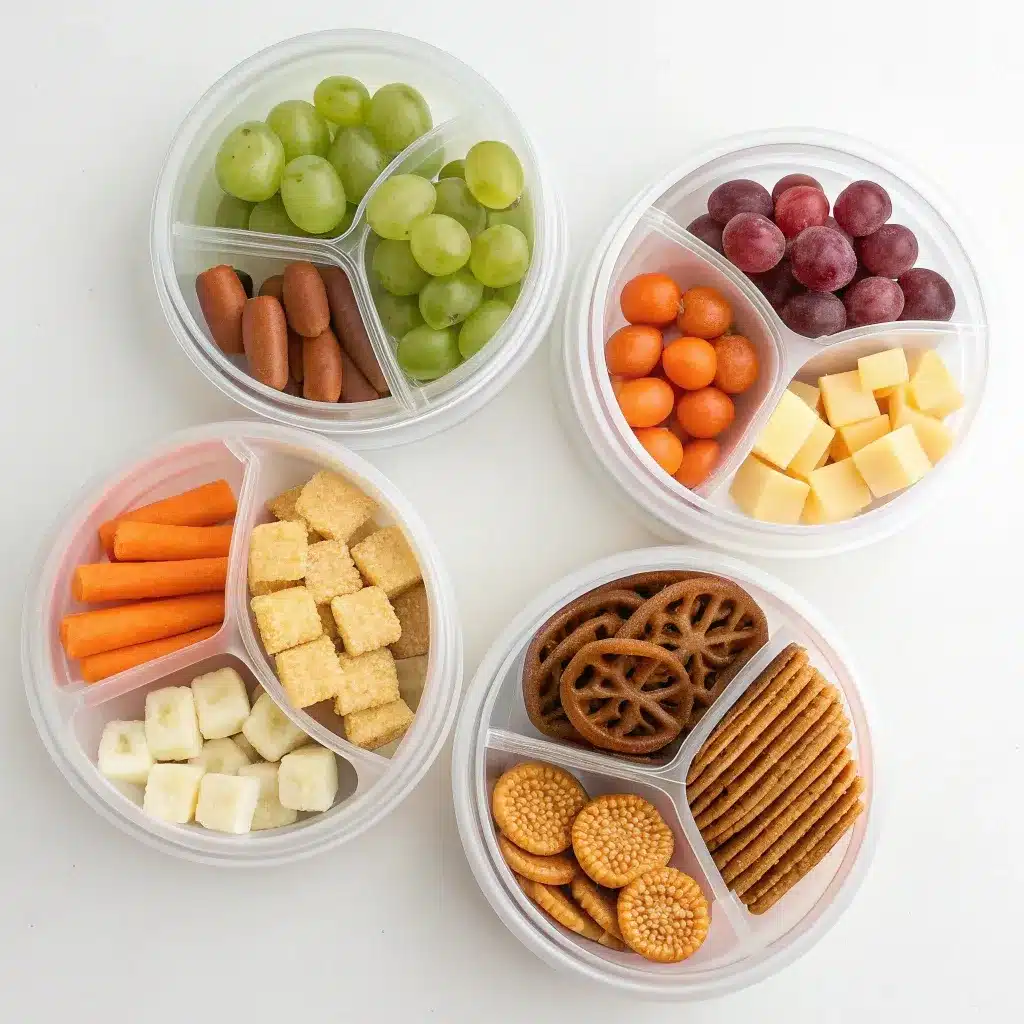
You’ll need (for 12 cups; double for 24):
- 12 clear cups with lids (5–6 oz)
- 12 mini 2 oz dip cups with lids (optional, for ranch or hummus)
- 1½ cups cheese cubes (cheddar, Colby Jack; ½-inch dice)
- 3 cups pretzels or GF crackers (tiny shapes work best)
- 2 cups baby carrots (or cucumber sticks)
- 1½ cups seedless grapes or mini clementines (draw jack-o’-lantern faces on clementine peels for a Halloween touch)
- Optional add-ins (pick 1–2): turkey roll-ups (nitrate-free), sliced olives, cherry tomatoes
Allergy-smart swaps:
- Nut-free: choose nut-free pretzels/crackers (check facility labels).
- Gluten-free: GF pretzels/crackers; verify dip brand.
- Dairy-free: swap cheese for DF cubes or extra veggie sticks; use DF ranch/hummus.
- Sesame note: if hummus includes tahini, mark “contains sesame.”
Assembly (15–20 minutes for 12 cups):
- Line & layer: Add a small handful of pretzels/crackers to each cup (¼–⅓ cup).
- Veggies: Tuck 3–4 baby carrots or cucumber sticks upright along the side.
- Protein: Drop in 6–8 cheese cubes (or turkey roll-ups folded into “ribbons”).
- Fruit pop: Add 4–5 grapes or one mini clementine with a jack-o’-lantern face.
- Dip (optional): Nest a 2 oz ranch/hummus cup on top or tape it to the outside; snap on the main lid.
Label (front sticker):
“Classroom Charcuterie Cup — cheese, pretzels/crackers, carrots, grapes (or clementine), ranch/hummus. Contains: dairy, wheat (if not GF), sesame if hummus.”
Pack & transport:
- Cups nest tightly in a flat bin; add a thin cool pack under the bin if traveling long.
- Hand the teacher an extra 3–4 cups for staff or allergy swaps.
- These function as individually wrapped halloween treats and hand out in seconds.
Why teachers say yes: clear lids, clean ingredients, visible labels, and a tidy portion. Perfect no bake halloween snacks for class.
15a) Protein Bento Cups (Variation — Savory, High-Satiety)
Build per cup:
- 6–8 cheese cubes or 2 turkey ribbons
- 3–4 cucumber sticks + 2–3 cherry tomatoes
- ¼ cup pretzels/GF crackers
- 1 DF ranch cup (2 oz)
Label note: “Contains: dairy (if cheese), wheat (pretzels), eggs (if ranch), sesame (if hummus).”
Why this works: keeps kids full without sugar; easy to tailor to allergy notes from the teacher.
15b) Veggie “Jack-O’-Lantern” Cups (Variation — All-Veg)
Build per cup:
- ½ cup carrot/cuke sticks
- ¼ cup bell pepper strips (orange for theme)
- 1 mini clementine with drawn face or 4–5 grapes
- 1 hummus cup (2 oz)
Label note: mark sesame if hummus has tahini; dairy-free by default.
Tip: Slip a mini napkin under the lid—teachers love the thoughtfulness.
15c) “Monster Eye” Fruit & Cracker Cups (Variation — Fun Visual)
Build per cup:
- ¼ cup crackers (GF if needed)
- ¼ cup mixed fruit (grapes, berry halves)
- 1 “monster eye”: mozzarella pearl + olive slice stacked on a cucumber coin
Label note: “Contains: dairy, wheat (if not GF).”
Make-ahead: Add the “eye” morning of to keep it bright.
Assembly-Line Plan (for 24–30 cups in ~25–30 minutes)
- Tray 1: Drop crackers into all cups.
- Tray 2: Add veggies to all cups.
- Tray 3: Add protein/cheese to all cups.
- Tray 4: Add fruit; snap lids.
- Label & bin: Stick labels as you go; nest cups in a flat bin (5×5 or 4×6 grid).
- Cool pack under the bin for safe travel — this keeps them travel friendly halloween desserts (and snacks) with crisp textures.
Four More Savory “Balance” Minis (Zero Oven)
Savory bites keep kids happy between sweets and help teachers manage energy levels. These four mini recipes are true no bake halloween snacks for class: fast assembly, clear labels, and simple, single-serve packaging. Each one can be made nut-aware, portioned cleanly as individually wrapped halloween treats, and packed as travel friendly halloween desserts—in this case, dessert-adjacent snacks that ride to school without mess.
16) Pretzel Witch Brooms
Three ingredients, huge smiles. These are a reliable crowd-pleaser that assemble quickly and hold shape in transit.
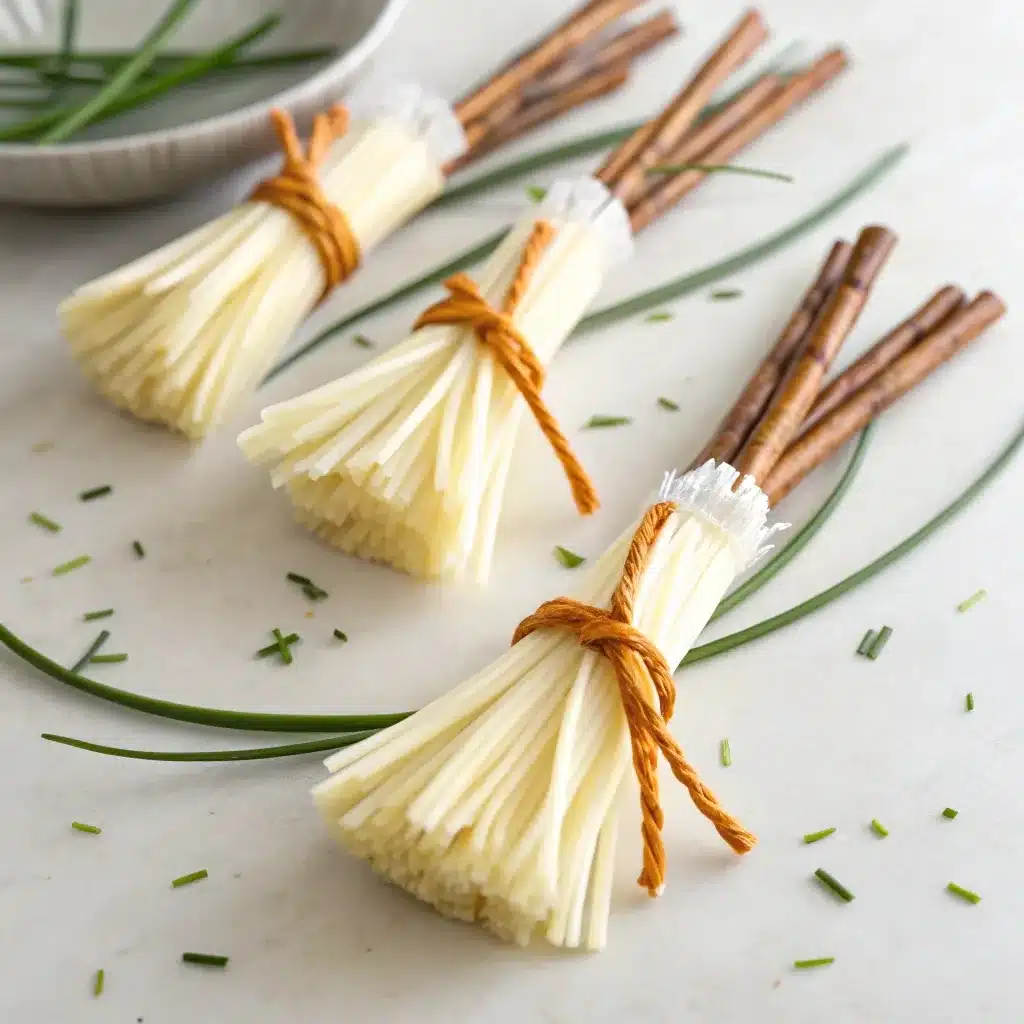
Full recipe: Pretzel Witch Brooms
Troubleshooting:
- Chive slipping? Pat cheese dry first; tie a double knot.
- Pretzel breaking? Gently twist the stick while inserting.
17) Jack-O’-Lantern Hummus Dippers
Protein-forward, colorful, and classroom tidy. The little “pumpkin face” makes these the cutest savory cups on the table.
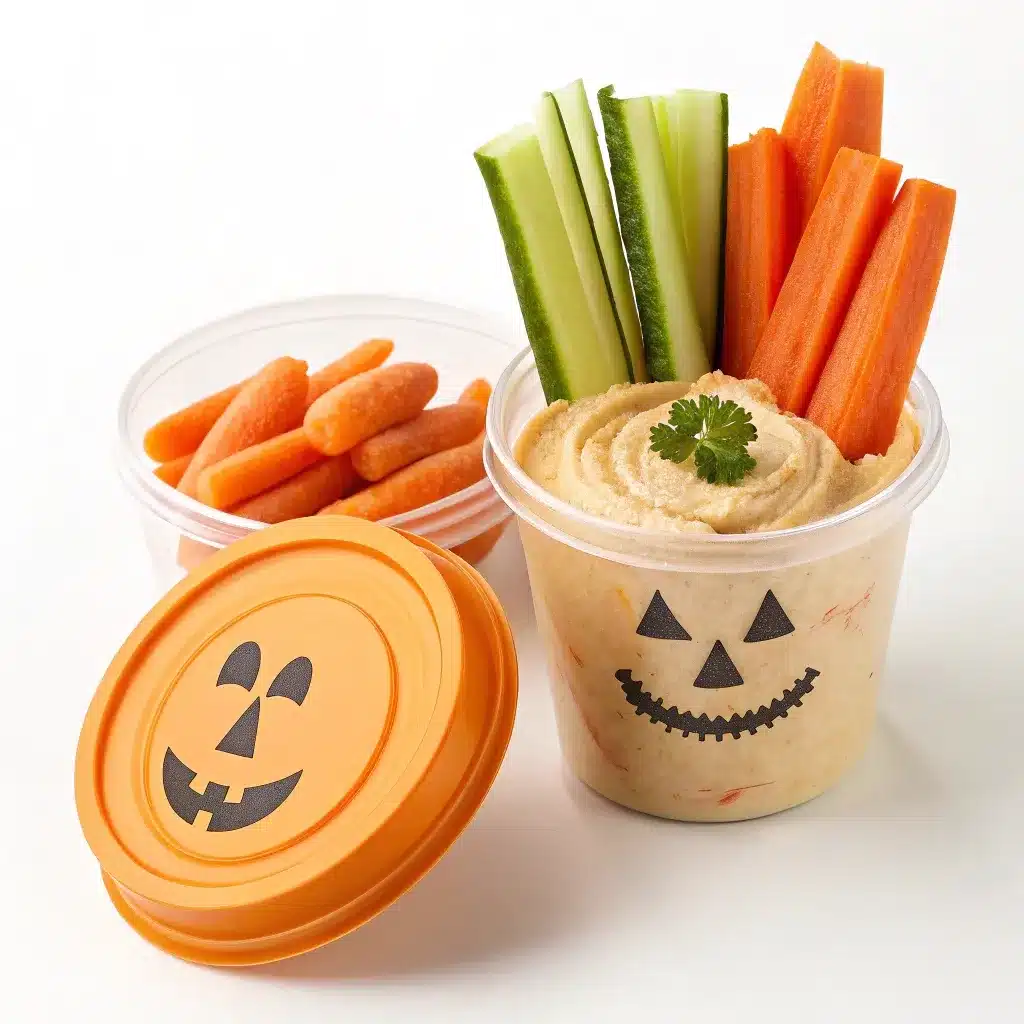
You’ll need (24 cups):
- 24 × 2 oz lidded hummus cups (store-bought or portioned from a tub)
- 24 small clear cups (5–6 oz) with lids
- Veggie dippers: 3–4 cups carrot sticks, 3–4 cups cucumber sticks, 2 cups orange bell pepper strips
- Optional: 24 mini clementines to tuck beside the cup
Steps (15–20 minutes):
- Face detail: Use a food-safe marker or small stickers to add jack-o’-lantern faces to the hummus cup lids.
- Pack veggies: In each larger cup, stand 4–6 veggie sticks (mix of carrots/cukes/pepper).
- Nest hummus: Place the sealed hummus cup on top; snap the main lid.
Packaging & labels:
- Pack: Cups nest tightly in a flat bin.
- Label: “Hummus (chickpeas, tahini), carrots, cucumbers, bell pepper. Contains: sesame.” If sesame-free hummus is used, mark it clearly.
Troubleshooting:
- Condensation on lids? Chill components first, then assemble quickly; keep the transport bin cold for 10 minutes before leaving.
18) Cheese “Pumpkin” Skewers
Tiny “pumpkins” without a stove—great filler for snack plates and excellent for younger grades.
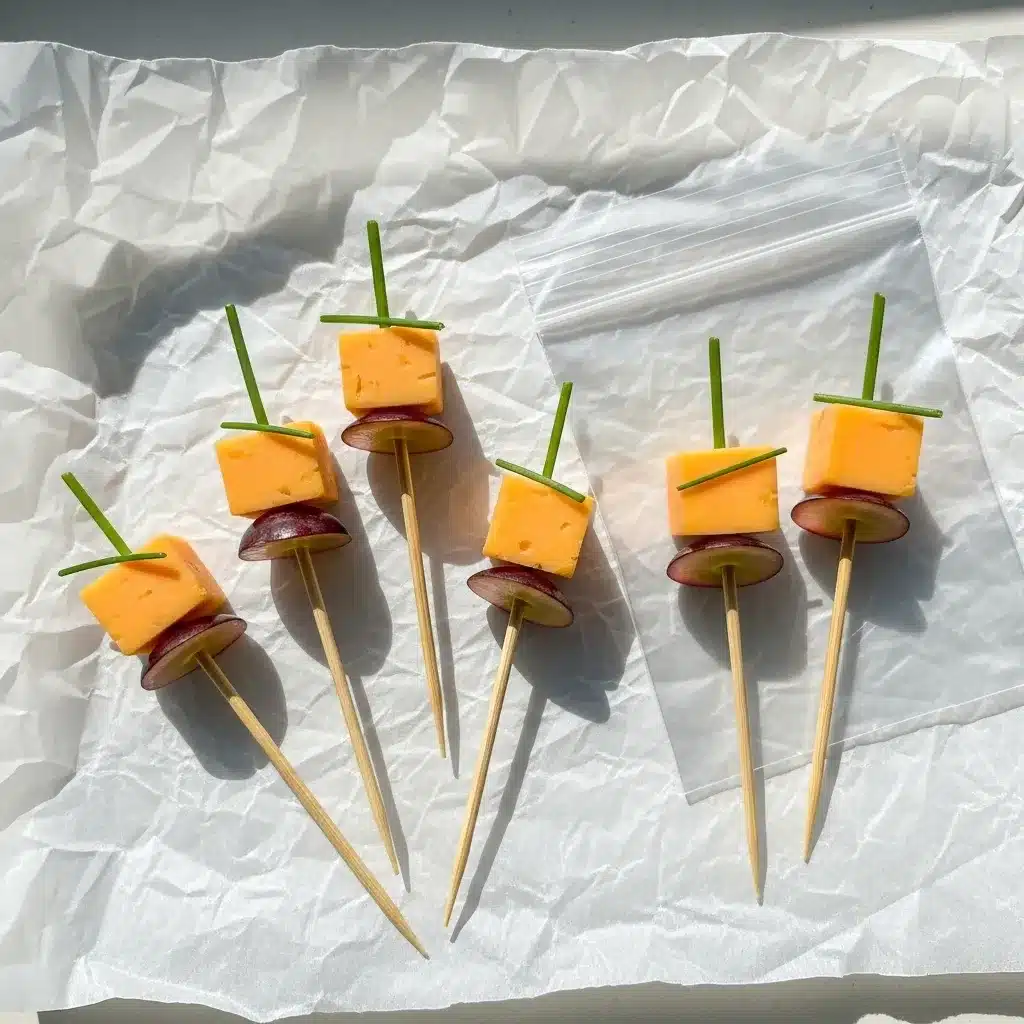
You’ll need (24 skewers):
- 1 lb cheddar (½-inch cubes) → ~40–45 cubes
- 24 short party picks (use blunt tips for little hands)
- 24 tiny chive bits (stems)
- Optional: 12 green grapes (halve; one half per skewer below the cheese)
Steps (10–12 minutes):
- Assemble: Thread one cheddar cube on each pick (and a grape half underneath if using).
- Finish: Press a tiny chive piece into the top of the cheddar cube to act as the “pumpkin stem.”
Troubleshooting:
- Chive falling out? Use a toothpick to make a tiny starter hole.
- Skewers poking bags? Place a fold of parchment over the pick tips before sealing.
19) Cucumber “Monster Eyes” Cups
Playful visuals, fresh crunch. These cups balance sweet platters and still pass the hand-out test.
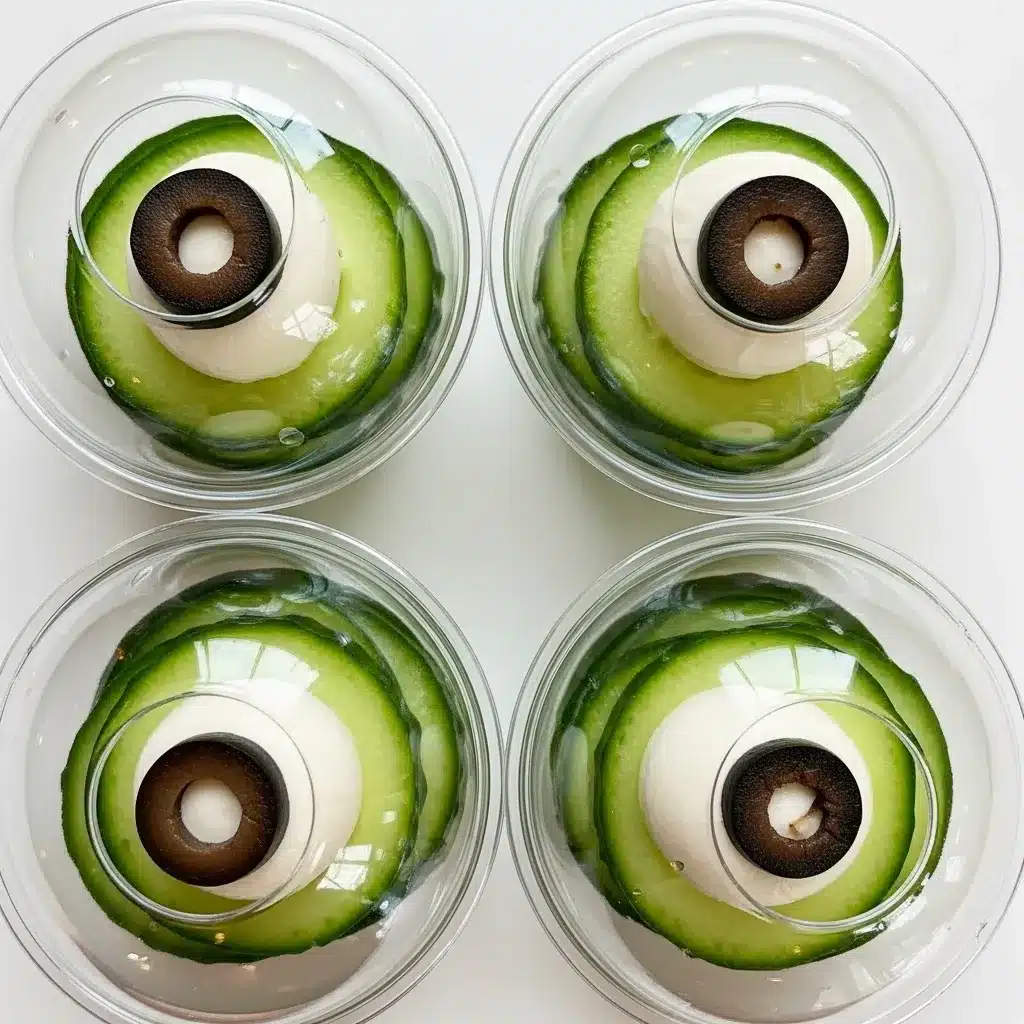
You’ll need (24 cups):
- 24 small clear cups (4 oz) with lids
- 2 large cucumbers (peeled if waxed), sliced into ¼-inch rounds (~60–70 rounds)
- 24 mozzarella pearls (DF alternative: small vegan mozzarella balls)
- 24 pitted olive slices (black or green)
- Optional: 24 crackers (GF brand if needed), bagged separately to keep crisp
Steps (12–15 minutes):
- Base: Place 2–3 cucumber rounds in each cup.
- Eye build: Stack 1 mozzarella pearl + 1 olive slice on a cucumber round to make the “eye.”
- Finish: Add one more cuke round for snacking if space allows; lid tight.
Packaging & labels:
- Pack: Cups line up snugly; keep horizontal in bin.
- Label: “Cucumber, mozzarella pearl, olive. Contains: dairy.” For DF, mark “dairy-free mozzarella used.”
Troubleshooting:
- Moisture pooling? Pat cucumber slices dry and add a tiny square of paper towel under the bottom layer (remove before serving if teacher prefers).
- Eyes sliding? Flatten one cuke round slightly with a paper towel to reduce slip.
Quick chooser (when you need one savory in 10–15 minutes)
- Fastest: Cheese “Pumpkin” Skewers (10–12 min)
- Most playful: Witch-Broom Pretzels (12–15 min)
- Best dipper: Jack-O’-Lantern Hummus Dippers (15–20 min; fridge-friendly)
- Fresh balance: Cucumber “Monster Eyes” Cups (12–15 min; DF option)
These four give you a savory anchor in a sea of sweets—teacher-approved portions, clear labels for nut free halloween treats for school, and packaging that functions as individually wrapped halloween treats for quick distribution. They also stack safely in bins for truly travel friendly halloween desserts and snacks.
Bonus Sweet Minis (Round Out the +21)
These last two sweets finish your halloween class party treats roster with maximum speed and minimum mess. Both are true easy halloween treats no bake and portion beautifully as individually wrapped halloween treats. You’ll get precise yields, packaging sizes, allergy labeling, and storage windows so they move from counter to classroom without stress—exactly what you need for no bake halloween snacks for class that are also genuinely travel friendly halloween desserts.
20) Mummy Graham Crackers
Crisp, creamy, and wildly photogenic—these “bandaged” mummies stack flat, set fast, and bag in minutes.
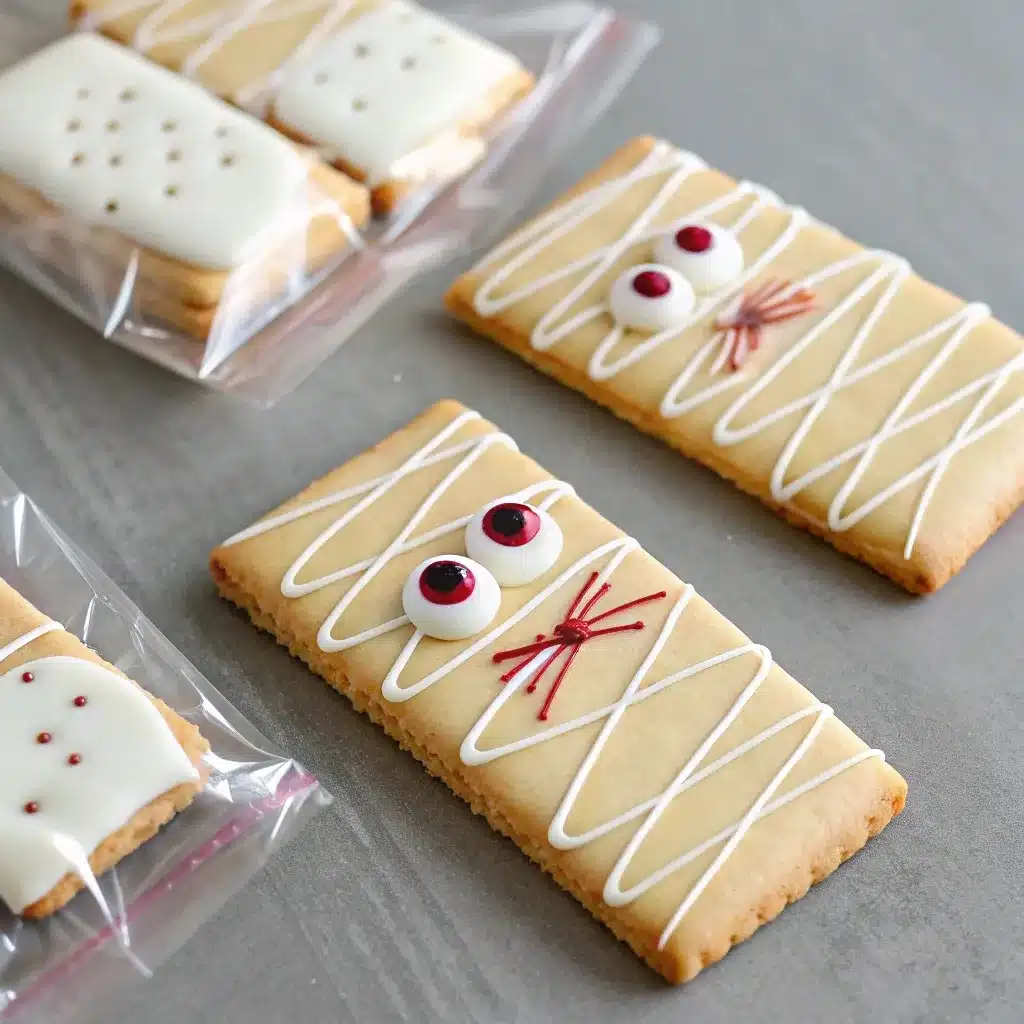
Full recipe: Mummy Graham Crackers
Troubleshooting:
- Crackers snapping during dip? Spread coating with a spatula instead of dipping; support the cracker on your palm.
- Drizzle too thick? Warm the bag 5–10 seconds; aim for thread-thin lines so bandages look delicate.
Cost & yield:
- 1 box of grahams + 1 lb coating ≈ 24 mummies; very budget-friendly for a full class.
21) Candy-Corn Snack Mix Cups
Colorful, crunchy, and fast—these cups feel festive without full-on candy overload. A micro drizzle “locks” sprinkles so they don’t spill in the classroom.
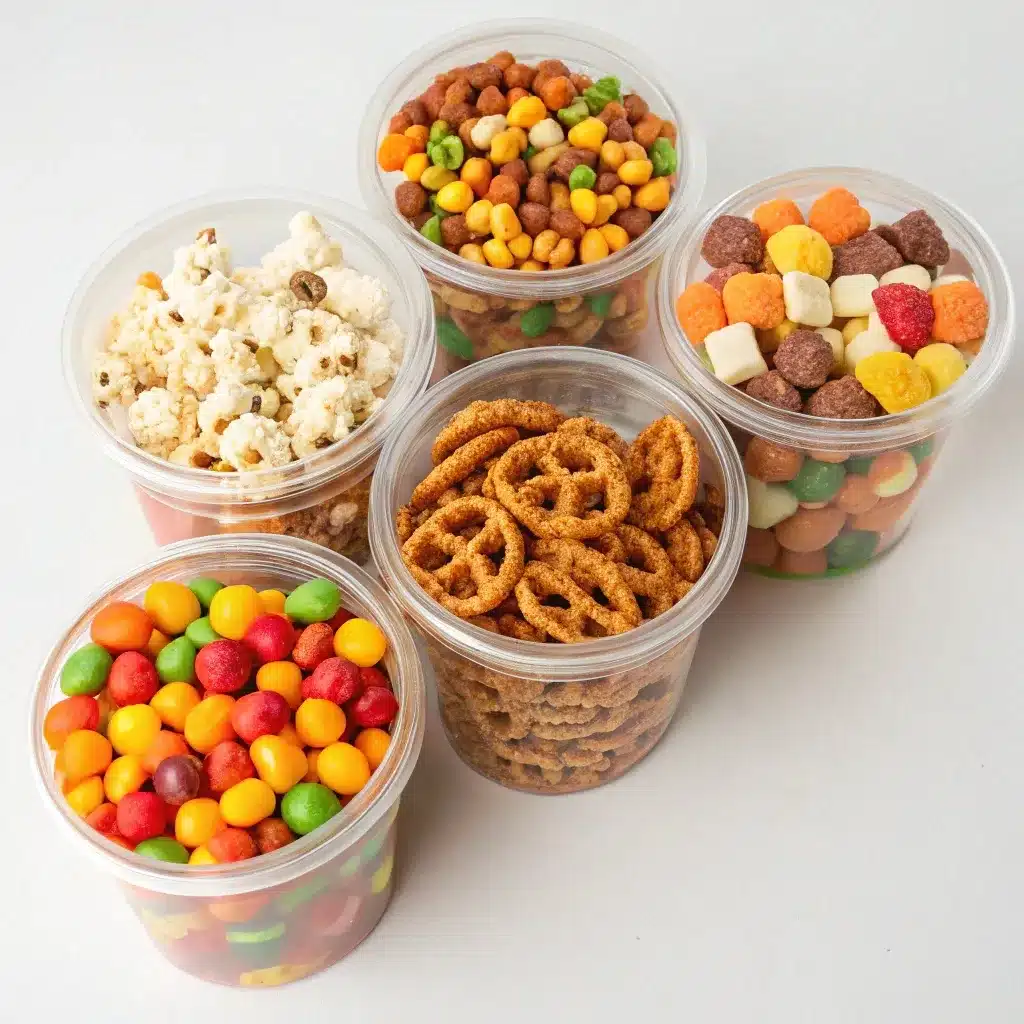
You’ll need (24 cups):
- 6 cups plain popcorn (air-popped or lightly salted)
- 3 cups corn-square cereal
- 3 cups mini pretzels (GF brand if needed)
- 1½–2 cups candy corn (or dye-free alternative)
- 6–8 oz white coating (just enough for a light binding drizzle)
- ½ cup small Halloween sprinkles (optional)
- 24 clear 4 oz cups with tight lids
Equipment: Very large bowl, parchment-lined sheet pan, microwave-safe bowl, spoon
Steps (15–18 minutes):
- Mix base (3–4 min): In a large bowl, gently combine popcorn, cereal, and pretzels.
- Sweet pop (1–2 min): Fold in candy corn (reserve a handful for topping).
- Micro-drizzle (4–5 min): Melt coating until smooth. Drizzle lightly over the bowl in a thin stream while tossing with a wide spoon—just enough to make a few clusters (don’t soak).
- Set briefly (3–4 min): Spread mix onto a parchment-lined sheet; add optional sprinkles and the reserved candy corn; let stand until the drizzle firms.
- Cup & lid (3–4 min): Scoop ¼ cup into each 4 oz cup; snap lids firmly.
Classroom packaging & labels:
- Pack: Cups nest perfectly in a flat bin.
- Label: “Popcorn, corn cereal, pretzels, candy corn, light white drizzle, sprinkles. Contains: wheat (pretzels/cereal), may contain dairy/soy (coating).” Note GF pretzels/cereal if used.
Allergy swaps:
- GF: Use GF pretzels + verified GF corn cereal; check sprinkles.
- DF: DF coating or skip drizzle (still tasty).
- Dye-light: Choose dye-free candy or reduce candy corn; lean on cereal shapes for color/texture.
Troubleshooting:
- Soggy mix? Too much drizzle or humidity. Use a lighter hand and let set fully before cupping.
- Lids popping off? Overfilled cups. Stick to ¼ cup; tap cups gently so mix settles before lidding.
Cost & yield:
- Pantry staples keep cost low; one batch yields exactly 24 cups (¼ cup each), ideal for a standard class.
Quick chooser (when you need two fast sweets to finish the tray)
- 10–12 minutes + set: Mummy Graham Crackers (drizzle + eyes, bag 1 each)
- 15–18 minutes: Candy-Corn Snack Mix Cups (¼-cup portions with tidy lids)
These two complete your +21 with zero oven time, classroom-ready packaging, and labels that answer every teacher question—proof that no bake halloween snacks for class can be adorable, fast, and fully travel friendly halloween desserts.
Classroom FAQs
What treats are most likely to be approved quickly?
Anything clearly labeled and packaged as individually wrapped halloween treats. Teachers love tidy items: halloween marshmallow pops (sleeved), white chocolate halloween bark (small squares), pretzel rods (in sleeves), and mini cups with lids. Clear “Ingredients” + “Contains” lines speed hand-out.
Our classroom is nut-free. What can I safely bring?
Choose nut free halloween treats for school using seed butter (SunButter) instead of peanut butter, GF pretzels/crackers if needed, and coatings/sprinkles with labels photographed. Great picks: SunButter monster bites, dairy-free bark, bark squares, pops, and Krispie minis. Write “Nut-Free” on the label and keep brand photos on your phone.
I only have 30 minutes—what’s the fastest plan for 24–30 kids?
Run the 10-minute assembly cycle:
– Batch A: halloween marshmallow pops (dip, sprinkle, sleeve).
– Batch B: white chocolate halloween bark (spread, score, chill, snap; 1–2 squares/bag).
This combo delivers easy halloween treats no bake with minimal cleanup.
How many pieces should I pack per child?
Pops/rods: 1 each. Bark or small cookies: 1–2 small pieces. Bites: 2. Cups: 1 cup + a wrapped spoon. Always make 10% extra for teachers/allergy swaps.
Conclusion — Your Classroom-Fast Game Plan
When the class note appears, think in three lanes: one cookie build, one glossy white-chocolate tray, and one pop or cup. That trio covers crunch, color, and clean hand-outs. Use our 10-minute cycle to dip or assemble a batch, chill to set, then bag and label. Every idea here was sized for desks and backpacks so your halloween class party treats arrive cute, countable, and classroom-approved.
If you’re truly racing the clock, choose the speed combo—no bake halloween snacks for class like bark squares and pops. If you need an allergy-smart spread, pair SunButter monster bites with dairy-free bark and add a small batch of savory cups. Either way, keep labels simple, snap photos of packaging, and layer parchment in your bins. In under an hour you’ll have easy halloween treats no bake that look polished, pass every checkpoint, and hand out in seconds—individually wrapped halloween treats that are genuinely travel friendly halloween desserts. Happy class-party season!