Introduction
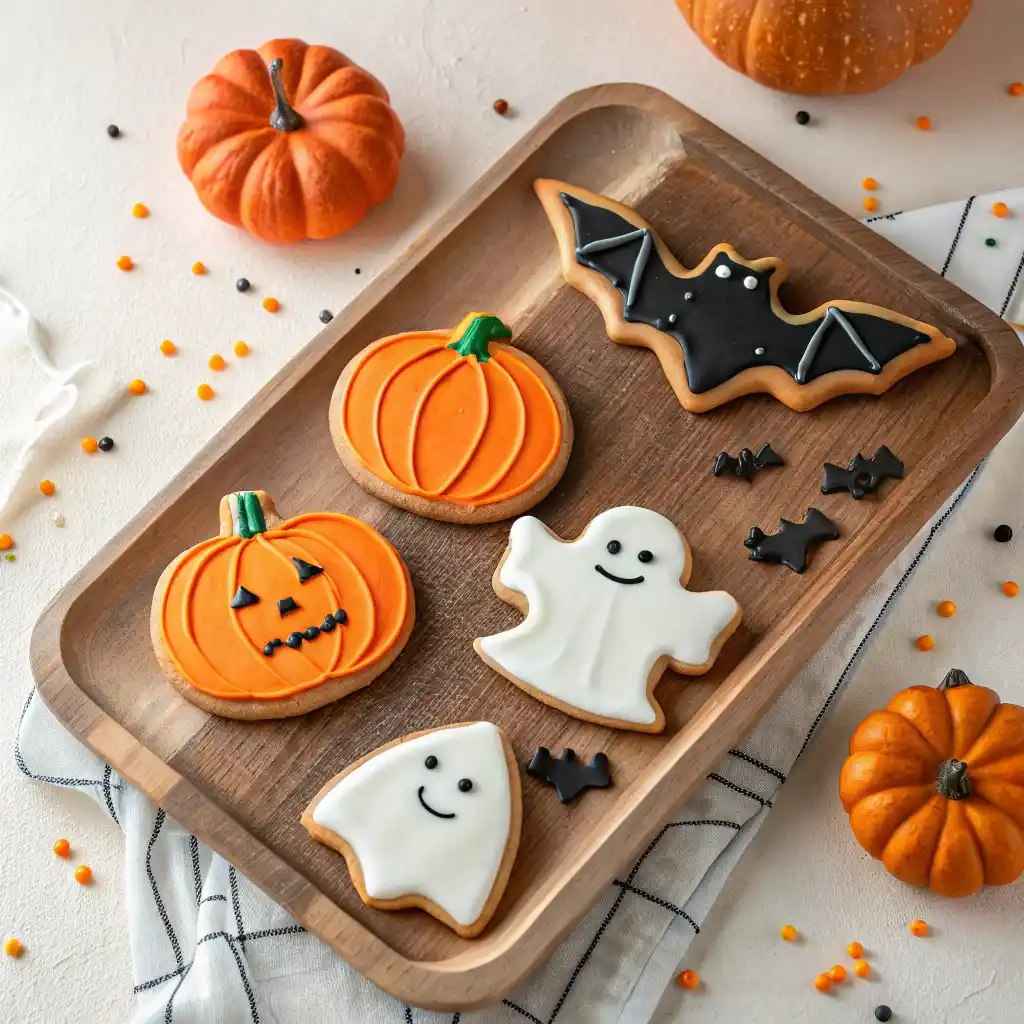
Halloween sugar cookies with royal icing are the kind of treat that never goes out of style. They’re simple to bake, fun to decorate, and instantly bring a spooky yet playful vibe to any October celebration. With a good sugar cookie base and the magic of royal icing, you can transform basic dough into ghosts, pumpkins, bats, and spiderwebs that look straight off a bakery tray.
I still remember the first time I baked a batch of cut-out Halloween cookies as a kid—rolling the dough, stamping shapes, and watching them turn golden in the oven. But the real fun always came after, when the cookies cooled and we brought them to life with bright icing, candy eyes, and sprinkles. That creative moment is what makes Halloween cookie decorating such a beloved tradition.
In this recipe and guide, I’ll walk you through everything you need: a no-fail sugar cookie dough, a step-by-step royal icing tutorial, and lots of Halloween cookie decorating ideas that are perfect for beginners and kids. Whether you want spooky spider webs, silly monster faces, or cute pumpkins, these cookies will be the highlight of your party table—and the ones everyone reaches for first.
Table of Contents
Why Halloween Sugar Cookies Are Always a Hit
The Magic of Cut-Out Halloween Cookies
When it comes to Halloween baking, nothing beats a Halloween sugar cookies recipe that lets you cut out shapes and decorate them in endless spooky styles. With just one batch of dough, you can roll, cut, and transform it into pumpkins, ghosts, bats, and spiderwebs that look like they came straight from a bakery window. That’s why cut-out Halloween cookies are such a classic—they’re endlessly versatile, and every family can make them their own.
The beauty of sugar cookies is how well they hold their shape. You don’t need fancy tools; just a rolling pin, cookie cutters, and a little imagination. Once baked, they’re sturdy enough for decorating, but still soft and buttery when you bite in. This combination of easy baking and big creative payoff makes them one of the most requested spooky Halloween cookies every year.
Royal Icing – The Secret to Spooky Designs
The real star of decorated cookies is the icing. Buttercream is great for cupcakes, but for cookies, royal icing for Halloween cookies is the game changer. It’s smooth, sets hard, and creates a glossy finish that’s perfect for flooding, piping outlines, and layering details. With just powdered sugar, meringue powder, and water, you can make icing that’s sturdy enough for spiderwebs yet thin enough to flood a ghost silhouette.
Even if you’re new to decorating, royal icing makes it possible to create easy decorated Halloween cookies that look impressive without requiring bakery-level skills. Flood the base, let it dry, and then add faces, stitches, or even candy eyes for that playful Halloween charm. Kids especially love squeezing icing bags and adding sprinkles, turning baking into a family activity.
That’s the magic: these cookies aren’t just desserts, they’re a creative experience. Whether you’re hosting a party or baking with kids, Halloween sugar cookies with royal icing are the perfect mix of fun, flavor, and festive spirit.
Print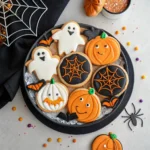
Halloween Sugar Cookies with Royal Icing – Spooky Fun
- Total Time: 40 minutes (plus chilling)
- Yield: ~30 cookies (depending on cutter size)
Description
Soft, buttery cut-out sugar cookies decorated with colorful royal icing. These Halloween sugar cookies with royal icing are fun, festive, and perfect for spooky parties or baking with kids.
Ingredients
- 2 ¾ cups all-purpose flour
- 1 cup unsalted butter, softened
- 1 cup granulated sugar
- 1 large egg
- 1 tsp vanilla extract
- 1 ½ tsp baking powder
- ¼ tsp salt
- (Optional) 1 tsp pumpkin spice for seasonal flavor
Royal Icing:
- 3 cups powdered sugar
- 2 tbsp meringue powder
- 5–6 tbsp water (adjust for consistency)
- Gel food coloring (orange, black, green, purple)
- Candy eyes, sprinkles, or edible glitter (optional)
Instructions
- In a large bowl, cream butter and sugar until light and fluffy.
- Beat in egg and vanilla extract until combined.
- In another bowl, whisk flour, baking powder, salt, and pumpkin spice.
- Gradually add dry ingredients to wet until dough forms.
- Wrap dough in plastic and chill for 30–60 minutes.
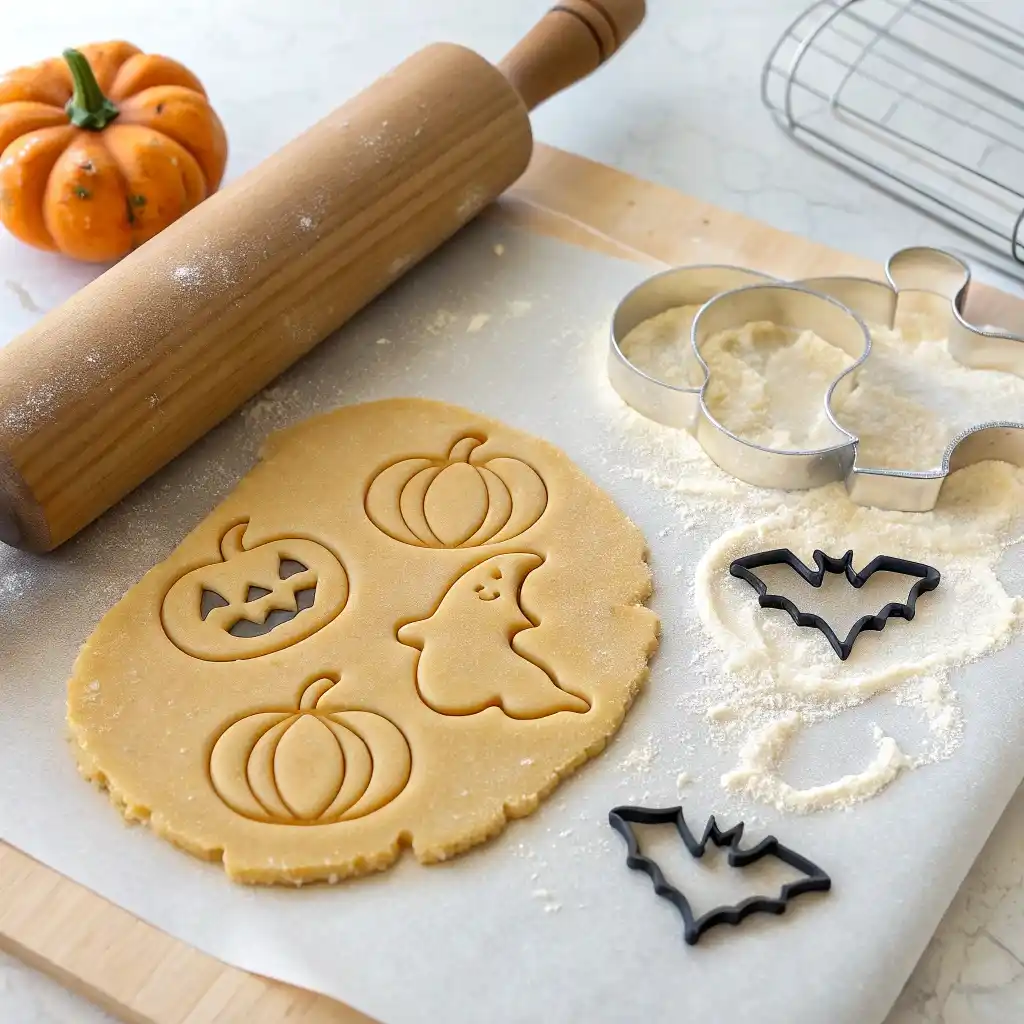
- Preheat oven to 350°F (175°C). Roll dough on parchment paper to ¼-inch thickness.
- Cut into pumpkin, ghost, or bat shapes with cookie cutters.
- Bake on lined sheets for 8–10 minutes or until edges are just set. Cool completely.
- Make icing: whisk powdered sugar, meringue powder, and water until smooth. Divide into bowls and color.
- Outline cookies with thick icing, flood with thinned icing, and decorate with details, sprinkles, or candy eyes.
- Allow icing to dry 4–6 hours before stacking or packaging.
Notes
- Dough can be made ahead and frozen for up to 2 months.
- Royal icing consistency: thicker for outlines, thinner for flooding.
- For kids, use squeeze bottles instead of piping bags for easier decorating.
- Cookies stay fresh in airtight containers for up to 5 days.
- Prep Time: 30 minutes (plus chilling)
- Cook Time: 10 minutes
- Category: Dessert, Holiday Baking
- Method: Baking
- Cuisine: American
Nutrition
- Serving Size: 1 cookie
- Calories: 140 kcal
- Sugar: 12 g
- Sodium: 50 mg
- Fat: 6 g
- Saturated Fat: 4 g
- Unsaturated Fat: 1.5 g
- Trans Fat: 0 g
- Carbohydrates: 20 g
- Fiber: 0.5 g
- Protein: 1.5 g
- Cholesterol: 20 mg
Ingredients & Tools You’ll Need
Key Ingredients for Perfect Sugar Cookies
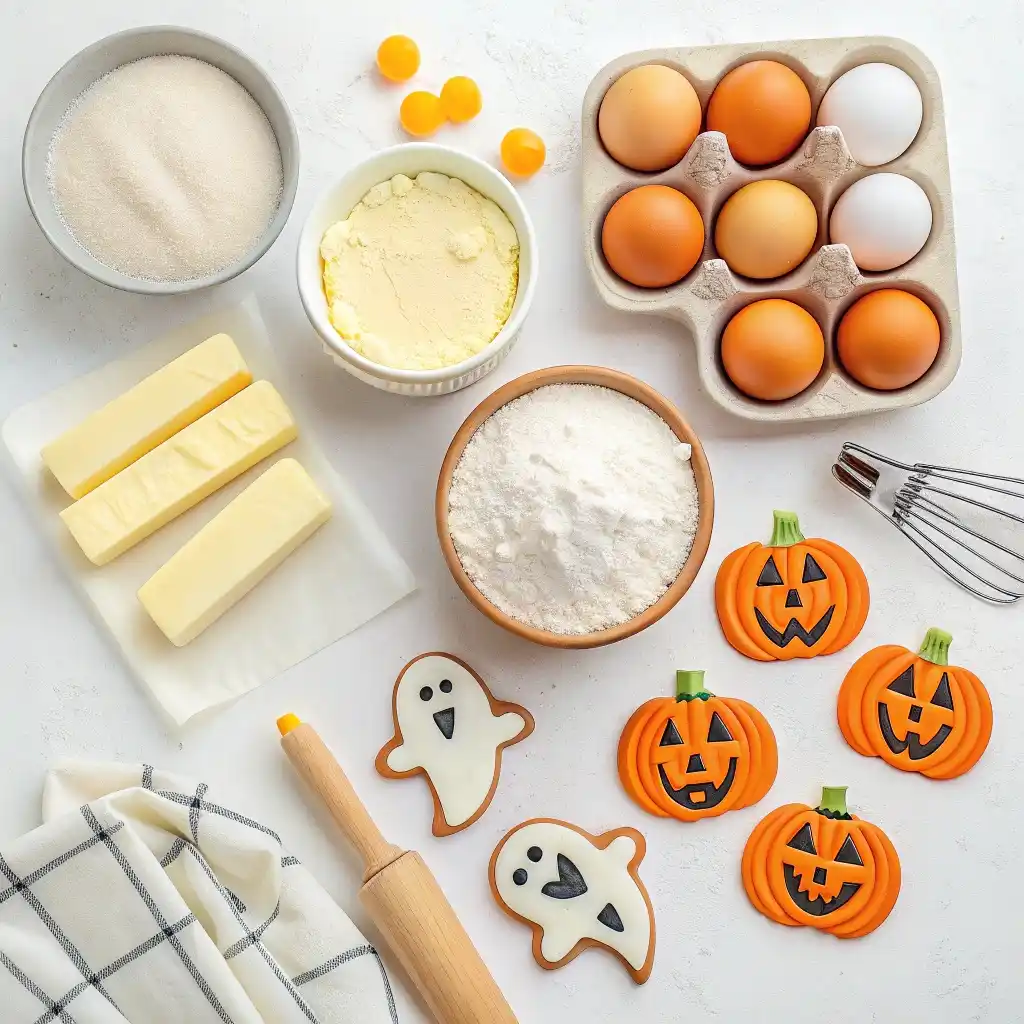
The base of any great Halloween sugar cookies recipe is simple, but each ingredient matters. Start with all-purpose flour for structure and unsalted butter for that rich, melt-in-your-mouth flavor. Granulated sugar sweetens and helps cookies hold their shape, while eggs bring everything together. A touch of vanilla adds warmth, though you can also mix in pumpkin spice for seasonal flair. Baking powder ensures the dough bakes evenly without spreading too much, which is exactly what you want for cut-out Halloween cookies that keep their ghost or pumpkin shape.
For the icing, powdered sugar, meringue powder, and water are all you need for classic royal icing for Halloween cookies. Add gel food coloring in black, orange, green, and purple to match the holiday vibe. Candy eyes, sprinkles, or edible glitter give your cookies that final spooky sparkle.
Tools for Easy Cookie Decorating
Having the right tools makes decorating much easier, especially if you’re trying out new Halloween cookie decorating ideas. A set of Halloween-themed cookie cutters (pumpkins, bats, cats, ghosts) will instantly turn plain dough into festive shapes. Rolling pins and parchment paper help keep dough even, while cooling racks ensure cookies are ready to ice.
For decorating, grab a few piping bags with small round tips. Use them for outlining cookies before flooding with thinned icing. Toothpicks or scribe tools are great for pulling icing into spiderwebs or marbling designs. If you’re baking with kids, let them use squeeze bottles instead of piping bags—it’s less messy and keeps things fun. For more inspiration on simple but festive decorating, try these Halloween Marshmallow Pops, which use the same candy eyes and sprinkles to create playful results.
When your pantry is stocked and your tools are ready, making spooky Halloween cookies becomes less stressful and more creative. The setup is half the battle, and once you have it, the fun of decorating begins.
Step-by-Step Recipe
How to Make the Cookie Dough
The foundation of every Halloween sugar cookies recipe is a dough that holds its shape but stays soft once baked. Begin by creaming together butter and sugar until light and fluffy, then add in eggs and vanilla extract. Gradually mix in flour and baking powder until the dough comes together. If you’d like to add seasonal flair, sprinkle in a teaspoon of pumpkin spice.
Chill the dough for at least 30 minutes before rolling. This makes it easier to handle and ensures your cut-out Halloween cookies won’t spread while baking. Once chilled, roll the dough between two sheets of parchment paper for even thickness, then cut into pumpkins, ghosts, bats, or cats.
Baking & Preparing for Decoration
Arrange the cookies on a lined baking sheet and bake at 350°F (175°C) for 8–10 minutes, until the edges are just set but not browned. Cool completely on wire racks before icing. Decorating on warm cookies will melt your icing, so patience here makes all the difference.
When you’re ready, prepare your royal icing for Halloween cookies by whisking powdered sugar, meringue powder, and water until smooth. Separate into bowls and add gel food coloring. Start with outlines, flood the centers, and let each layer dry before adding details. Candy eyes, sprinkles, or drizzled webs will instantly turn these into spooky Halloween cookies that shine at any party.
If you enjoy hands-on decorating, you’ll also love these Halloween Monster Brownies, which use a similar process of adding candy eyes and colorful details for a playful, festive effect.
Decorating Halloween Cookies with Royal Icing
Easy Halloween Cookie Designs for Beginners
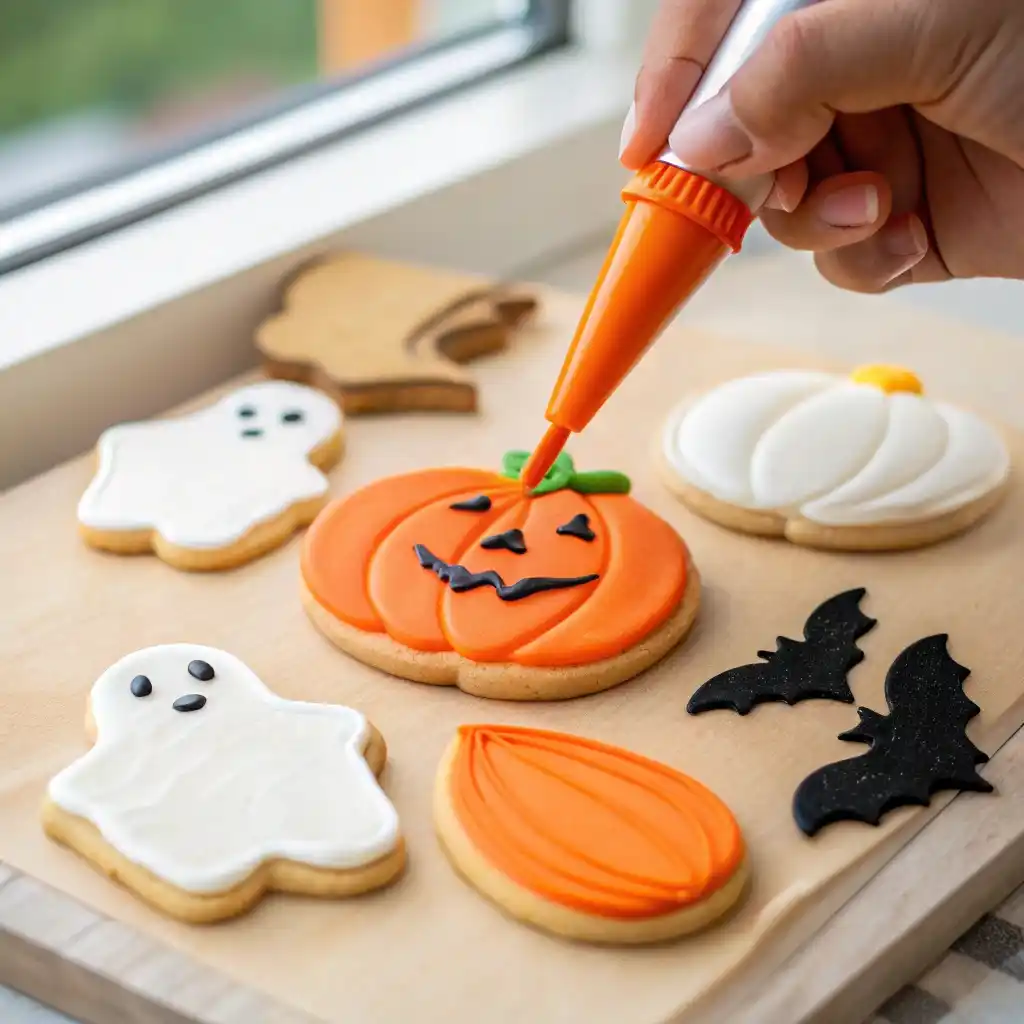
The beauty of royal icing is that it makes easy decorated Halloween cookies possible for anyone, even if you’ve never piped before. Start with simple shapes like pumpkins and ghosts. Outline the edges with slightly thicker icing, then fill the center with thinned icing using the flooding method. A toothpick or scribe tool helps spread the icing evenly and pop any air bubbles. Once the base dries, add faces, stitches, or spiderwebs with contrasting colors.
For pumpkins, outline in orange, flood the center, then add green vines once dry. For ghosts, flood with white, then pipe on silly or spooky faces in black. Bats and cats can be done in dark icing with tiny yellow eyes for dramatic effect. These simple steps turn your Halloween sugar cookies recipe into bakery-worthy treats without stress.
Spooky Cookie Decorating Ideas for Kids
When decorating with kids, keep things playful and less about perfection. Use candy eyeballs to turn basic shapes into monsters or mummies. Let them drizzle icing for spiderwebs, then add sprinkles for a textured, spooky look. Kids love squeezing icing bottles, and even messy designs end up as fun, festive spooky Halloween cookies.
Another easy hack: dip half of a round cookie in black icing and leave the other half plain, then add candy eyes—it instantly looks like a peeking monster. Or try striping orange and purple icing for a fun marbled effect. For party spreads, mix in other themed desserts like these Halloween Cupcakes with Candy Corn to create a colorful table of spooky sweets.
The best part is how flexible these cookies can be. From creepy spiderwebs to cute pumpkins, decorating is about creativity, not perfection. Whether you’re going for creepy, silly, or kid-friendly, Halloween cookie decorating ideas like these will keep everyone entertained while filling your dessert table with color and charm.
FAQs
Can I freeze decorated Halloween sugar cookies?
Yes! Once your cookies are fully dried, place them in a single layer between sheets of parchment paper in an airtight container. They can be frozen for up to 2 months. This is perfect if you’re planning your Halloween sugar cookies recipe ahead of a party. Just thaw at room temperature before serving.
How long does royal icing take to dry?
Royal icing for Halloween cookies usually needs 4–6 hours to set fully, though you can decorate in stages once the base layer is dry to the touch. For stacking or packaging, always let them dry overnight to avoid smudges.
Can I use store-bought dough instead of homemade?
Absolutely. While homemade dough gives the best flavor and texture, you can roll out store-bought sugar cookie dough, cut it into shapes, and decorate. It’s one of the best shortcuts for making easy decorated Halloween cookies on a busy schedule.
What are the easiest Halloween cookie decorating ideas for beginners?
Start with pumpkins, ghosts, and bats. Outline, flood, then add faces or sprinkles. Even simple shapes look festive. For kids, mummies with candy eyes or spiderwebs drawn with a toothpick are always fun and foolproof.
Conclusion
There’s a reason Halloween sugar cookies with royal icing remain one of the most loved holiday bakes year after year. They’re simple, adaptable, and bring just the right balance of spooky and fun. From pumpkins with cheeky faces to ghostly outlines and colorful spiderwebs, the possibilities are endless. With a reliable dough and easy-to-mix royal icing, even beginners can create spooky Halloween cookies that look like they came straight from a bakery.

The best part is how versatile this recipe can be. Bake a batch for classroom parties, decorate with kids at home, or serve them as part of a bigger Halloween dessert table. If you’re hosting, pair these cookies with festive treats like White Chocolate Halloween Bark to add more variety and color to your spread.
So whether you stick to classic ghosts and pumpkins or get creative with monster faces and candy eyes, these easy decorated Halloween cookies will always be a crowd favorite. Grab your cutters, whip up some icing, and let the decorating fun begin—because nothing says Halloween quite like a tray full of spooky, sweet cookies.