Introduction
White Chocolate Halloween Bark has become one of my go-to Halloween traditions. It’s colorful, festive, ridiculously easy, and the kind of treat you can whip up in less than 20 minutes—no baking required. Every October, I get excited to bring this bark back into the kitchen. It started when I was prepping for a last-minute Halloween gathering and needed something quick but cute. I melted some white chocolate, tossed in leftover candy, and sprinkled a little magic on top. The result? A bark that’s now requested by friends and family every year.
The real fun of making this bark is that you can get so creative with the toppings—candy eyes, pretzels, M&Ms, gummy worms, sprinkles… whatever screams “Halloween” to you. And because it’s so easy to make, it’s perfect for little hands to help with too. It’s become a spooky kitchen tradition in our home, and I’m sure it’ll be in yours, too.
If you love fast, festive, no-bake treats, you’ll also love my White Chocolate Mummy Truffles—they’re just as fun and kid-approved!
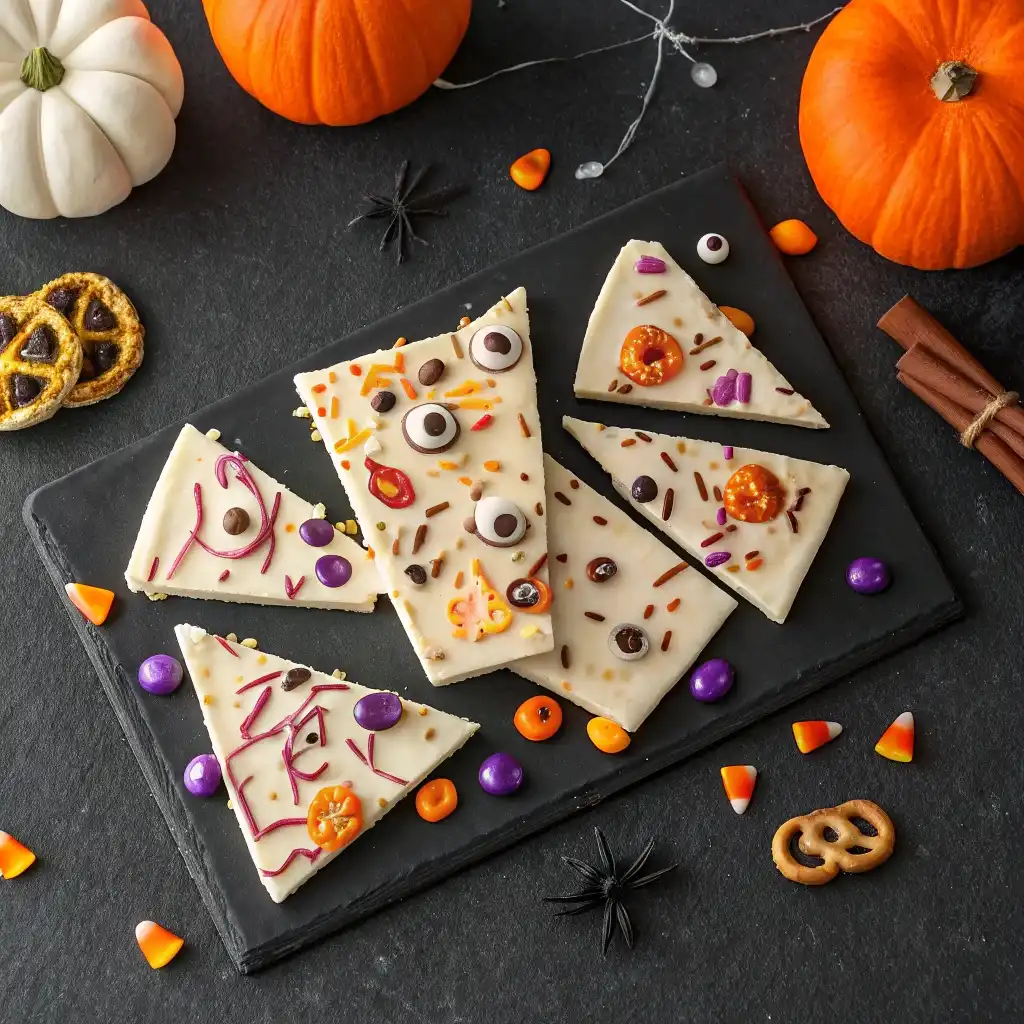
Table of Contents
Why I Love Making Halloween Bark
There’s something so satisfying about making a treat that looks like it took a lot of effort but only takes minutes to pull together. White Chocolate Halloween Bark is exactly that kind of magic. I love how I can open up my pantry, pull out whatever Halloween candy we have on hand, and turn it into something everyone gets excited about.
When my niece decorated her first bark with candy eyeballs and gummy fangs, her face lit up. It was a reminder that the best Halloween treats aren’t just about sugar—they’re about memories. And when your kitchen smells like melted white chocolate? You know you’re doing something right.
What Makes This Bark Special
This bark stands out for three reasons:
- It’s completely no-bake – No oven, no stovetop, no stress.
- Endless ways to customize – You can go spooky, cute, classy, or totally over-the-top.
- It stores well – Make it ahead and break it out when the party starts.
Even better, it’s a great way to repurpose leftover Halloween candy or clean out your baking drawer. Toss in whatever you have—M&Ms, gummy worms, pretzels, sprinkles—and press it into the warm white chocolate base. As it cools, everything sets perfectly in place.
If you’re into white chocolate-based Halloween recipes, don’t miss this Halloween Layer Cake. They make a great match for this bark on any spooky dessert table!
Print
White Chocolate Halloween Bark
- Total Time: 45 minutes
- Yield: 20 pieces 1x
- Diet: Vegetarian
Description
This festive White Chocolate Halloween Bark is a no-bake treat made with melted white chocolate and topped with spooky Halloween candies. It’s quick, fun to make, and perfect for parties, gifts, or decorating dessert tables. Kid-friendly and fully customizable.
Ingredients
- 12 oz white chocolate (chips or bars)
- 2 tbsp Halloween sprinkles (orange, purple, black)
- 1/4 cup candy eyes
- 1/4 cup M&Ms or Reese’s Pieces
- 1/4 cup mini pretzels, broken
- 2 tbsp gummy worms or candy corn
- Optional: gel food coloring (orange or purple)
Instructions
- Line a baking sheet with parchment paper.
- In a microwave-safe bowl, melt white chocolate in 20-second intervals, stirring until smooth.
- Pour melted chocolate onto the parchment and spread into a rectangle, about 1/4 inch thick.
- Quickly decorate with sprinkles, candy eyes, M&Ms, pretzels, and gummy candies.
- (Optional) Add colored chocolate drizzle using a piping bag or Ziploc with snipped corner.
- Chill in the refrigerator for 30 minutes or until set.
- Once firm, break into irregular pieces. Serve or store.
Notes
- Use good-quality white chocolate for best flavor and texture.
- Store in an airtight container at room temp for 5–7 days.
- Bark can also be frozen for up to 1 month.
- Get creative with toppings—Oreos, chopped candy bars, or ghost marshmallows work great too.
- Prep Time: 15 minutes
- Chill Time: 30 minutes
- Cook Time: 0 minutes
- Category: Dessert, Snack
- Method: No-Bake
- Cuisine: American
Nutrition
- Serving Size: Per Piece
- Calories: 130 kcal
- Sugar: 11 g
- Sodium: 30 mg
- Fat: 7 g
- Saturated Fat: 4 g
- Unsaturated Fat: 2 g
- Trans Fat: 0 g
- Carbohydrates: 14 g
- Fiber: 0.5 g
- Protein: 1 g
- Cholesterol: 2 mg
What You’ll Need to Make White Chocolate Halloween Bark
Making White Chocolate Halloween Bark doesn’t require much. You only need a few basic ingredients and tools to pull off a colorful, spooky dessert that looks way more impressive than it is. This is the kind of recipe you can prep in 10 minutes, especially if you’ve got some leftover Halloween candy sitting around.
Ingredients You’ll Need
The best part about White Chocolate Halloween Bark is how flexible it is. You can go all-in with themed candies or keep it simple with whatever you have on hand.
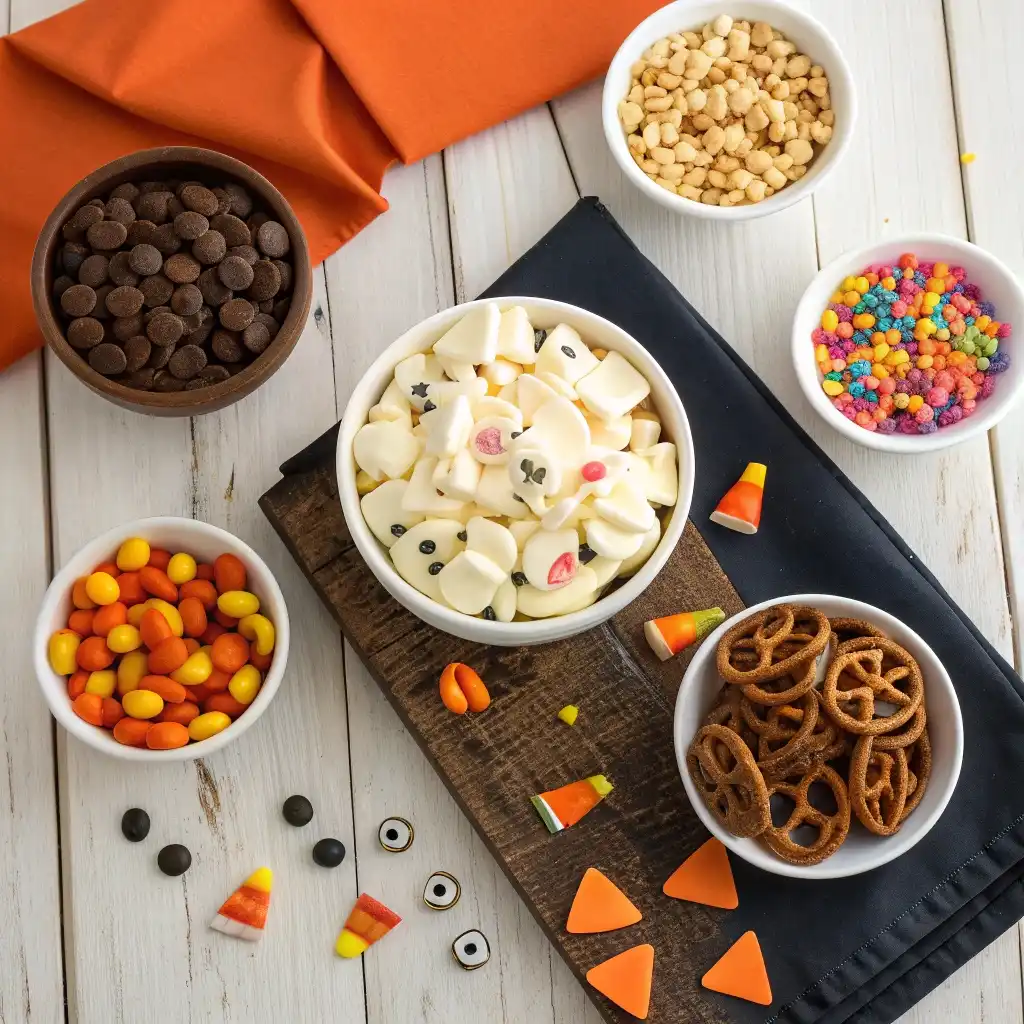
Here’s a basic ingredient list to get you started:
- 12 oz white chocolate – use bars or high-quality chips that melt smoothly
- Candy eyes – for that spooky Halloween vibe
- Mini pretzels – adds crunch and contrast
- Sprinkles – Halloween-themed, like orange, black, and purple
- M&Ms or Reese’s Pieces – colorful and festive
- Gummy worms or candy corn – for a fun, creepy touch
- Optional food coloring – gel-based orange or purple to swirl in spooky patterns
You can swap ingredients based on what you like or need. Want to go nut-free? Leave out the peanut candies. Prefer vegan? Use dairy-free white chocolate and vegan gummies.
Tools That Make It Easy
You don’t need any fancy equipment, but a few tools will make the process smoother:
- Microwave-safe bowl – for melting white chocolate
- Rubber spatula or offset spatula – to spread the melted chocolate evenly
- Parchment paper – so nothing sticks
- Baking sheet – to hold the bark while it chills
- Ziploc bag or piping bag – if you want to drizzle colored chocolate
These tools are probably already in your kitchen. That’s what makes White Chocolate Halloween Bark so easy and beginner-friendly.
How to Make White Chocolate Halloween Bark Step-by-Step
Making White Chocolate Halloween Bark is as easy as melt, pour, decorate, and chill. It’s fast, mess-free, and fun to do alone or with kids. If you’ve got 15 minutes and a little imagination, you’re good to go.
Start by melting your white chocolate in a microwave-safe bowl. Heat it in short 20–30 second bursts, stirring between each round until smooth. Be careful not to overheat—white chocolate burns easily.
Next, line a baking sheet with parchment paper. Pour the melted chocolate onto the paper and spread it into a rectangle about a quarter-inch thick. Don’t worry about perfect edges—this is bark, after all.
Now, move fast. While the chocolate is still warm and soft, start adding your toppings. Press in candy eyes, M&Ms, sprinkles, and pretzels. Add gummy worms crawling across the bark for a creepy-cute finish. If you’re using colored chocolate drizzle, this is the moment to zigzag it on for extra Halloween flair.
Once decorated, place the tray in the fridge for 20–30 minutes or until fully set. After it’s firm, lift the bark off the parchment and break it into uneven pieces. The jagged edges add to its spooky charm.
Tips for Bark That Looks Bakery-Worthy
To keep your White Chocolate Halloween Bark looking sharp and tasting great, follow these simple tricks:
- Use good-quality white chocolate. It melts smoother and tastes richer.
- Don’t overload the toppings. A few well-placed pieces go a long way visually.
- Work quickly. Chocolate starts to set fast, especially in a cool room.
- Layer textures. Mix chewy candies with crunchy ones for the best bite.
- Chill flat. Keep your baking sheet level in the fridge so the bark sets evenly.
And remember—perfection isn’t the goal. The charm of White Chocolate Halloween Bark is that no two pieces are the same. Each one is spooky, sweet, and fun to snack on.
How to Store and Customize White Chocolate Halloween Bark
You’ve made a colorful batch of White Chocolate Halloween Bark, now what? Whether you’re serving it at a party or making it as edible gifts, storing it the right way makes all the difference.
Best Way to Store Halloween Bark
The key to keeping your bark fresh is a cool, dry place. Once the bark has set and been broken into pieces, transfer it to an airtight container. If your kitchen runs warm, keep it in the fridge to prevent melting—especially if you used candy that gets sticky.
Avoid stacking the pieces too tightly. A layer of wax or parchment paper between each level can help keep decorations from smudging.
Properly stored, White Chocolate Halloween Bark lasts:
- 5 to 7 days at room temperature
- Up to 2 weeks in the fridge
- 1 month in the freezer, sealed tightly
If you’re freezing it, just make sure to thaw it in the fridge to avoid moisture build-up.
Creative Ways to Use and Gift It
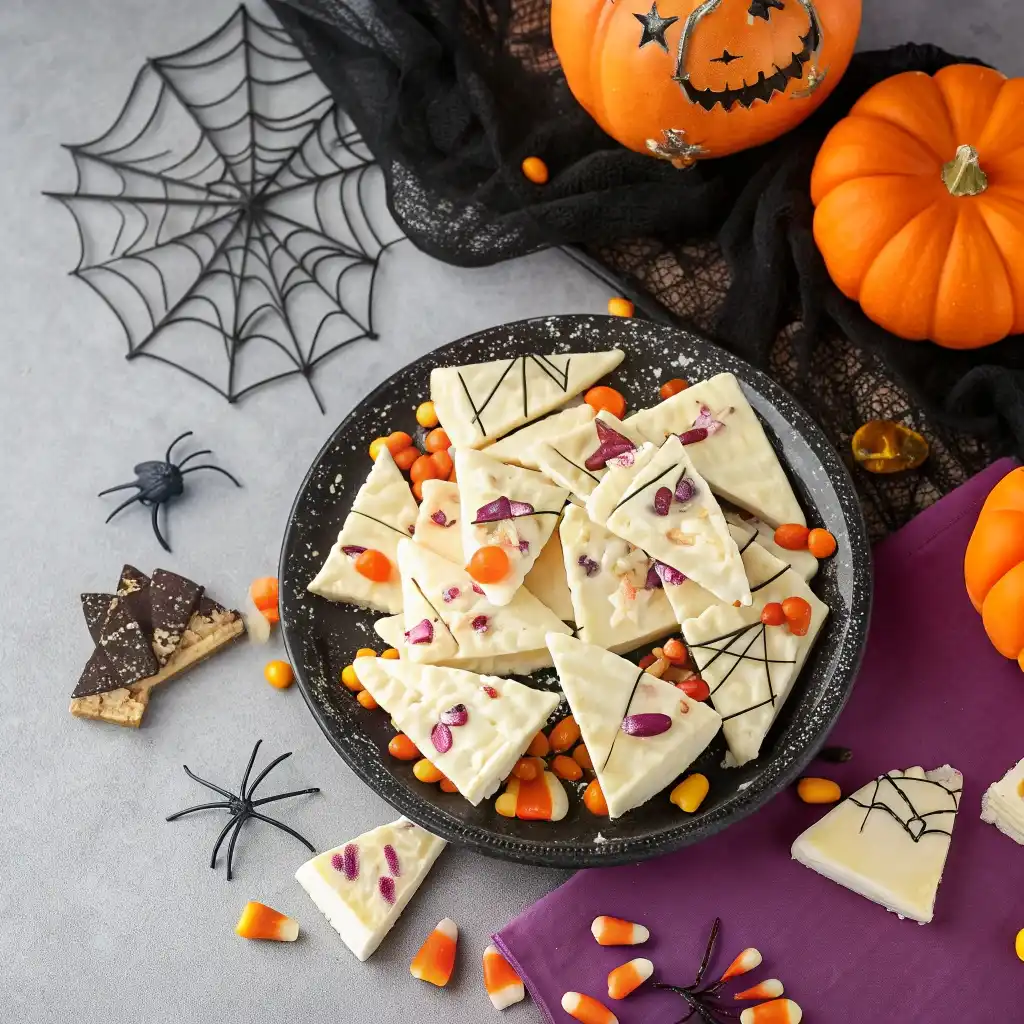
This bark isn’t just for snacking. It makes a great addition to treat bags, dessert boards, and party favors. Break it into medium-sized shards, wrap in clear cellophane bags, and tie with black-and-orange ribbon for a festive Halloween gift.
Here are a few fun ways to use your White Chocolate Halloween Bark:
- Cupcake toppers: Break into small pieces and place on frosted cupcakes
- Gift bags for kids: Add a few bark shards to Halloween goodie bags
- Party table centerpiece: Stack on a tiered tray with other themed treats
- Trick-or-treat swaps: Perfect for classroom parties or small gatherings
- Add a twist: Use dark chocolate for a spookier look or swirl with food coloring for a marbled effect
If you have guests with dietary needs, make a second batch with vegan or gluten-free toppings. Everyone deserves a bite of spooky fun.
Frequently Asked Questions
How to make Halloween chocolate bark?
Halloween chocolate bark is made by melting chocolate, spreading it onto a baking sheet, and decorating it with spooky toppings. For White Chocolate Halloween Bark, use melted white chocolate as the base, then add candy eyes, sprinkles, pretzels, and Halloween-themed candies. Let it chill until firm, then break into shards.
What’s the best way to melt white chocolate bark?
The easiest method is using the microwave. Heat the white chocolate in 20-second intervals, stirring between each one, until it’s smooth. Avoid overheating, as white chocolate burns more easily than dark chocolate.
What’s the difference between white chocolate and white bark?
White chocolate contains cocoa butter and often tastes creamier and richer. White bark, sometimes called almond bark, usually uses vegetable fats and is better for coating or melting quickly. For the best flavor, White Chocolate Halloween Bark works best with real white chocolate.
How to make white chocolate candy cane bark?
Candy cane bark follows the same method as Halloween bark. Melt the white chocolate, spread it, then sprinkle crushed candy canes on top. Chill it until set, then break it into peppermint-flavored pieces.
What kind of chocolate is best for bark?
High-quality baking chocolate or couverture chocolate melts best and tastes smoother. For White Chocolate Halloween Bark, choose white chocolate bars instead of chips, which may have stabilizers that resist melting.
How long to melt chocolate for chocolate bark?
It usually takes about 1 to 2 minutes in the microwave using short bursts. Stir often to prevent scorching. White chocolate especially requires gentle heating for the best texture.
Conclusion
Making White Chocolate Halloween Bark is one of the easiest and most satisfying ways to celebrate spooky season. It’s no-bake, quick to assemble, and a total crowd-pleaser for both kids and adults. Whether you’re throwing a party, filling treat bags, or just having fun in the kitchen, this bark brings color and joy to every Halloween celebration.
Use your favorite toppings, switch up the candy, or even create your own flavor twist—it’s completely up to you. One batch, a handful of ingredients, and you’ve got a festive snack that looks like it came from a bakery window.
Give it a try this season, and don’t forget to share your creations in the comments or tag me on your socials. Happy Halloween, and may your chocolate always melt smoothly!